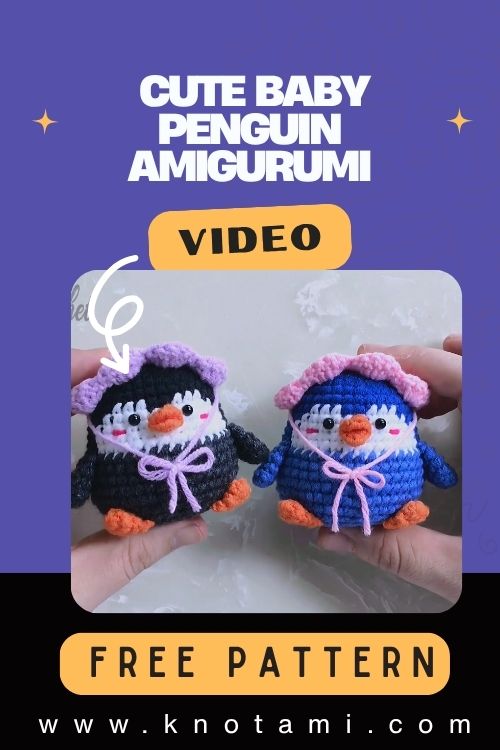
DIY Crochet Cute Baby Penguin Amigurumi Plush Pattern
There’s something deeply magical about the act of crafting especially when it involves turning a simple strand of yarn into a living breathing character full of personality. Crochet offers the perfect blend of coziness, creativity, and craft. The soft click of hooks, the rhythmic grace of every stitch, and the thrill of seeing something take shape these are the quiet joys of making something from your own hands. Every yarn project tells a story, full of care, warmth, and love.
That’s the beauty behind this Crochet Cute Baby Penguin Amigurumi project: a tiny plushie that feels like it waddled right out of a storybook. With its chubby body, sweet round eyes, and a soft pastel tummy patch, this penguin is the definition of adorable. Whether you’re adding it to a nursery shelf, gifting it to a friend, or simply making it to enjoy the process, this amigurumi piece adds instant charm and whimsy.
Even better, this project suits crochet lovers of all levels. If you’re a beginner, you’ll gain confidence through simple shaping and familiar stitches. If you’re more experienced, you’ll enjoy the modular design and the chance to add unique touches. This baby penguin pattern is designed to let your creativity shine whether you stick to the classic gray-and-white scheme or try pastel fantasy colors.
And let’s not forget the craft itself calm hands, focused minds, and the sweet reward of creation. Step by step, this project invites you into a soothing world of looping yarn and building shapes, where each part becomes a small piece of a cuddly whole. So let’s get started… your tiny penguin is waiting to come to life!

Materials & Tools
Here’s everything you need to make your Crochet Cute Baby Penguin Amigurumi Plush:
Yarn:
-
Yarn Type: Soft acrylic or cotton yarn
-
Weight: DK (3) or worsted (4)
-
Suggested Colors:
-
Light gray (main body)
-
White (face & belly)
-
Yellow or orange (beak and feet)
-
Optional pastel color (hat or scarf)
-
Crochet Hook:
-
Size: 3.0 mm or 3.5 mm hook
-
Use 3.0 mm for a tighter finish and no visible stuffing
-
Accessories:
-
Safety eyes: 6mm or 8mm round eyes
-
Black embroidery thread (mouth and blush details)
-
Polyester fiberfill stuffing
Tools:
-
Scissors
-
Tapestry needle
-
Stitch markers
-
Optional: Keychain ring or small bow
Yarn Tip:
Choose a yarn with good stitch definition. Worsted weight is forgiving if you’re just starting out, while DK weight offers a finer, neater finish.
Step-by-Step Crochet Instructions
Let’s go through each part of the little penguin, step by step!
1. Making the Head
Start with a magic ring and work in continuous spirals.
-
Round 1: 6 single crochets (sc) in magic ring
-
Round 2: Increase in each stitch (12)
-
Round 3: (Sc 1, inc) around (18)
-
Round 4: (Sc 2, inc) around (24)
-
Round 5: (Sc 3, inc) around (30)
-
Rounds 6-10: Sc around (30)
-
Round 11: (Sc 3, dec) around (24)
-
Round 12: (Sc 2, dec) around (18)
Insert safety eyes between rounds 6 and 7 with 8 stitches between them. Add light pink or blush near the eyes with embroidery thread.
Tip: Use an invisible decrease (front loop only) for a smoother shape.
2. Forming the Upper Body
Stuff the head lightly before continuing.
-
Round 13: (Sc 1, dec) around (12)
-
Round 14: Sc around (12)
-
Round 15: (Sc 1, inc) around (18)
-
Rounds 16-20: Sc around (18)
3. Creating the Belly Patch
Using white yarn:
-
Ch 6, turn
-
Row 1: Sc in each stitch (5), ch 1, turn
-
Rows 2-4: Repeat row 1
-
Fasten off, leaving a long tail for sewing.
Sew the patch on the front of the body, just below the face.
4. Crocheting the Wings (Make 2)
With main yarn color:
-
Round 1: 6 sc in magic ring
-
Round 2: (Sc 1, inc) around (9)
-
Rounds 3-5: Sc around (9)
Fold flat and sew closed. Attach to the sides of the body below the head.
5. Making the Beak & Feet
Beak:
-
Ch 3, sc in next 2, sl st to finish. Sew below eyes.
Feet (make 2):
-
Ch 4, turn
-
Row 1: Sc in next 3
-
Row 2: Ch 1, sc in next 3
-
Fold and stitch to base.
6. Assembly & Finishing
Now comes the fun part bringing your plushie to life!
-
Sew head and body smoothly using whip stitch.
-
Attach wings, beak, belly patch, and feet.
-
Embroider little eyebrows or blush if desired.
-
Stuff firmly but evenly.
Stuffing Tip:
Start with light amounts and build up. Overstuffing can warp the shape; under-stuffing leaves floppy areas.
7. Final Touches & Accessories
Add a tiny scarf, winter hat, or backpack for themed versions. Try a small pom-pom hat for festive vibes!
Customization Ideas
Let your imagination run free with these creative twists:
-
Color Variations:
Soft pastels, bold contrasting shades, or winter colors like icy blue. -
Themed Penguins:
Christmas Penguin (red hat), Birthday Penguin (party hat), Summer Penguin (tiny sunglasses). -
Texture Play:
Use velvet yarn for a plush, luxurious finish! -
Props:
Mini fish, snowball, heart, or present.
Advanced Tips & Troubleshooting
Improve your amigurumi game with these expert tips:
-
Invisible Decrease: Front loop only for seamless shaping.
-
Consistent Tension: Keep your tension relaxed but firm.
-
Round Tracking: Use stitch markers to count rounds correctly.
-
Shape Checks: Pause every few rounds to inspect asymmetry.
-
Stuffing Balance: Use small clumps for even filling.
-
Joining Parts: Pin in place before stitching.
-
Weaving Tails: Hide ends deep inside body.
-
Pattern Abbreviations: Know your sc from your hdc and inc!
Care Instructions
Keep your baby penguin amigurumi plush cuddly and bright!
-
Hand wash gently in cold water.
-
Use mild detergent.
-
Lay flat to air dry.
-
Keep away from strong sunlight to avoid fading.
-
Store in an airtight bag when gifting or storing long-term.
Display & Gift Ideas
-
Nursery Shelf Decor: So sweet in a baby room!
-
Desk Buddy: Makes workdays cuter and cozier.
-
Holiday Ornament: Hang it on your Christmas tree.
-
Birthday Surprise: Slip it into a gift box.
-
Stocking Stuffer: Perfect handmade treat.
Benefits of Crocheting Your Baby Penguin Plush
Crafting this plush is more than a project…
-
Mindful Joy: Repetitive motions calm the mind.
-
Meaningful Gifting: Handmade always brings smiles.
-
Eco-Friendly: Use scrap yarn or recycled stuffing.
-
Stress Relief: Focused crafting soothes mental chatter.
-
Creative Satisfaction: Seeing your penguin come alive is magic!
Photography & Social Media Tips
Ready to show the world your crochet cutie?
-
Shoot photos in natural daylight.
-
Use soft or snowy background textures.
-
Add props like mini fish, yarn balls, or frosty scenes.
-
Zoom in to showcase stitch texture and facial details.
Project Summary Table
| Category | Details |
|---|---|
| Skill Level | Easy – Intermediate |
| Estimated Time | 6–8 hours |
| Finished Size | 8–10 inches (approx.) |
| Estimated Cost | $10–15 |
Conclusion
Bringing this Crochet Cute Baby Penguin Amigurumi to life is more than just a craft it’s a heartwarming journey into mindful making and creative expression. Each stitch tells a story, each detail adds charm, and when it’s finally done, your little penguin becomes more than yarn it becomes a memory, a hug, a smile.
So grab your hook, pour a warm drink, and start stitching. Before long, this little penguin will be waddling right into your heart.