DIY Crochet Cute Gengar Pokemon Amigurumi Pattern
There’s something magical about taking a simple string of yarn and transforming it into a delightful, three-dimensional creation. Crochet is much more than a hobby it’s an act of love, joy, and creativity stitched together one loop at a time. Whether you’re new to the craft or have been crocheting for years, there’s nothing quite like the satisfaction of bringing something soft and handmade into the world with your own two hands. The process is calming, rhythmic, and invites us to slow down, enjoy the moment, and experience the art of making.
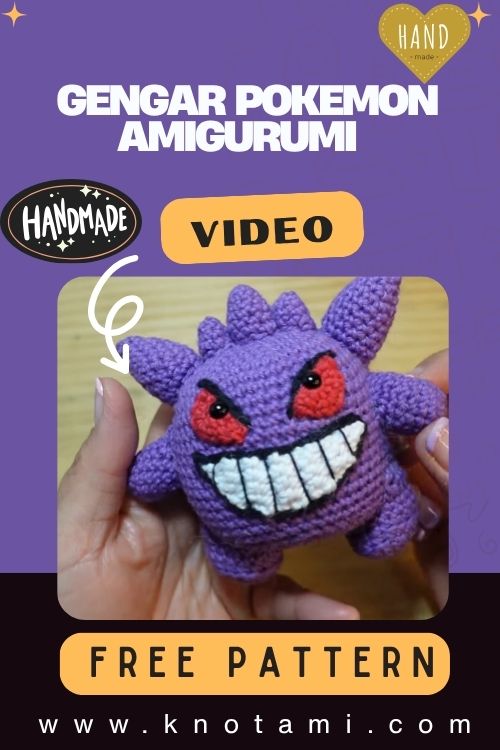
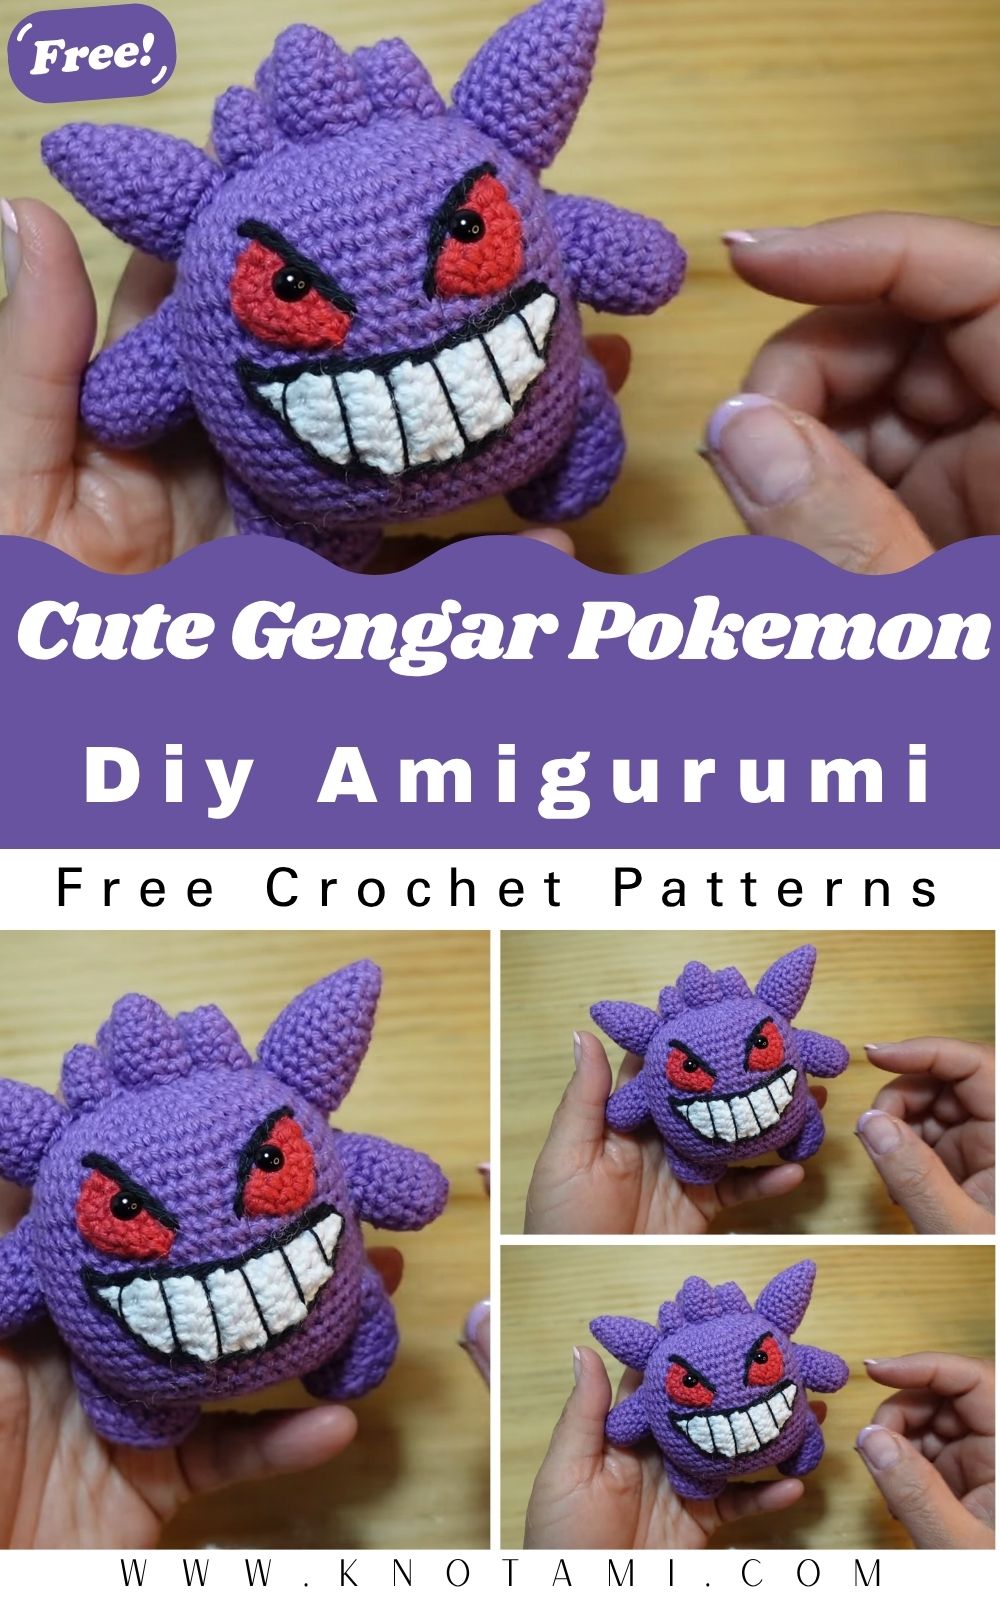
In this tutorial, we’re diving into a fun and fandom-inspired project: the Crochet Cute Gengar Pokémon Amigurumi Pattern. Gengar, the iconic Ghost-type Pokémon with its mischievous smile and spiky silhouette, is a perfect subject for an amigurumi project. Its bold purple color, expressive eyes, and playful demeanor make it instantly recognizable whether you’re a long-time Pokémon fan or just discovering the charm of amigurumi plush toys.
What makes this crochet pattern especially awesome is how adaptable it is for different skill levels. Whether you’re a seasoned crochet artist looking for a satisfying new challenge or a beginner searching for a fun project to level up your skills, this tutorial offers clear steps and creative freedom. You can play with colors, add your own details, and make a Gengar that reflects your personal style or gift it to a fellow Pokémon fan.
Crocheting is like meditation once you get into the flow, your hands move effortlessly, and your mind finds peace. That’s why projects like this one are more than crafts; they’re emotional journeys. This mini Gengar plush is not just a cute keepsake it’s a reminder of the joy and warmth that handmade items can bring. Whether you’re crafting it as a thoughtful gift or adding it to your own cozy collection, this crochet Gengar is guaranteed to spark smiles and admiration.
Materials & Tools
Before we jump into the stitches and rows, let’s prepare our materials. Having everything laid out will make the process smooth, stress-free, and enjoyable.
Yarn:
-
Main color: Purple (Worsted weight or DK, depending on desired size)
-
Accent color: Black or dark gray (for mouth, shadows, etc.)
-
White and red yarn: For eyes and facial details (optional if you’re not using felt)
Crochet Hook:
-
3.0 mm or 3.5 mm for tighter stitches (ideal for amigurumi, prevents stuffing from showing)
Other Essentials:
-
Stuffing (polyfill)
-
Safety eyes (10–12 mm) or embroidered eyes
-
Tapestry needle (for sewing parts and weaving ends)
-
Scissors
-
Stitch markers (helpful for keeping track of rounds)
-
Felt (optional) in white and red for the iconic Gengar face
Choosing the Right Yarn:
For best results, pick a smooth, worsted-weight acrylic yarn. It’s durable, easy to work with, and holds shape nicely. For a fluffy or velvety Gengar, go for plush yarn, but remember it may require a larger hook size and extra stuffing.
4. Step-by-Step Crochet Instructions
Let’s begin building our mischievous ghost buddy! This tutorial is structured in a clear sequence, so you can follow along easily whether you’re working from a written pattern, video reference, or both.
4.1 Creating the Head
The head is a crucial part of Gengar roundish with pointy spikes!
-
Start with a magic ring (MR).
-
Round 1: 6 single crochets (sc) into MR.
-
Round 2: Increase in each stitch (12 sc).
-
Round 3: 1 sc, inc repeat around (18 sc).
-
Continue increasing until you have a smooth sphere shape (around 36–42 sts depending on your yarn and size).
-
Once shaping is done and before closing, attach safety eyes between rounds 8–9 or as desired.
-
Stuff firmly, maintaining a round shape.
Tip: To avoid flat shapes, stuff gradually and consistently. Avoid overpacking just enough to give structure without stretching stitches.
4.2 Forming the Body
Gengar has a simple yet chubby body shape.
-
Work directly from the head or sew on later (dep. on pattern style).
-
Start decreasing after a few rounds to taper the neck.
-
Work evenly for 5-6 rounds to shape the torso.
-
Slight increases for a plump belly may be needed.
-
Stuff as you go, keeping a firm shape.
4.3 Legs and Arms
Gengar has tiny arms and chunky little legs or feet.
-
Arms: Small tubes (6 sc around, worked for 6–7 rounds)
-
Legs/Feet: Slightly bigger tubes. Flatten slightly before sewing to create base support.
Pro Tip: Position the legs evenly and fill them tightly so Gengar stands freely.
4.4 Spikes and Ears
-
Create 4–6 small triangular spikes for the head.
-
Create 2 longer ears/spikes for the top sides.
-
Sew firmly and symmetrically around the head for that classic silhouette.
4.5 Assembly & Final Touches
-
Sew the arms near the upper sides of the body.
-
Position legs under the belly.
-
Add facial expression using felt or embroidered yarn:
-
Oval red eyes with white accents
-
Broad mouth with pointed teeth (embroidered or felt)
-
Finishing Touch: Block the shape softly if needed to flatten any uneven stitches.
5. Customization Ideas
Let your imagination run wild! Gengar doesn’t have to be just purple.
-
Rainbow Gengar: Use multicolor yarn for a psychedelic twist.
-
Winter Gengar: Add a crochet scarf or snow hat.
-
Glow-in-the-Dark Yarn: Use special yarn for an extra spooky glow.
-
Pastel Gengar: Soft, baby blue or lavender
-
Halloween Theme: Give Gengar a tiny pumpkin or witch hat accessories.
Accessories can be sewn on or left removable for fun dress-up play.
6. Advanced Tips & Troubleshooting
Even skilled crafters run into hiccups here’s how to stay ahead:
-
Invisible Decreases: Insert hook in front loops only to keep work smoother.
-
Even Tension: Hold yarn comfortably; avoid tightening too much.
-
Prevent Round Twists: Use stitch markers at the start of each round.
-
Avoid Overstuffing: Too much stuffing stretches stitches; add just enough for structure.
-
Clean Joins: Use whip stitch for seamless attachment.
-
Avoid Gaps: Use smaller hook if stuffing is visible.
-
Pattern Reading Tip: Don’t skip abbreviations; use a glossary nearby for reference.
7. Care Instructions
Handmade plush toys need TLC:
-
Hand wash in cold or mildly warm water
-
Use gentle soap or baby shampoo
-
Air dry flat on towel
-
Don’t machine dry – may distort shape
-
Avoid strong sunlight (can fade yarn colors)
For gifting, consider wrapping in tissue paper or storing in a breathable cotton bag.
8. Display & Gift Ideas
Whether for personal use or as a present, there are so many fun ideas:
-
Home decor on a shelf or among books
-
Cute accessory for a child’s room
-
Desk buddy at work or study space
-
Add a tiny loop for a holiday ornament
-
Personalized handmade gift for Pokémon fans, friends, or kids
9. Benefits of Making This Crochet Cute Gengar Pokémon
Crafting is about more than just the end product:
-
Promotes mindfulness and relaxation
-
Reduces stress and anxiety
-
Offers a sense of accomplishment
-
Creates eco-friendly handmade gifts
-
Build emotional connection through handmade items
Crocheting small, manageable projects like this can be deeply fulfilling especially when shared with others.
10. Photography & Social Media Tips
Want to show off your Gengar on Instagram, Pinterest, or your blog? Follow these tips:
-
Use natural lighting by a window
-
Add yarn skeins, hooks, or flowers as props
-
Take close-ups to highlight texture and facial expressions
-
Use soft, neutral backdrops like wood or pastel fabric
-
Try in-action shots with hands or kids hugging the plush
11. Conclusion
Crafting your own Crochet Cute Gengar Pokémon Amigurumi is more than a project it’s an experience full of creativity, calm, and joy. Every stitch brings you closer to holding something truly unique in your hands, something infused with time, attention, and warmth. Whether you’re a Pokémon fan, a crochet enthusiast, or someone who loves thoughtful handmade gifts, this little Gengar is sure to bring smiles and nostalgia.
So grab your hook, some purple yarn, and let’s make magic together one stitch at a time.