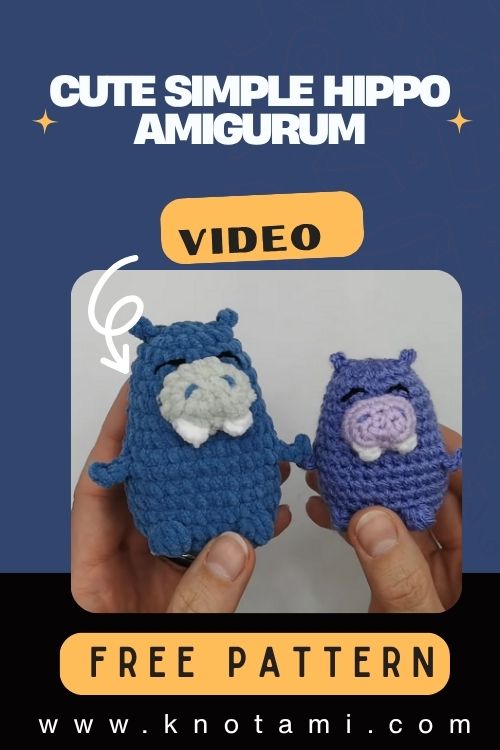
Crochet Cute Simple Hippo Amigurumi Project Toy
There’s an undeniable joy in creating something with your own two hands. Transforming yarn into a soft, cuddly character feels almost magical a mix of creativity patience, and heartwarming accomplishment. Crochet, especially amigurumi, gives you the power to shape thread into life, wrapping love, art, and texture into something that sparks joy every time you look at it. Whether you’re making a toy for a child or a keepsake for your own shelf, every stitch is infused with personality and pleasure.
Enter the charming [Crochet Cute Simple Hippo Amigurumi], a delightful project that’s as adorable as it is beginner-friendly. This plush hippo boasts round cheeks, tiny ears, and a lovable expression that makes it the perfect addition to any handmade collection. Its simple structure, easy-to-master steps, and customizable features make it eye-catching whether you want a realistic hippo or a kawaii-style version.
One of the best parts about this project is its accessibility. Whether you’re just learning to crochet or you’ve already made a dozen plushies, this pattern offers a fun and rewarding experience. It uses basic stitches, simple increases and decreases, and straightforward assembly techniques, all while giving advanced crafters room to play with creative details.
Let the soothing rhythm of crocheting take over as you build this adorable hippo, stitch by stitch. It’s not just about making something cute it’s also about embracing the slow craft movement, celebrating handmade art, and gifting a touch of warmth in a world that needs it. This project is ideal for cozy weekends, thoughtful gifting, or even as a relaxing daily crochet practice.

Materials & Tools
Before you begin, gather the following supplies for your Crochet Cute Simple Hippo Amigurumi.
Materials Needed
-
Yarn: Medium weight (4-ply or worsted) acrylic or cotton yarn
-
Main Color: Light gray or lilac (for the hippo body)
-
Contrast Color: White or pink (muzzle, accessories, etc.)
-
-
Hook Size: 3.0–4.0 mm (depending on your yarn choice)
-
Stuffing: Polyester fiberfill
-
Safety Eyes: 8mm or 10mm size (or felt/embroidery alternative)
-
Scissors
-
Tapestry Needle (for sewing pieces together)
-
Stitch Markers (to mark rounds)
Yarn Selection Tip
Choose a soft, sturdy yarn that holds shape well typically acrylic or cotton. For a plush, huggable hippo, use pastel or natural shades, and consider mixing textures (like velvet yarn) for an extra cozy touch. You can also use multi-colored yarn for a unique, whimsical effect.
4. Step-by-Step Crochet Instructions
Let’s walk through how to crochet a simple yet adorable hippo plush, using basic amigurumi methods. Crochet in continuous rounds unless otherwise stated.
1. Making the Head
-
Begin with a magic ring using the main color yarn.
-
Round 1: 6 sc into ring.
-
Round 2: Inc in each stitch (12).
-
Round 3: (Sc 1, inc) x 6 (18).
-
Round 4: (Sc 2, inc) x 6 (24).
-
Round 5–8: Sc in each stitch around.
-
Round 9: (Sc 3, inc) x 6 (30).
-
Insert safety eyes between Rounds 6 and 7, roughly 6 stitches apart.
-
Start stuffing firmly.
-
Round 10: (Sc 3, dec) x 6 (24).
-
Round 11: (Sc 2, dec) x 6 (18).
-
Round 12: (Sc 1, dec) x 6 (12).
-
Finish stuffing and fasten off, closing the opening tightly.
2. Crochet the Muzzle
-
Magic ring, 6 sc.
-
Round 2: Inc in each stitch (12).
-
Round 3: Sc around.
-
Optional: Add small dimples or embroidered nostrils.
-
Stuff lightly and sew to lower part of the face, centered between the eyes.
3. Forming the Body
-
Magic ring, 6 sc.
-
Round 2: Inc in each stitch (12).
-
Round 3: (Sc 1, inc) (18).
-
Round 4: (Sc 2, inc) (24).
-
Round 5–12: Sc around.
-
Start stuffing as you go.
-
Round 13: (Sc 2, dec) (18).
-
Round 14: (Sc 1, dec) (12).
-
Close off, ensuring the body is firmly stuffed.
4. Limbs (Make 4 for Legs & Arms)
-
Magic ring, 6 sc.
-
Rounds 2–4: Sc around.
-
Lightly stuff and fasten off.
-
Sew evenly around the base of the body as arms and legs.
5. Ears (Make 2)
-
Magic ring, 4 sc.
-
Round 2: (Sc 1, inc) around (6).
-
Fasten off and sew to top of head, slightly angled.
6. Tail
-
Chain 4, sl st into first chain.
-
Attach to the back of the body for a curved, stubby tail.
7. Assembly & Final Touches
-
Attach the head to the body securely, using whip stitch.
-
Sew ears, limbs, and tail in position.
-
Embroider eyebrows, blush spots, or a tiny bow for extra cuteness.
-
Add accessories like a scarf or flower for personality.
Expert Tips
-
Stuff firmly for structure but don’t overpack stuffing shouldn’t show through stitches.
-
Use pins to position limbs before sewing to ensure symmetry.
-
Switch to a smaller hook if your stitches are loose or uneven.
5. Customization Ideas
Make your hippo even more special with personalized touches:
-
Color Variations: Try pastels for kawaii style or dark grays for a realistic look.
-
Themed Versions: Turn your hippo into a holiday character with a Santa hat or bunny ears.
-
Accessories: Add a crocheted scarf, bow tie, or flower crown.
-
Different Textures: Use velvet or chenille yarn for a plush, fluffy hippo.
6. Advanced Tips & Troubleshooting
-
Invisible Decreases: Use front loop only technique for smooth shaping.
-
Even Tension: Adjust your hand grip or hook size if stitches vary in size.
-
Round Alignment: Use stitch markers at the start of each round to avoid skewed shapes.
-
Flat Circles: Increase correctly to keep rounds flat while shaping the head and body.
-
Stuffing Balance: Insert stuffing in small amounts to avoid lumps.
-
Loose Stitches: Tighten or redo if stuffing peeks through.
-
Joining Parts: Try a ladder stitch for seamless joins.
-
Pattern Terms: Recognize standard abbreviations (sc, inc, dec) to follow tutorials confidently.
-
Color Changes: Use invisible color switch to avoid harsh lines.
-
Reinforce Eyes: Secure safety eyes with felt backing if toy will be for small children.
7. Care Instructions
Keep your amigurumi hippo looking new and huggable:
-
Hand Wash Only with a mild detergent.
-
Soak gently; avoid scrubbing to prevent fuzzing.
-
Air Dry Flat never use a dryer.
-
Store away from direct sunlight to prevent fading.
-
Display in a safe, dust-free space.
8. Display & Gift Ideas
-
Nursery Decor: Perfect for baby showers or kids’ rooms.
-
Shelf Buddy: Adds charm to a bookshelf or work desk.
-
Holiday Ornament: Add a loop to hang it on a Christmas tree.
-
Bag Charm: Turn into a keychain for playful style.
-
Gifting: Handmade toys make heartfelt birthday or baby gifts.
9. Benefits of Making a Hippo Amigurumi
-
Promotes calm and focus through repetitive motion.
-
Sparks joy every time you finish a project.
-
Encourages sustainable crafting with reusable materials.
-
Creates emotional connections through handmade gifts.
-
Boosts creativity and offers a sense of achievement.
10. Photography & Social Media Tips
Want to show off your work? Here’s how to capture it beautifully:
-
Use soft daylight for true colors.
-
Add cute props like yarn, books, or tiny plants.
-
Choose neutral backdrops for focus on the plush.
-
Take close-ups to highlight texture and stitch detail.
11. Project Summary Table
| Category | Details |
|---|---|
| Skill Level | Easy–Intermediate |
| Estimated Time | 6–8 hours |
| Finished Size | 10–14 inches (varies by yarn) |
| Estimated Cost | $10–15 |
12. Conclusion
There’s a quiet joy in turning a ball of yarn into a lovable little hippo full of personality, softness, and handmade charm. Whether you’re crocheting for fun, stress relief, or to make a thoughtful gift, this [Crochet Cute Simple Hippo Amigurumi] project is bound to bring warmth and happiness. Each stitch is a step toward something meaningful, adorable, and entirely unique. So pick up your hook, choose your favorite yarn, and start crafting your cute hippo friend is waiting to come to life!