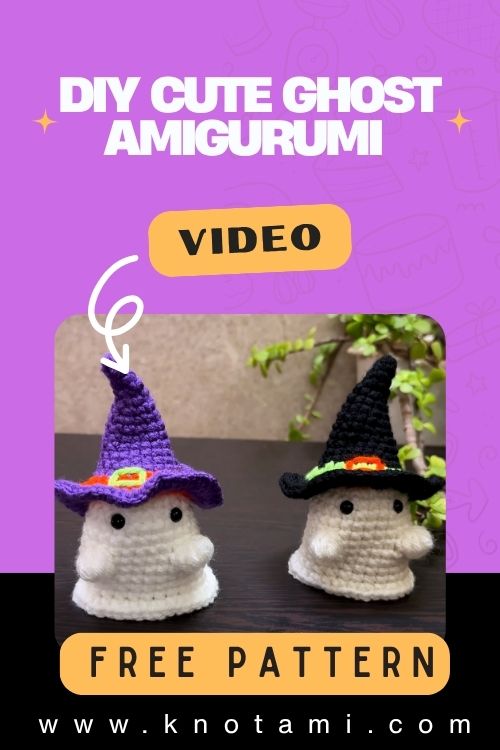
Crochet Mini Ghost Keychain Halloween Amigurumi Project
There’s something magical about sitting down with a soft skein of yarn and transforming it into something cute, meaningful, and full of personality. Whether it’s the soothing rhythm of stitches or the joy of holding a creation that once existed only in your imagination, crocheting is a special kind of handmade magic. When you start with a scrap of yarn and end with a finished plush toy or charm, the sense of satisfaction is priceless.
Enter today’s project: the Crochet Mini Ghost Keychain an irresistibly charming amigurumi that combines the adorable world of kawaii-style characters with a touch of Halloween spirit. Small enough to attach to a backpack, purse, or keys, yet detailed enough to make a spooky-cute statement, this little ghost will steal your heart (and maybe a few screams the cute kind!).
Whether you’re just dipping your hook into the world of amigurumi or you’re a seasoned crocheter looking for a quick, satisfying make, this pattern has something for everyone. Designed to be worked in the round with simple stitches, it’s a great way to practice shaping, seamless stitching, and working with small forms. You’ll walk away not only with a completed ghost but with new confidence in your crochet skills.
Crochet is often seen as a slow craft and that’s part of the charm. As your hook moves and the rows form, the process becomes meditative. With this project, not only do you get the Zen of crafting but also the pure joy of watching your cute little ghost come alive with safety eyes and a sweet smile. Whether you’re gifting it or keeping it, this tiny ghost is sure to bring a handmade touch of Halloween spirit wherever it goes.

Materials & Tools
To crochet your own Mini Ghost Keychain gather the following:
Yarn
-
Type: Medium-weight (category #4) acrylic or cotton yarn.
-
Color: White for the ghost body (you can use black, pink, or colored yarn for accessories).
-
Tip: Cotton gives a cleaner stitch look, while acrylic is softer and more flexible.
Crochet Hook
-
Size: 2.5mm–3.5mm hook (depending on your yarn thickness and desired tightness). Use a smaller hook for tighter stitches to keep stuffing from peeking through.
Safety Eyes
-
6mm or 8mm black safety eyes (or you can embroider eyes with black thread for babies or pets).
Stuffing
-
Polyester fiberfill for shaping the plush.
Other Tools
-
Tapestry needle for sewing and weaving ends.
-
Scissors for trimming yarn.
-
Stitch marker to track your rounds.
-
Keychain ring or clasp (optional but recommended).
-
Hot glue or small black bead for the mouth (optional, but can be embroidered).
Yarn Tips:
-
Try using velvet or fluffy yarn for a ghost with soft, plush texture.
-
Want a glow-in-the-dark ghost? Use glow yarn or add a neon yarn stripe!
-
For a ghost with drapey texture, use a brushed alpaca or mohair blend.
4. Step-by-Step Crochet Instructions
Before we begin: this tutorial is worked in continuous rounds using the amigurumi method. Use a stitch marker to keep track of your beginning stitch in each row.
Abbreviations:
-
MR = Magic Ring
-
sc = single crochet
-
inc = increase (2 sc in same stitch)
-
dec = decrease (sc2tog)
-
sl st = slip stitch
-
st(s) = stitch(es)
Step 1: Crochet the Ghost Head
-
Round 1: Make an MR, work 6 sc into the ring. (6)
-
Round 2: Inc in each st around. (12)
-
Round 3: (1 sc, inc) repeat around. (18)
-
Round 4–6: Sc in each st around. (18)
🪄 Tip: This is a great time to install the safety eyes typically between Rounds 4 and 5, spacing them about 4–5 stitches apart. Add mouth with embroidery thread or safety bead later.
Step 2: Form the Neck and Upper Body
-
Round 7: (2 sc, dec) repeat around. (14)
-
Round 8: Sc in each st around. (14)
Start stuffing lightly but firmly. Use your fingers or a small tool to gently press stuffing into the top.
Step 3: Build the Body
-
Round 9: (1 sc, inc) repeat around. (21)
-
Round 10–12: Sc in each st around. (21)
-
Round 13: (5 sc, inc) repeat around. (24)
-
Round 14: Sc in each st around. (24)
🪄 Tip: Check shaping as you go the ghost should look like a teardrop or bell shape with a rounded head and gently widening body.
Step 4: Shape the Base
-
Round 15: (2 sc, dec) repeat around. (18)
-
Round 16: (1 sc, dec) repeat around. (12)
-
Round 17: Dec around. (6)
Finish stuffing before completely closing. Fasten off with sl st and weave in the end using a tapestry needle.
Step 5: Add the Details
-
Embrace simplicity: add pink blush with colored thread or felt circles.
-
Sew on a small felt heart or bow tie.
-
Optional: Add a tiny chain or keychain clasp to the top of the head using a jump ring.
Step 6: Assembly
-
If you plan to hang this, sew or glue a loop on the top.
-
Use a few firm whip stitches to secure the loop inside the head.
-
Attach accessories like hats or scarves using yarn scraps or felt shapes.
Final Touches
-
Use a black embroidery thread to add a tiny smiling mouth.
-
Add a mini witch hat for a Halloween twist.
-
Use fabric glue for decorative felt accents.
5. Customization Ideas
Make your Crochet Mini Ghost Keychain uniquely yours by exploring fun variations:
-
Colorful Ghosts: Try pastel ghosts for a kawaii vibe, neon yarn for rave-style ghosts, or black yarn for a gothic twist.
-
Holiday Ghosts: Add Santa hats for Christmas, bunny ears for Easter, or tiny pumpkins for fall.
-
Textured Yarn: Use fluffy boucle yarn for a cloud-like ghost.
-
Accessories: Give them mini brooms, lollipops, tiny “boo” signs, or ribbon bows.
6. Advanced Tips & Troubleshooting
Here’s how to make your ghost perfect every time:
-
Invisible Decreases: Use front loop only (FLO) method to avoid bumps.
-
Consistent Tension: Keep hands relaxed too tight means holes, too loose means sag.
-
Avoid Twisting Rounds: Always mark your round start and follow your stitch count.
-
Perfect Stuffing: Add small amounts at a time and shape with fingers from outside.
-
Fix Lopsided Shapes: Use blocking pins and steam lightly (for cotton yarn only).
-
Seamless Joins: Use the “invisible finish” method to close rounds cleanly.
-
Avoid Yarn Splitting: Use hooks with rounded edges for smooth stitching.
-
Reading Patterns: Break down each round and highlight repeats with brackets.
7. Care Instructions
Since your ghost will likely hang out with keys or bags, proper care is essential:
-
Washing: Hand wash gently in cool water with mild soap.
-
Drying: Press lightly with towel and lay flat to dry never wring.
-
Avoid Direct Sunlight: Prevents yellowing of white yarn.
-
Storage: Keep in a sealed box if storing long-term to avoid dust.
8. Display & Gift Ideas
Whether you’re keeping or gifting your Mini Ghost, here are some fun uses:
-
Halloween Décor: Hang on a tree, wreath, or as spooky bunting.
-
Kids’ Room Charm: Adds a cute, friendly touch to a child’s bedpost or backpack.
-
Desk Buddy: Brighten up your office space with a ghostly companion.
-
Keychain Accessory: Attach to your keys and carry spooky smiles everywhere.
-
Handmade Gift: Make multiple and gift them inside treat bags or boxes.
9. Benefits Section
Crocheting this Mini Ghost Keychain is more than a craft it’s therapy with a hook:
-
Relaxation: Find peace through repetitive stitching.
-
Eco-Friendly: Use scraps or recycled yarn to create thoughtful, low-waste art.
-
Emotional Value: Handmade gifts are priceless treasures.
-
Skill Improvement: Builds your confidence and crochet technique.
-
Joyful Giving: Share love through handmade creations people can carry everywhere.
10. Photography & Social Media Tips
Show off your creation like a crochet pro:
-
Use natural daylight near a window for soft, even lighting.
-
Add props like mini pumpkins, leaves, or yarn for seasonal flair.
-
Use neutral backgrounds (white, wood, linen) so your ghost stands out.
-
Take close-ups to show stitch texture, eye placement, and cute details.
11. Conclusion
There’s something incredibly fulfilling about turning a simple string of yarn into a tiny creature full of charm and personality. From the first stitch to the final detail, this Crochet Mini Ghost Keychain project offers both calm and joy whether you’re crafting alone on a cozy evening or sharing the magic with friends. So pick up your hook, grab some yarn, and bring this cute little ghost to life. You’ll soon feel the same sense of happiness that thousands of crocheters experience each time they turn creativity into something touchable, shareable, and absolutely unforgettable.