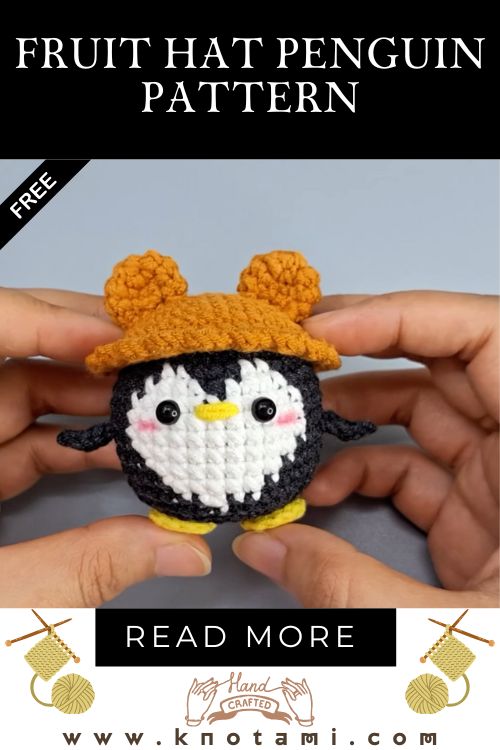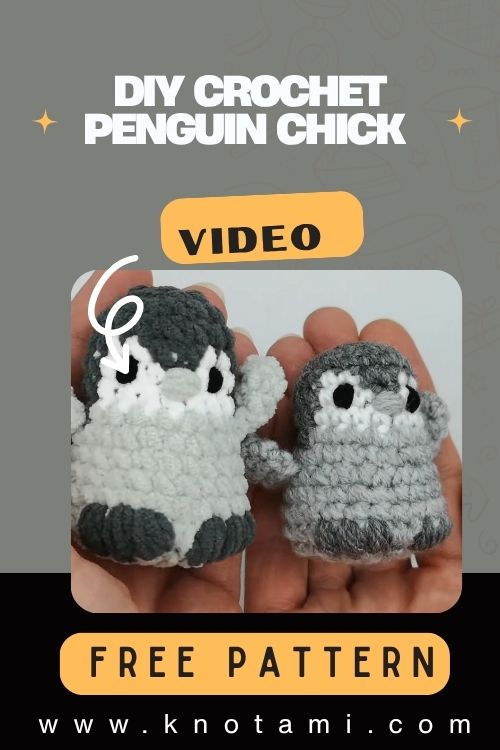
DIY Crochet Penguin Chick Amigurumi Pattern for Beginners
There’s something absolutely magical about the art of crochet that comforting rhythm of yarn sliding through your fingers loop after loop forming into something cute, soft, and personal. The joy of crafting is not just in creating something with your hands, but in watching imagination come to life, one stitch at a time. There’s a special kind of satisfaction in transforming a simple ball of yarn into a character full of charm, warmth, and personality.
Today’s featured project is no different! Meet the Crochet Penguin Chick Amigurumi, a delightfully adorable plush that captures hearts with its fluffy baby feathers and classic penguin features. Whether you’re a crochet newbie or an experienced crafter, this project offers just the right blend of simplicity and creativity. Plus, who can resist a tiny baby penguin with big round eyes and cuddly appeal?
What makes this pattern even better is its versatility. Beginners will love the step-by-step approach that keeps things simple and repetitive. Meanwhile, more advanced crocheters can get creative with colors, textures, and embellishments to make this little penguin truly unique. It’s a perfect introduction to amigurumi, especially if you’re looking to expand your plush-making skills while crafting something absolutely adorable.
Beyond the stitches and structure, crocheting this penguin chick is an experience in mindfulness. Each stitch becomes a small moment of focus, every round a celebration of progress. Whether you’re making this as a gift, a toy, or just for fun, this project embraces the slow, soothing power of handmade craft turning yarn into joy, one row at a time.

Materials & Tools Needed
To get started on your Crochet Penguin Chick Amigurumi, gather the following supplies:
Yarn
-
Main Color: Light gray or soft fluffy yarn for the body
-
Secondary Color: White for the face and belly
-
Accent Color: Yellow or pale orange for the beak and feet
-
Optional: Black (or darker gray) for shading or embroidery details
Tip: For the best result, choose a medium-weight yarn in acrylic or cotton. Fluffier yarn (like chenille or velvet) can add a cozy feel just ensure your hook size matches to avoid large gaps between stitches.
Crochet Hook
-
Recommended Size: 3.0 mm–4.0 mm hook (depending on yarn thickness)
Other Essentials
-
Safety eyes (6 mm–8 mm recommended)
-
Polyester fiberfill stuffing
-
Tapestry needle (for sewing parts)
-
Scissors
-
Stitch markers (to track rounds easily)
Note: If making this for a small child, consider embroidering the eyes instead of using plastic safety eyes for added safety.
4. Step-by-Step Crochet Instructions
Below is a full beginner-friendly guide to crocheting your very own Penguin Chick Amigurumi, inspired by the adorable design in the video tutorial shared.
1. Crochet the Head
-
Begin with a magic ring, and work single crochet (sc) increases in rounds to shape the spherical head.
-
Insert safety eyes between rounds 6–7.
-
Lightly stuff as you go to help maintain shape.
Tip: Place eyes slightly farther apart to give your chick a baby look closer eyes tend to look more mature.
2.Shape the Neck & Upper Body
-
Without fastening off the head, continue working your rounds downward.
-
Use decreases to gently taper the neck area.
-
Gradually increase again to form the upper belly and body base.
3.Form the Main Body
-
Switch to white yarn to create the tummy panel.
-
Alternate between increases, straights, and decreases to shape the round body.
-
Keep checking symmetry this avoids lopsidedness and maintains a cute silhouette.
4. Create Base / Feet
-
For the base, you can create flat ovals in yellow or orange.
-
Or connect crocheted feet directly to the main body.
-
Stuff firmly and close the bottom with invisible decreases or slip stitches.
5. Add Flappy Wings
-
Use the body color to make small, teardrop-shaped flippers.
-
Use whip stitch or mattress stitch to attach them symmetrically on the sides.
6. Sew & Assemble
-
Attach the beak using yellow yarn.
-
Make sure all parts are evenly spaced and secure.
-
If using fluffy yarn, do final shaping with fingers rather than pulling cotton stuffing tightly.
7. Add Final Touches
-
Embroider cute blush cheeks.
-
Add a scarf, bow tie, or tiny hat if you’d like to personalize!
-
Groom fluff gently with a soft brush for added softness.
Pro Tip: Take time with your finishing. The assembly and tiny details are what turn a crocheted object into a cute character with personality.
5. Creative Customization Ideas
One of the best parts about amigurumi is how personal you can make it. Here are some unique variations to try:
| Theme | Idea |
|---|---|
| Winter Penguin | Add a crocheted muffler or tiny earmuffs |
| Holiday Penguin | Red + white scarf, holding a little wrapped gift |
| Fantasy Penguin | Use pastel yarns, add sparkly felt wings |
| Rainbow Penguin | Change colors for each part (belly, wings, feet) |
| Baby Shower Gift | Add embroidered initials or a pacifier prop |
You can also use velvet yarn for extra cuddliness or tweak the body shape for a chubbier penguin chick!
6. Advanced Tips & Troubleshooting
Even the simplest patterns can bring challenges. Here are some pro tips:
-
Use a stitch marker to track the first stitch in rounds.
-
Practice invisible decreases to keep your penguin smooth and neat.
-
Don’t overstuff it stretches your stitching and makes gaps.
-
Use the yarn under method for tighter stitches in amigurumi.
-
Work in continuous rounds (spiral) unless specified otherwise.
-
If your head looks lopsided, adjust stuffing and sew slowly.
-
Keep your tension even for uniform shape.
-
Weave in ends securely especially behind facial features.
-
If the wings stick out too much, move them lower down the body.
-
Always check proportions before stitching parts permanently.
7. Care Instructions
Handmade amigurumi requires gentle care:
-
Hand wash only using mild soap
-
Squeeze gently do not twist
-
Air dry flat in shade
-
Avoid direct sunlight to prevent color fading
-
Store in breathable containers or display cabinets
If gifting, include a tiny care tag with washing tips it’s both helpful and thoughtful!
8. Display & Gift Ideas
Your handmade Penguin Chick makes a lovely:
-
Nursery decoration
-
Desk buddy
-
Friendship or birthday gift
-
Holiday tree ornament
-
Soft baby shower decor
-
Cute shelf companion with other plushies
Place it in a gift box surrounded by shredded paper or add a little Made With Love tag to make your gift extra special.
9. Benefits of Making This Crochet Penguin Chick
Crafting amigurumi isn’t just about the final piece — it’s about the experience:
-
Relieves stress and promotes mindfulness
-
Sparks creativity and builds skills
-
Creates unique, eco-conscious decor and gifts
-
Connects you to a vibrant crafting community
-
Delivers joy when shared with friends and family
A simple ball of yarn becomes a token of affection one that lasts.
10. Photography & Social Media Tips
Want to show off your finished crochet penguin?
-
Use natural daylight for true color representation
-
Place it near props (like mini snowflakes or yarn balls)
-
Try a soft background wood, linen, or faux fur works well
-
Capture close-ups to show stitches, textures, and expressions
Posting your work can inspire others and help you keep a record of your amazing progress!
11. Project Summary Table
| Category | Details |
|---|---|
| Skill Level | Beginner / Easy |
| Estimated Time | 4–6 hours (approx.) |
| Finished Size | 4–6 inches (depending on yarn & hook) |
| Estimated Cost | $5–$10 |
| Main Techniques | Magic ring, sc, invisible decrease, assembly |
| Pattern Style | Amigurumi (worked in spiral rounds) |
12. Conclusion
There’s just something truly heartwarming about creating your own crochet Penguin Chick Amigurumi especially knowing that every stitch is made with intention, care, and joy. Whether you’re adding it to your personal collection, gifting it to someone special, or showcasing it in your home, this little plush is more than just yarn it’s a tiny treasure stitched with love.
So grab your hook, pick your favorite yarn, and start this relaxing project today. You’ll soon discover the joy of slow crafting and the pride of creating something cute, meaningful, and utterly lovable.
Happy crocheting, and may your penguin chick bring smiles wherever it waddles