DIY Crochet Polo Shirt Stylish Top Pattern
There’s something magical about transforming a simple skein of yarn into a piece of art that not only brings joy but also carries your personal touch. Whether you’re making cozy scarves, adorable plush toys, or a stylish garment, the rhythm of crocheting invites both creativity and calmness. From the soft fiber slipping through your fingers to the excitement of seeing your project come together stitch by stitch, crochet offers an unmatched sense of fulfillment and wonder.
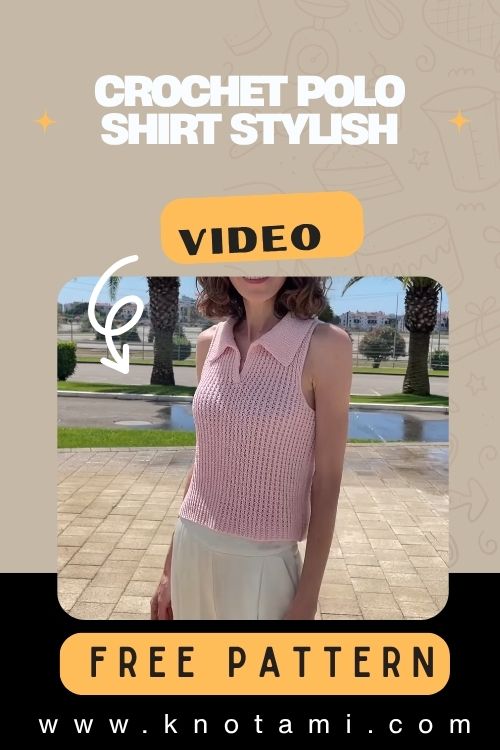
Among the many beloved crochet projects, today’s featured creation stands out for its balance of simplicity and charm: the DIY Crochet Polo Shirt Stylish Top Pattern. Unlike standard crochet garments, this design blends casual elegance with a fun handmade twist. It’s a wearable piece that feels both vintage and modern, perfect for fashion DIY lovers looking to elevate their handmade wardrobe with something truly unique.
This pattern welcomes both beginners looking to learn new techniques and seasoned crocheters in search of a new adventure. The methodical stitches and simple pattern structure give room for skill refinement while leaving plenty of space for creative freedom. Whether you want to go bold with vibrant colors or keep it neutral for everyday wear, this project lets you crochet a stylish polo shirt that expresses your personality.
The beauty of crocheting a garment like this lies not just in the finished piece but in the slow, meditative process. Each stitch is like a breath grounding, relaxing, and rewarding. Whether you create this polo shirt for yourself, a special friend, or as a handmade gift, you’re crafting more than a top you’re weaving memories, self-expression, and love into every loop and stitch.

Materials & Tools
Before starting your DIY Crochet Polo Shirt Stylish Top Pattern, gather the following materials and tools:
Yarn
-
Type: DK weight or sport yarn (100% cotton preferred for breathability)
-
Colors: Main color for the body + contrasting shade for collar and edging (optional)
-
Quantity: Approximately 200–300g depending on size
Crochet Hook
-
Size: 3.5mm or 4.0mm (adjust according to your tension and yarn)
Additional Tools
-
Scissors
-
Tapestry needle (for weaving in ends)
-
Stitch markers (to track increases and rounds)
-
Measuring tape (for checking size)
Yarn Selection Tips
Choose a lightweight cotton or cotton blend yarn to achieve a structured yet breathable finish perfect for a wearable top. Pastels offer a soft, elegant look, while bold colors can make a fashion statement. Make sure your yarn and hook combo gives you even stitches and a comfortable drape.
4. Step-by-Step Crochet Instructions
Here’s a straightforward guide to creating your own stylish crochet polo shirt. This pattern follows a top-down method, meaning you’ll begin at the collar and work your way to the hem.
1. Crochet the Collar
Start by making a foundation chain that matches the neckline circumference. Join with a slip stitch to form a circle. Work single crochets or half-double crochets for 4–6 rows to form a sturdy collar. Add a button slit if desired by working incomplete rounds.
Tip: Use a contrasting color for a classic polo look.
2. Create the Yoke (Shoulder & Upper Chest)
After the collar, begin working in rounds to form the shirt’s yoke using double crochets or half-double crochets. Use stitch markers to mark 4 corners this helps form the sleeve lines. Increase evenly at the corners to expand the piece while keeping the neckline intact.
3. Separate for Sleeves
Once the yoke covers your shoulder width, chain a bridge under each arm and continue crocheting in rounds for the main body. This shape forms naturally into a T-shirt silhouette.
4. Build the Main Body
Continue working in rounds without increases until you reach your desired length. You can add shaping (optional) by doing subtle increases at the sides for a curved waist.
5. Crochet the Sleeves
Return to the underarm stitches and pick up yarn to work each sleeve. Crochet rounds to the desired length short sleeves for a summer style or ¾ length for a cozy finish. Add a clean edge by working a few rows of single crochet.
6. Add Button Placket
Reattach the yarn at the neckline and work a short vertical strip in rows to form the button panel. Use small buttons or crochet your own.
7. Finishing Touches
Weave in all ends with a tapestry needle. Block the garment for evenness if necessary. Attach buttons, and you’re done!
Pro Tip: Lightly steam block your finished piece to enhance stitch definition and shape.
5. Customization Ideas
Make your crochet polo shirt legendary with these fun variations:
-
Color Blocking: Swap colors at the sleeves or lower hem for a retro 90s vibe.
-
Striped Patterns: Add thin or thick stripes for visual interest.
-
Different Yarn Types: Try bamboo yarn for drape, or acrylic for warmth.
-
Holiday Versions: Choose festive red and green for Christmas or pastel shades for spring.
-
Trendy Add-ons: Add crochet appliqués, tiny pockets, or lace edgings.
6. Advanced Tips & Troubleshooting
Here are expert pointers to help you achieve the best result:
-
Invisible Increases: Use front-loop-only increases to avoid gaps.
-
Even Tension: Keep yarn hand placement consistent it reflects in your stitch uniformity.
-
Check Fit Often: Try on the project mid-way to adjust size before continuing.
-
Avoid Twisted Necks: Ensure your collar join is flat a twist will distort the yoke.
-
Fix Uneven Edges: Use blocking or a row of slip stitches to clean up hems.
-
Read Abbreviations: Familiarize yourself with common ones like hdc, dc, sl st.
-
Seamless Sleeve Join: Use the “no-hole” technique by tightening the underarm stitches.
7. Care Instructions
Keep your handmade crochet polo shirt fresh and beautiful with these gentle care instructions:
-
Hand wash in cool water using mild detergent
-
Avoid twisting or wringing
-
Lay flat to air-dry
-
Store away from direct sunlight
-
For long-term storage, fold neatly in a box or drawer
8. Display & Gift Ideas
Your crochet polo shirt isn’t just a functional item it’s wearable art! Here’s how you can use or gift it:
-
Wear it as a boho summer outfit
-
Give it as a handmade birthday gift
-
Style it for a cottagecore photo shoot
-
Use it as a thoughtful Mother’s Day gift
-
Hang it as home décor in a craft room
9. Benefits Section
Creating this Crochet Polo Shirt Stylish Top Pattern brings more joy than just owning a handmade garment:
-
Encourages mindfulness and relaxation
-
Offers a wonderful stress-relieving hobby
-
Builds a sense of achievement and pride
-
Promotes sustainable fashion
-
Deepens emotional connection through DIY gifting
10. Photography & Social Media Tips
Want to showcase your masterpiece like a pro? Try these tips:
-
Shoot in natural daylight
-
Use props like yarn balls or wooden hangers
-
Keep the background simple think linen or neutral wall
-
Capture close-ups of button details and stitches
11. Project Summary Table
| Category | Details |
|---|---|
| Skill Level | Beginner to Intermediate |
| Estimated Time | 6–8 hours |
| Finished Size | Customizable (S–XL) |
| Estimated Cost | $10–15 (depending on yarn choice) |
12. Conclusion
Crocheting your own stylish polo shirt is like weaving a story with your hands one filled with creativity, patience, and love. It’s proof that with just a hook and yarn, you can bring fashion to life. Whether you keep it for yourself or gift it to someone special, this top will be more than just clothing; it will be a reminder of your skill, time, and passion. So go ahead pick up that hook, and stitch your way to something beautiful today.