

Crochet has a special way of turning a quiet moment into something cozy and meaningful. With nothing more than yarn, a hook, and a steady rhythm, simple loops grow into pieces full of charm and personality. I love that gentle glide of the hook and the soft bundle forming in your hands. It slows the day down and ends with a little win you can hold.
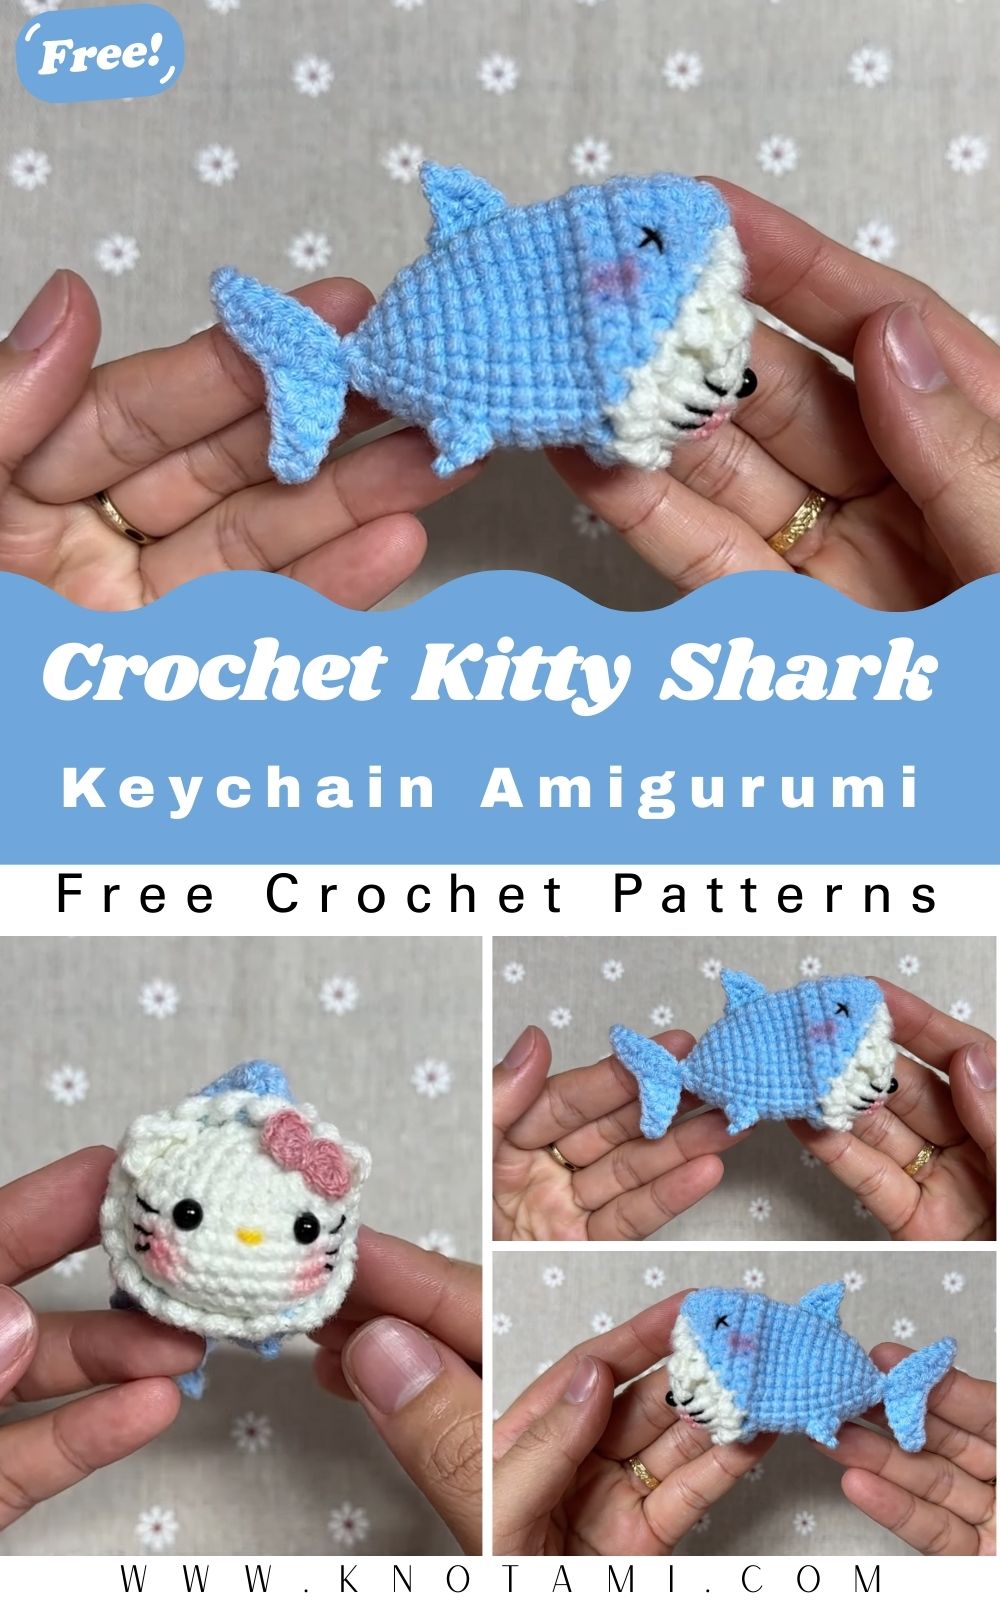
We’re stitching up a playful mashup today: a kitten in a shark suit, small enough to dangle from your keys or tote. The DIY Crochet Kitty Shark Keychain Amigurumi Pattern blends sweet kitty features with a tiny, toothy costume for maximum cuteness. Picture a plump, happy face peeking out from a shark hoodi,e equal parts quirky and adorable.
Whether you’re brand-new to crochet or a seasoned maker, this bite-sized project is relaxing, beginner-friendly, and perfect for gifting. It works up quickly, uses just a bit of yarn, and adds cheerful personality to backpacks, zipper pulls, and keyrings. Ready to make one for yourself and one for a friend? Let’s dive in.
Materials & Tools
Before diving in, let’s gather everything you’ll need to crochet your charming kitty shark keychain.
Materials List
-
Yarn:
-
Main body: Light gray or ocean blue
-
Belly & muzzle: White or cream
-
Ears: Pink or light peach
-
Details (eyes, fins, etc.): Black or darker shade of gray
-
Optional: Red or coral for mouth or blush accents
-
-
Yarn Weight:
-
Use sport weight or DK weight yarn for a mini, keychain-sized result.
-
-
Hook Size:
-
2.5 mm to 3.0 mm crochet hook (depending on your yarn thickness).
-
-
Stuffing:
-
Polyester fiberfill for shaping the body.
-
-
Safety Eyes:
-
6 mm or 8 mm (depending on your desired cuteness level).
-
-
Tapestry Needle:
-
For sewing and weaving in ends.
-
-
Scissors:
-
Sharp tip for precise snipping.
-
-
Stitch Markers:
-
To keep track of rounds, especially if working continuously.
-
-
Keychain Hardware:
-
Small metal chain and clasp to turn your amigurumi into a keychain.
-
Yarn & Color Selection Tips
To achieve a polished and adorable finish:
-
Use cotton yarn for a crisp, well-defined stitch look.
-
Acrylic yarn gives a softer, fluffier result, great for plush-style keychains.
-
Combine contrast colors like gray and pink, or tra y fantasy versions mint green shark with lilac kitty ears!
-
Avoid fuzzy or textured yarns for small amigurumi; you’ll want your stitches visible and neat.
Step-by-Step Crochet Instructions
Let’s bring your cute Kitty Shark Keychain Amigurumi to life step by step!
Making the Head
-
Start with the kitty’s head base:
-
Use gray or shark-colored yarn.
-
Round 1: Magic ring with 6 single crochets (sc).
-
Round 2: 2 sc in each stitch (12 sc).
-
Round 3: (1 sc, inc) repeat around (18 sc).
-
Round 4: (2 sc, inc) repeat around (24 sc).
-
Round 5–8: Work even (24 sc).
-
-
Insert safety eyes between rounds 6–7, spaced evenly.
-
Add stuffing gradually, firm but soft.
-
Round 9: (2 sc, dec) repeat (18 sc).
-
Round 10: (1 sc, dec) repeat (12 sc).
-
Round 11: Decrease around (6 sc). Fasten off and close.
Pro Tip: Shape the head gently as you go, keeping it slightly oval for a cute, squeezable look.
Forming the Body & Belly
-
Start with white yarn (belly):
-
Magic ring, 6 sc.
-
Round 2: 2 sc in each stitch (12 sc).
-
Round 3: (1 sc, inc) repeat (18 sc).
-
Round 4: Switch to shark-color yarn.
-
-
Body shaping:
-
Round 5–9: Work evenly (18 sc).
-
Round 10: (1 sc, dec) repeat (12 sc).
-
Stuff lightly and close off witha slip stitch.
-
Stuffing Tip: Keep the bottom flat so your kitty shark sits nicely on surfaces.
Making the Shark Hood
This part gives the kitty its adorable shark disguise!
-
With gray yarn:
-
Magic ring, 6 sc.
-
Round 2: 2 sc each (12 sc).
-
Round 3: (1 sc, inc) around (18 sc).
-
Round 4: (2 sc, inc) around (24 sc).
-
Round 5–7: Work even for 3 rounds.
-
-
Mouth Opening:
-
Switch to white yarn.
-
Round 8: (3 sc, dec) repeat around.
-
Round 9: (2 sc, dec) repeat around.
-
Fasten off, leaving a tail.
-
Creative Touch: Add tiny triangle teeth with white thread around the hood opening for that funny shark grin.
Crafting the Ears
-
With pink yarn, chain 2.
-
Work 3 sc into the second chain.
-
Row 2: 1 sc, 1 hdc, 1 sc.
-
Fasten off and shape into a triangle.
-
Make two ears and attach them inside the shark hood so they peek out adorably.
Shaping Tip: Use slightly stiffer yarn or light fabric glue behind the ears to help them stand upright.
Creating the Tail & Fins
-
Tail Fin:
-
Magic ring, 4 sc.
-
Round 2: (1 sc, inc) repeat (6 sc).
-
Round 3–4: Work even, then flatten.
-
Sew onto the back of the shark body.
-
-
Side Fins:
-
Chain 3, sc in the second chain, hdc in the next.
-
Make two and sew symmetrically on the sides.
-
Finishing Detail: Add small embroidered gill lines using black thread to make it look more shark-like.
Assembly & Positioning
Now comes the fun part, putting everything together!
-
Sew the head onto the body securely.
-
Place the shark hood over the head and stitch it around the edges (just enough to stay in place but still look loose).
-
Attach the fins and tail symmetrically.
-
Add tiny whiskers using black embroidery floss.
-
Attach the keychain ring by sewing a loop of yarn or a small metal jump ring on top of the head.
Polishing Tip: Hide all yarn ends neatly inside the body using a tapestry needle. This gives a clean, store-quality finish.
Adding Final Touches
-
Use blush or pink thread to add soft, rosy cheeks.
-
Stitch a tiny “mouth” under the shark’s hood if you want a peekatf kitty’s smile.
-
Add a little bow tie or mini fish accessory for extra cuteness.
Finishing Hack: Lightly brush the surface with a clean toothbrush to soften yarn fuzz and give a professional texture.
Customization Ideas
Make your Kitty Shark Keychain truly one-of-a-kind with these creative variations:
-
Color Themes:
-
Classic: Gray shark hood, white belly.
-
Ocean Fantasy: Teal hood, lavender ears.
-
Kawaii Pastel: Soft pink and mint green combo.
-
Holiday Edition: Red shark hood and green belly for Christmas!
-
-
Yarn Options:
-
Cotton yarn: Defined stitches, neat structure.
-
Acrylic yarn: Slightly soft and squishy.
-
Chenille yarn: Plush, luxurious texture.
-
-
Accessories:
-
Add a micro coffee cup, fish charm, or mini crown.
-
Stitch initials on the back for a personalized touch.
-
Use metallic yarn for shiny shark fins!
-
Advanced Tips & Troubleshooting
Perfect your craft with these expert amigurumi insights:
-
Invisible Decrease: Use front loops only for seamless shape transitions.
-
Consistent Tension: Practice holding the yarn evenly for smoother stitches.
-
Round Alignment: Always mark your first stitch to avoid uneven shaping.
-
Fixing Uneven Heads: Steam-block gently with a hot iron (hovering, not pressing).
-
Stuffing Balance: Fill slowly, shaping as you go to prevent lumps.
-
Seamless Joins: Use whip stitch through back loops only for invisible attachment.
-
Color Switching: Change yarn at the final pull-through of the previous stitch.
-
Avoid Yarn Splitting: Use hooks with smooth heads for cleaner stitches.
-
Embroidery Precision: Use small embroidery needles for facial details.
-
Count Constantly: Prevent misaligned rounds by counting after each row.
Care Instructions
Keep your handmade Kitty Shark Keychain looking fresh and adorable:
-
Wash: Gently hand-wash in cold or lukewarm water.
-
Soap: Use mild detergent or baby shampoo.
-
Dry: Pat gently and air dry flat avoid heat or tumble dryers.
-
Avoid: Direct sunlight, which can fade bright yarns.
-
Storage: Keep in a fabric pouch or sealed box to prevent dust.
Tip: For keychains used daily, spot-clean gently with a damp cloth instead of full washing.
Display & Gift Ideas
Your Crochet Kitty Shark Keychain Amigurumi can be used in countless fun ways!
-
Gifts: Perfect for birthdays, Valentine’s Day, or holidays, especially for cat or ocean lovers.
-
Bag Charm: Attach to purses, backpacks, or pencil cases.
-
Desk Décor: Sit it by your workspace to brighten your mood.
-
Home Accent: Add to your amigurumi shelf display.
-
Ornament: Turn it into a holiday ornament by adding a ribbon loop.
Creative Idea: Make a family of kitty sharks, each ina different ccolorfor a super-cute collectible set!
Benefits of Making the Kitty Shark Keychain
Beyond the cuteness, crocheting this project offers real emotional and mental benefits:
Relaxation & Mindfulness
The rhythmic flow of crochet helps quiet the mind and reduce anxiety, offering a meditative sense of peace.
Stress Relief
The repetitive motion releases tension and increases focus in a mindful, screen-free way to unwind.
Sense of Accomplishment
From yarn to character, watching your tiny shark kitty form gives you that satisfying I made this feeling.
Eco-Friendly Gift
Handmade items are sustainable, waste-free, and full of love, a meaningful alternative to plastic trinkets.
Emotional Connection
Each handmade amigurumi carries emotion and time; whether gifted or kept, it’s a symbol of care and creativity.
Photography & Social Media Tips
Show off your adorable creation online with these photography tricks:
-
Natural Light: Shoot near a window in daylight for soft, warm tones.
-
Props: Include yarn, crochet hooks, or shells for an ocean theme.
-
Background: Use plain pastels, white, or textured fabric backgrounds.
-
Close-ups: Highlight the shark’s hood details, fins, and facial expressions.
-
Angles: Capture side, front, and overhead shots for variety.
-
Editing: Brighten slightly, add contrast, and keep it natural.
-
Hashtags: CrochetKittyShark, AmigurumiKeychai,n HandmadeLo, CrochetAddict, YarnArt
Social Media Hack: Record a short reel of your shark kitty “swimming” in slow motion, guaranteed engagement!
Conclusion
Crocheting the DIY Crochet Kitty Shark Keychain Amigurumi Pattern is more than a craft; it’s a joyful adventure in creativity. From that first magic ring to the final stitch, every moment is filled with imagination and delight.
This little kitty shark may be small, but it’s overflowing with character, a playful mix of cuteness, humor, and handmade charm. Whether it dangles from your keys or becomes a heartfelt gift for a loved one, it’s sure to spark smiles and conversations wherever it goes.