

Crochet has a quiet kind of magic: the gentle rhythm of hook and yarn, the way simple loops become something you can hold and cherish. It’s calming, creative, and so personal. With every stitch, you’re crafting more than a toy; you’re making a soft keepsake, full of time, care, and heart.
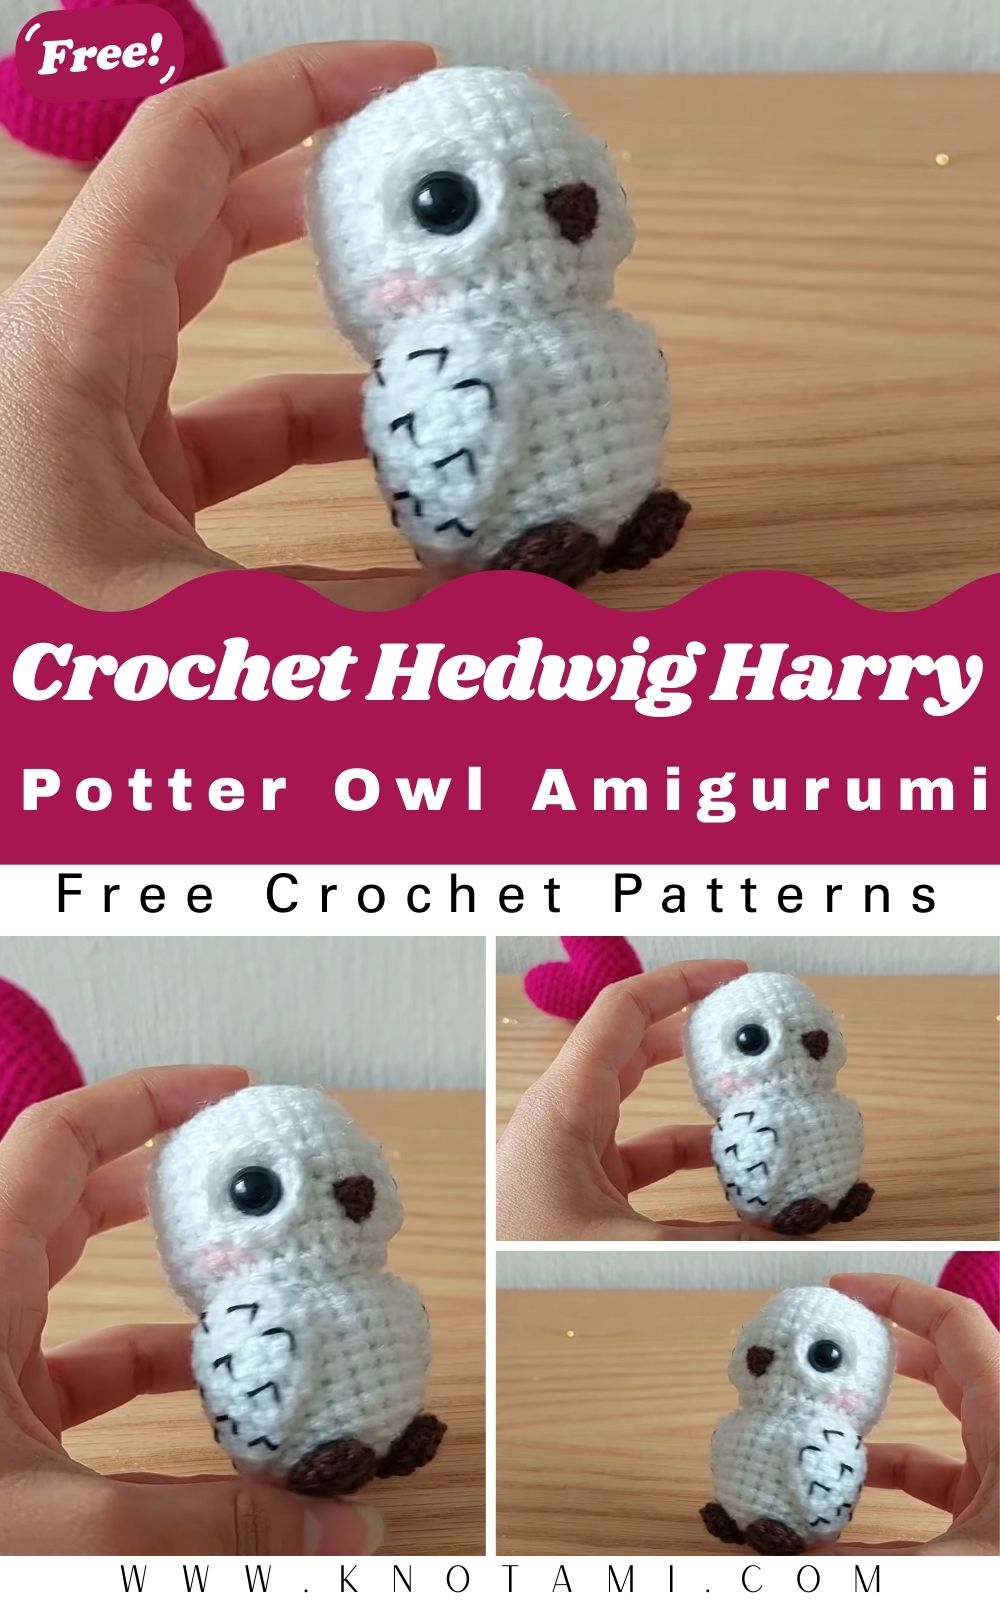
Now, let’s talk Hedwig, the beloved snowy owl of the wizarding world. Loyal, elegant, and endlessly charming, she’s the perfect muse for a sweet amigurumi. The DIY Crochet Hedwig Harry Potter Owl Amigurumi Pattern brings that charm to life, turning plush white yarn into a mini owl with bright, expressive eyes, a tiny beak, and gentle wings. Whether you’re a Potterhead, a crochet lover, or both, this project blends fandom and handmade warmth beautifully.
This pattern is welcoming for beginners yet satisfying for seasoned makers. You’ll practice amigurumi basics like working in the round, shaping with increases and decreases, and adding simple details—think subtle speckles and soft wing accents that give Hedwig her personality. The petite size is perfect for an evening of mindful stitching or a cozy weekend make.
Materials & Tools
Here’s what you’ll need to bring Hedwig the Owl to life:
Materials List
-
Yarn:
-
Main Color: White (body, head, wings)
-
Accent Color: Light gray or black (for feather tips and eyes)
-
Beak & Feet: Yellow or mustard yarn
-
Optional: Small amount of dark gray for feather detailing
-
-
Yarn Weight:
-
DK or light worsted Category 3 works beautifully for structured detail.
-
-
Crochet Hook:
-
2.5 mm to 3.0 mm hook adjust based on your yarn weight.
-
-
Stuffing:
-
Soft polyester fiberfill for shaping the body.
-
-
Safety Eyes:
-
8 mm or 10 mm round black eyes or embroidered eyes for a softer look.
-
-
Tapestry Needle:
-
For sewing parts and weaving in ends.
-
-
Scissors:
-
Sharp pair for clean snips.
-
-
Stitch Markers:
-
To keep track of your rounds.
-
Yarn & Color Tips
-
Use cotton yarn for crisp stitch definition, perfect for showing off Hedwig’s feathers.
-
Acrylic yarn creates a fluffier, softer feel, giving your owl a plush-like texture.
-
For extra magic, add a touch of shimmer yarn or metallic thread to the wings.
-
Stick with white for the authentic Hedwig look, or experiment with pastel hues for a fantasy-inspired version!
Step-by-Step Crochet Instructions
Let’s crochet your adorable Hedwig Owl Amigurumi together, step by step!
Making the Head
-
Start with white yarn and a magic ring:
-
Round 1: 6 sc in the ring.
-
Round 2: 2 sc in each stitch (12 sc).
-
Round 3: (1 sc, inc) repeat around (18 sc).
-
Round 4: (2 sc, inc) repeat around (24 sc).
-
Round 5: (3 sc, inc) repeat (30 sc).
-
-
Rounds 6-10: Work evenly in single crochet (30 sc).
-
Insert safety eyes between rounds 7 and 8, spaced 8 stitches apart.
-
Embroider gray or black accents around the eyes to mimic Hedwig’s expressive look.
-
Round 11: (3 sc, dec) repeat (24 sc).
-
Round 12: (2 sc, dec) repeat (18 sc).
-
Begin stuffing. Keep it firm but even.
-
Round 13: (1 sc, dec) repeat (12 sc).
-
Round 14: Decrease around (6 sc). Fasten off and close the hole.
Tip: Use a stitch marker to track the beginning of each round for perfect alignment.
Forming the Neck & Upper Body
-
With white yarn, start a new piece for the neck section.
-
Round 1: Magic ring, 6 sc.
-
Round 2: Increase around (12 sc).
-
Round 3-5: Work even (12 sc).
-
-
Sew or stitch this piece to the base of the head.
-
This step helps give Hedwig her characteristic round neck, making the transition to the body smoother.
Pro Tip: Slightly under-stuff the neck, which allows for natural flexibility when posing or displaying.
Building the Main Body
-
Start with white yarn:
-
Round 1: Magic ring, 6 sc.
-
Round 2: Increase all around (12 sc).
-
Round 3: (1 sc, inc) repeat (18 sc).
-
Round 4: (2 sc, inc) repeat (24 sc).
-
Round 5: (3 sc, inc) repeat (30 sc).
-
Round 6-10: Work even (30 sc).
-
-
Begin shaping the chest:
-
Round 11: (3 sc, dec) repeat (24 sc).
-
Round 12: (2 sc, dec) repeat (18 sc).
-
Round 13: Work even (18 sc).
-
-
Stuff firmly as you go.
-
Round 14: (1 sc, dec) repeat (12 sc).
-
Round 15: Decrease around (6 sc). Fasten off, weave in ends.
Stuffing Tip: Start lightly and add more as the shape forms to maintain balance and prevent lumps.
Making the Wings
-
Chain 7 with white yarn.
-
Row 1: Sc in 2nd chain, then across (6 sc).
-
Row 2–4: Sc across each row.
-
Row 5: Dec at both ends (4 sc).
-
Row 6: Sc across, fasten off.
-
Make 2 wings.
-
Embroider black or gray speckles on the wings using small V-shaped stitches to resemble Hedwig’s feathers.
Assembly Tip: Slightly curve the wings inward when sewing to give a natural resting pose.
Crafting the Tail and Feet
Tail:
-
Chain 5.
-
Row 1: Sc in each chain (4 sc).
-
Row 2: Repeat, then fasten off and shape slightly outward.
-
Sew at the lower back of the owl.
Feet:
-
Using yellow yarn, chain 3.
-
Work 1 sc, 1 hdc, 1 dc. Thiscreates a tiny claw shape.
-
Make 2 sets of 3 claws and sew to the base of the owl’s body.
Pro Tip: For a more realistic look, embroider thin brown lines across the claws.
Adding the Beak & Facial Features
-
With yellow or mustard yarn, chain 3.
-
Work 1 hdc in the second chain, sl st to finish.
-
Sew between the eyes.
-
Embroider small eyebrow lines or a slight blush around the cheeks for personality.
Finishing Detail: Use a single strand of dark yarn to lightly outline the beak and eyes, which makes them pop beautifully.
Assembly & Positioning
-
Attach the head to the body securely using a tapestry needle.
-
Sew wings symmetrically on each side.
-
Add a tail at the back, feet below.
-
Adjust stuffing if needed to balance the standing position.
-
Fluff the yarn slightly around the head using a soft brush to mimic feathers.
Balancing Tip: If your owl leans, add a small pebble or bead inside the bottom before sealing to stabilize the weight.
Customization Ideas
Once your Hedwig Amigurumi is complete, have fun giving her a unique touch!
Color Variations
-
Classic Hedwig: White with gray-tipped wings.
-
Fantasy Owl: Use pastel hues like lilac, sky blue, or soft pink.
-
Christmas Version: Red and white with a Santa hat.
-
Golden Snitch Theme: Add small gold threads and wings in metallic yarn!
Yarn Options
-
Cotton yarn for structure and defined stitches.
-
Velvet or chenille yarn for a plush, soft, cuddly owl.
-
Wool-blend yarn for a realistic, cozy texture.
Add-ons
-
Crochet a tiny Hogwarts letter for Hedwig to hold in her beak.
-
Add a mini Gryffindor scarf around her neck.
-
Create an Owl Post envelope with felt and embroidery thread.
-
Add glitter yarn around her eyes for a magical glow.
Advanced Tips & Troubleshooting
Here are expert tricks for a clean, professional finish:
-
Invisible Decrease: Insert hook into front loops of next two stitches; yarn over and pull through both loops.
-
Even Tension: Maintain consistent yarn flow, not too tight, not too loose.
-
No Twists: Always check your rounds before joining to prevent twisted stitches.
-
Smooth Shape: Gently massage the stuffed areas to distribute fiber evenly.
-
Seamless Joins: Use a whip stitch through back loops only for invisible seams.
-
Color Change Cleanliness: Change yarn colors on the final yarn-over of a stitch.
-
Avoid Lumpy Stuffing: Add stuffing gradually, especially for smaller parts like the neck.
-
Accurate Pattern Reading: Review abbreviations sc, inc, dec, sl s before starting.
-
Block for Perfection: Steam or mist lightly to relax yarn and refine shape.
-
Stitch Counting: Count every few rounds to maintain symmetry, crucial for small amigurumi!
Care Instructions
Your handmade owl deserves love and care to stay magical:
-
Wash Gently: Hand wash in cool water with mild soap.
-
Dry Flat: Squeeze water out gently and air dry on a towel.
-
Avoid Heat: No dryers or ironing, as they can distort the shape.
-
Sun Protection: Keep out of direct sunlight to prevent color fading.
-
Storage: Store in a clean, dry box or display case when not in use.
Bonus Tip: Add a drop of lavender oil or a scented sachet nearby for a fresh aroma that repels dust.
Display & Gift Ideas
Your Crochet Hedwig Amigurumi is perfect for displaying, gifting, or adding to your Harry Potter collection!
-
Gifts: Handmade presents always touch hearts. Give your owl to a Potter-loving friend.
-
Desk Buddy: Let Hedwig sit by your laptop to keep you company during work or study.
-
Home Décor: Display her on bookshelves beside your Harry Potter novels.
-
Holiday Ornament: Add a gold ribbon and hang Hedwig on your Christmas tree.
-
Collector’s Display: Make multiple owls in different sizes as a whole owl family!
Creative Touch: Attach a Hogwarts acceptance letter envelope to her bag. Fans will love the reference!
Benefits of Making the Crochet Hedwig Owl
Crocheting Hedwig is more than just a fun craft; it’s a relaxing and emotional experience that brings numerous benefits:
Relaxation & Mindfulness
The slow, repetitive rhythm of crochet soothes the mind, reduces anxiety, and encourages mindfulness.
Stress Relief
Each stitch becomes a quiet escape from daily stress, helping you focus on creativity instead of worries.
Accomplishment & Joy
Finishing Hedwig brings an overwhelming sense of pride that we’ve created a magical piece from scratch!
Eco-Friendly Gifting
Handmade items are sustainable, meaningful, and reduce waste compared to store-bought décor.
Emotional Connection
Every time you see your owl, you’ll remember the hours of care and creativity that went into crafting it, a true symbol of love and patience.
Photography & Social Media Tips
Once your owl is ready, share it with the world! Here’s how to capture its magic:
-
Natural Light: Photograph in daylight near a window for bright, soft images.
-
Props: Add Harry Potter books, a wand, or parchment letters for atmosphere.
-
Background: Use neutral tones like beige or wood to make white yarn pop.
-
Close-Ups: Highlight details like feathers, eyes, and beak texture.
-
Angles: Capture Hedwig front-facing, side, and perched on your hand for storytelling shots.
Social Media Trick: Record a short video of your Hedwig flying or holding a letter, fans adore creative motion clips!
Conclusion
Crocheting the DIY Crochet Hedwig Harry Potter Owl Amigurumi Pattern is more than a craf;, it’s a magical journey of creativity and imagination. From each careful stitch to the final embroidered detail, you’re not just making an owl; you’re crafting a piece of storytelling magic with your own hands.
Whether perched on your shelf or gifted to a fellow Potterhead, your handmade Hedwig will forever symbolize love, loyalty, and creativity. She’s more than yarn and stuffing, she’s a small, heartfelt reminder that magic exists wherever creativity thrives.