Cute Crochet Lechonk Pokemon Amigurumi Pattern Plush
There’s a special kind of magic in creating something out of nothing especially with yarn. With just a hook some soft yarn and your imagination you can turn a handful of stitches into a lovable creature. The journey from loose fibers to a finished crochet plush is one filled with calm, creativity, and incredibly rewarding moments. Each pull of the yarn brings your project closer to life, and with it comes the warmth of handmade art.
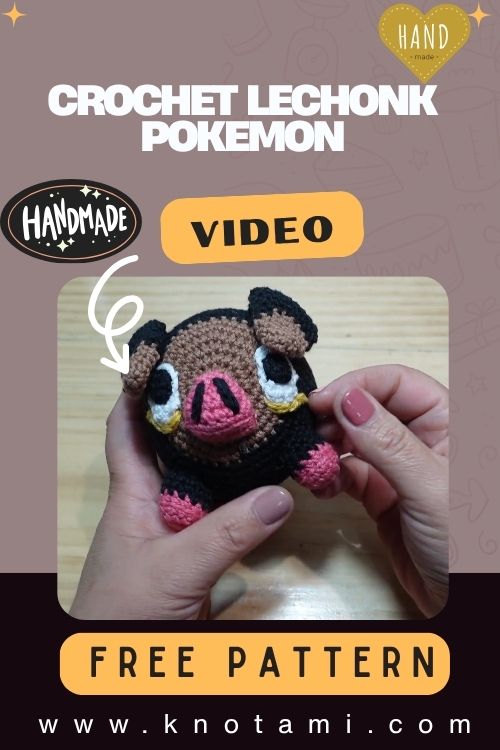
That’s exactly why today’s project is sure to make hearts melt the Crochet Lechonk Pokémon Amigurumi Plush. Recreating this adorable new Pokémon, introduced in the ninth generation, is a treat for any fan of cute crafts and critters. From its round body and little piggy snout to its fluffy texture and sweet color palette, Lechonk captures the hearts of gamers and crafters alike. With just a bit of basic crochet knowledge, you can bring this charming creature off the screen and into your hands as a cuddly, handmade plush.
Whether you’re a beginner looking for your next crochet project or an experienced crafter wanting a whimsical pattern to unwind with, this Crochet Lechonk Pokémon offers both simplicity and creative flexibility. The pattern is designed to be easy to follow and fun to customize from experimenting with different yarn textures to adding playful accessories that match Lechonk’s irresistible personality.
Most of all, crocheting is an art form that encourages mindfulness and joy. The rhythmic motions of each stitch slow down time, grounding you in the moment and letting your worries fade away. And when you finish? You’re left with not just a cute Pokémon plush, but a memory-filled keepsake that brings smiles to faces and comfort to hearts. This is the gentle beauty of slow crafting and why this Lechonk Amigurumi Pattern is a perfect project to relax with or gift to someone special.

Materials & Tools
Before you start crafting your Crochet Lechonk Pokémon, gather everything you need from the list below. Each item helps make the process smoother and your finished plush more polished:
Yarn:
-
Worsted weight yarn (#4) in these colors:
-
Soft brown or charcoal gray for the main body
-
Blush pink for the snout and cheeks
-
Light tan or beige for accents
-
Cream or white for details
-
Deep olive or black (optional for fur streaks or decoration)
-
Crochet Hook:
-
3.5 mm to 4.0 mm crochet hook (depending on your preference and yarn tightness)
Other Essentials:
-
10–12 mm safety eyes or black embroidery thread
-
Polyester fiberfill stuffing
-
Tapestry needle for sewing pieces together
-
Scissors
-
Stitch markers (to mark the rounds and avoid confusion)
-
Optional: Felt fabric and glue for snout detail or accessories
Yarn Choosing Tips:
Choose soft acrylic or cotton yarn for a plushy feel. If you want a more realistic or fur-like texture, consider using velvet or fluffy yarn as a creative alternative. Just be aware that textured yarn can be harder to work with, especially for beginners. Stick to high-contrast colors to make Lechonk’s details pop.
4. Step-by-Step Crochet Instructions
Let’s bring Lechonk to life one stitch at a time! This step-by-step guide breaks down the process into easy-to-manage sections you can follow at your own pace.
1. Making the Head
-
Start with the snout in blush pink:
-
Create a small oval shape using single crochet (sc) rounds.
-
Add tiny nostrils using black embroidery thread or felt once finished.
-
-
Switch to the body color (brown/gray) and work a spherical shape around the snout:
-
Begin with a magic ring and increase rounds to form the head.
-
Insert safety eyes between rounds 6–7, ensuring they are symmetrical.
-
Pro Tip: Insert the eyes before the head becomes too narrow around 70-80% of the head’s completion is ideal. This helps ensure proper alignment.
2. Forming the Neck & Upper Body
-
Continue crocheting downwards from the head without cutting the yarn.
-
Shape a slight curve using fewer increases to form the neck area.
-
Gradually increase your stitches again to grow Lechonk’s plump upper body.
The goal is a smooth, rounded shape avoid sharp corners or sudden decreases.
3. Building the Main Body
-
Keep working in spirals to create the full body width.
-
Use your stitch marker to keep track and avoid lopsided sections.
-
Start stuffing the body gradually, maintaining a soft yet firm feel.
-
Close the body with decreasing rounds at the bottom.
Pro Tip: Keep the stuffing evenly distributed with your fingers or a chopstick. Lumps can make your plush sag.
4. Shaping and Attaching the Legs/Feet
-
Create four small oval legs in matching yarn color.
-
Stuff lightly; you don’t want stiff legs.
-
Sew them symmetrically under the body two in front, two in back giving Lechonk a stable base to sit upright.
5. Crafting the Tail and Ears
-
For the tail, crochet a short cylinder or curly spiral and attach at the back.
-
Make two small triangular ears and position them on top of the head.
-
Add a bit of shape by folding the outer edges for a realistic touch.
You can add subtle tufts of yarn around the ears or on top of the head for a fluffy finish.
6. Assembly & Positioning
-
Sew all parts together with matching yarn and tight, secure stitches.
-
Position the legs so the plush can sit stably without rolling.
-
Attach the snout and ears securely.
Tip: Use pins to hold parts in place before sewing this helps with alignment and symmetry.
7. Adding Final Touches & Accessories
-
Embroider blush cheeks under the eyes.
-
Use felt to cut out a tiny tongue or add extra snout details.
-
Add fur markings with a darker yarn or embroidery thread (e.g., black streaks like Lechonk’s fluffy back).
Optional accessories:
-
Add a tiny flower crown, scarf, or bowtie for extra personality!
5. Customization Ideas
Love the idea of making your Crochet Lechonk Pokemon one-of-a-kind? Here are some fun ways to customize!
-
Rainbow Lechonk – Use pastel or gradient yarns for an eye-catching multicolor effect.
-
Halloween Lechonk – Add a ghost sheet costume or a pumpkin hat.
-
Christmas Lechonk – Attach a mini Santa hat and jingling bell scarf.
-
Glitter Yarn – Use yarn with sparkly strands for a magical, shiny effect.
-
Fuzzy Texture – Try plush or chenille yarn to make an extra soft and cozy Lechonk plush.
6. Advanced Tips & Troubleshooting
Want to make your project even more polished? Try these expert tips:
-
Invisible Decreases – Insert your hook under the front loops of two stitches, yarn over, and pull through; reduces bumpiness.
-
Even Tension Tips – Practice relaxing your wrist and yarn feed to avoid tight or loose inconsistencies.
-
Prevent Twisting in Rounds – Make sure your first stitch always goes directly into the magic ring’s first space.
-
Fixing Gaping Holes – Use matching yarn to close gaps after stuffing.
-
Perfect Stuffing – Use small bits of fiberfill at a time for smooth results. Don’t overstuff or your shape may distort.
-
Seamless Joining – Whip stitch or ladder stitch techniques make parts look like they naturally grow from the plush.
-
Understanding Abbreviations – Always refer to pattern shortcuts: sc = single crochet, inc = increase, dec = decrease, etc.
-
Pinned Assembly – Before sewing, always pin parts in place to visualize the final shape.
-
Details First – Embroider cheeks or snout accents while the head opening is still accessible.
-
Break the Routine – If your hands feel stiff, stretch or switch to a smaller part for a while to reset.
7. Care Instructions
You’ve poured your heart into making your Crochet Lechonk Pokemon now here’s how to keep it in tip-top shape:
-
Spot clean gently with cool water and mild detergent.
-
Hand wash only; no machine washing unless it’s tightly secured.
-
Air dry flat on a towel to prevent shape loss.
-
Avoid sunlight exposure for extended periods.
-
Store with other soft items in a dry place.
-
If gifting, consider adding a care tag to help your recipient keep it safe.
8. Display & Gift Ideas
Your handmade Lechonk Pokémon deserves to be admired! Here are some creative ideas:
-
Place on a bookshelf, bed, or desk for kawaii room décor.
-
Add into a themed gift basket with treats and tea for a cozy gift.
-
Give as a heartfelt handmade present for birthdays or holidays.
-
Attach a mini version as a keychain or bag charm.
-
Use as photo prop for kids or social media posts.
9. Benefits of Crocheting This Project
Crafting a Crochet Lechonk Pokémon plush isn’t just about the end result it’s also about the journey. Here’s why this project is good for the soul:
-
Mindfulness – The repetition of stitches promotes calm and focus.
-
Stress Relief – Crafting boosts mood and lowers anxiety.
-
Improves Fine Motor Skills – Learning to shape and sew develops dexterity.
-
Personal, Eco-Friendly Gifts – Handmade gifts use less waste and mean so much more.
-
Emotional Fulfillment – Watching your creation come to life brings deep joy.
10. Photography & Social Media Tips
Once your plush is finished, it’s time to show it off! Here’s how to make it Instagram-ready:
-
Use natural light for clear colors and soft shadows.
-
Add fun props like mini yarn skeins, flowers, or other Pokémon.
-
Use a solid, pastel, or neutral background to make your colors pop.
-
Zoom in for closeups of texture and stitch detail.
11. Conclusion
Creating your Crochet Lechonk Pokémon is more than a hobby it’s a beautiful act of creativity, intention, and warmth. From the moment you pull the first loop of yarn to the final stitch of the snout, you’re telling a story through your craft. Whether it’s meant to bring joy to someone else or serve as a soft, squishy reminder of your love for Pokémon and handmade art, this project is filled with personality and heart.
So grab your yarn, pick up your hook, and start on this charming journey. Your very own Lechonk is waiting to be stitched into life, ready to brighten homes, spark smiles, and remind you of the lovely things that come from your hands.