Easy Crochet Mini Shrek Keychain Amigurumi Pattern Adorable
There’s something beautifully magical about crocheting the calm click of the hook, the soft feel of the yarn, and the slow transformation from a simple strand into a delightful creation. With every stitch, you’re not just making a craft you’re weaving a bit of your personality into something unique and meaningful. Whether it’s plushies, garments, or mini accessories, crochet offers endless opportunities for creative expression.
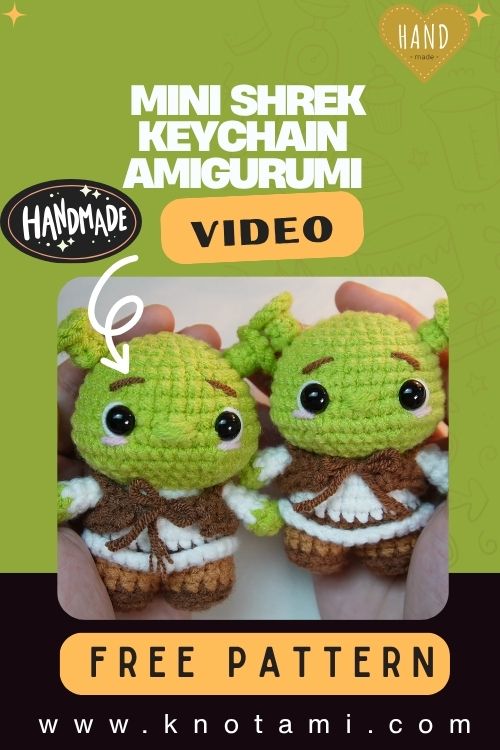
Today’s project is a perfect example of that joy: the Crochet Mini Shrek Keychain. This tiny version of everyone’s favorite green ogre is both adorable and Pinterest-perfect. Compact enough to fit on your bag or keychain but filled with personality, this handmade mini Shrek adds a touch of fun wherever it goes.
What’s even better? This project welcomes crocheters of all levels. Whether you’re picking up a hook for the first time or you’re experienced with amigurumi, crocheting this mini ogre offers just the right level of challenge, mixed with loads of creative freedom. Plus, the project is small so it can be completed in a few hours or worked on slowly during your Netflix sessions.
There’s something incredibly soothing about slow crafting the quiet rhythm, the satisfaction of progress, the joy of seeing your work take shape. And when that creation is as endearing as a pocket-sized Shrek, stitched lovingly by hand? It becomes a keepsake that brings joy to both the maker and the receiver. Perfect for gifting, collecting, or storytelling this project is sure to put a smile on everyone’s face.

Materials & Tools
To create your own Crochet Mini Shrek Keychain Amigurumi, here’s what you’ll need:
🪢 Yarn & Colors
-
DK or worsted weight yarn (Cotton or acrylic recommended for durability)
-
Light green (for skin)
-
Brown (pants)
-
Beige (shirt)
-
Black (belt)
-
Optional: Pink (mouth detail)
-
Hook Size
-
2.5mm to 3.5mm crochet hook (use a size that fits your yarn choice for firm stitches)
Notions
-
Polyester fiberfill stuffing
-
Pair of 6mm or 8mm black safety eyes
-
Black embroidery thread for eyebrows
-
Small metal keychain ring (optional but recommended)
-
Yarn needle or tapestry needle
-
Scissors
-
Stitch marker (to keep track of rounds)
Choosing the Best Yarn Colors
For a “classic Shrek look,” choose light leaf-green for the skin and earthy tones for clothing. If you want alternative versions (like a pastel Shrek with lavender skin), just swap the green and brown with your preferred colors. Cotton yarn gives a cleaner finish, while acrylic is more affordable and fuzzy both work great in this mini form.
4. Step-by-Step Crochet Instructions
Let’s break down the pattern into simple sections to help bring this adorable Shrek to life.
Pro Tip: Work in continuous rounds unless otherwise specified. Use a stitch marker to mark the beginning of each round.
1. Crochet the Head
Start with the iconic rounded head this is the foundation of Shrek’s personality.
-
Magic ring, 6 single crochets (sc) (6 sts)
-
Inc in each stitch around (12 sts)
-
[1 sc, inc] repeat (18 sts)
-
[2 sc, inc] repeat (24 sts)
5–8. Sc around (24 sts) -
[2 sc, dec] repeat (18 sts)
-
[1 sc, dec], repeat (12 sts)
-
Decrease around (6 sts), stuff head lightly and finish off.
Add safety eyes between rows 5 and 6, spaced 3 stitches apart. Embroider a tiny smirk and eyebrows to capture his character.
2. Create the Upper Body (Shirt Section)
The body is a cylinder shape that transitions into his clothing.
-
Use beige yarn to attach to bottom of head, sc around (12 sts)
-
Increase evenly to 18 stitches
3–8. Sc in each st (shirt section) -
Switch to dark brown yarn for pants
10–14. Sc around, decreasing gradually and stuffing as you go
3. Make the Legs and Base
Shrek’s little stumpy legs help form a stable base.
-
Make 2 legs in brown yarn:
-
Magic ring, 6 sc
-
Inc around (12 sts)
-
Sc around for 3 rows
-
Fasten off, leave tail for sewing
-
-
Attach legs securely to bottom body part.
4. Arms, Ears, & Vest
No Shrek is complete without his ogre ears and peasant shirt vest!
Ears (Make 2)
-
Magic ring, 4 sc
-
Sc in each st for 2 rows
-
Flatten and sew onto either side of head
Arms (Make 2)
-
Magic ring, 4 sc
-
Increase to 6 stitches
-
Sc 3 rows, stuff lightly
-
Sew just below head on either side
Vest
Using black yarn:
-
Chain long enough to wrap around body
-
Single crochet 2 rows
-
Sew ends and body to form mini vest piece
5. Assembly & Final Touches
-
Attach limbs symmetrically
-
Sew vest in place
-
Embroider mouth or add felt piece
-
Add keychain ring to top of head
Stuffing Tip: Stuff firmly enough to give structure, but avoid overfilling or gaps will appear in stitches.
5. Customization Ideas
Want to get creative? Here are a few variations to try:
-
Fairy-Tale Shrek: Add a tiny crown or cape.
-
Christmas Shrek: Use red & white yarn, add a Santa hat.
-
Baby Shrek: Light pastel green with baby-blue clothes.
-
Halloween Zombie Shrek: Use gray yarn and add “stitches” or patches.
You can also:
-
Switch to velvet yarn for a plush texture.
-
Create a tiny Donkey companion to go with the keychain.
-
Add initials or names for personalized holiday gifts.
6. Advanced Tips & Troubleshooting
Whether you’re a beginner or pro, these expert tips help perfect your project:
-
Invisible decreases help avoid bumps use front loop only (FLO).
-
Control stitch tension by holding yarn loosely and practicing consistent finger movement.
-
Prevent twisted rounds by marking your beginning stitch clearly.
-
Fix bulky seams by whip-stitching tightly with matching yarn.
-
Balance stuffing avoid lumpy arms by understuffing, but keep head solid.
-
Use sharp scissors to cut clean yarn tails.
-
Count stitches often, especially in small parts like ears and arms.
-
Always read pattern abbreviations (e.g. sc = single crochet, inc = increase).
7. Care Instructions
Your crochet Shrek keychain is handmade art here’s how to keep it beautiful:
-
Hand wash gently in cool water with a mild detergent
-
Do not wring press water out gently
-
Lay flat to air dry completely
-
Avoid direct sunlight to preserve colors
-
Store in a dry, enclosed area or gift box for best protection
8. Display & Gift Ideas
There are so many ways to enjoy and share your finished Crochet Mini Shrek Keychain:
-
Clip to backpacks, totes, or fanny packs
-
Use as a car mirror charm
-
Add to a shelf of geeky collectibles
-
Create as a thoughtful handmade birthday gift
-
Attach to Christmas stockings for a fun surprise
-
Plan a themed set with Puss-in-Boots or Donkey
-
Sell at local craft fairs, Etsy, or anime conventions
9. Benefits of Crafting This Keychain
Crocheting a cute Shrek toy brings more than just the fun of fandom:
-
Relieves stress and encourages mindfulness
-
Sparks creative imagination
-
Offers satisfying results for daily progress
-
Inspires eco-friendly, handmade gifting
-
Brings emotional value to maker and receiver
10. Photography & Social Media Tips
Show off your crochet masterpiece on Instagram, Pinterest, or TikTok!
-
Use soft natural light (near windows)
-
Add greenery or yarn balls as props
-
Use a neutral background for focus
-
Experiment with multiple angles: flat lay, close-ups, or hand shots
11. Conclusion
Crocheting a Mini Shrek Keychain is a delightful blend of creativity, fandom, and craft bringing to life a tiny version of the lovable ogre that can travel with you everywhere you go. Whether you give it as a gift, keep it as a personal treasure, or sell it at a craft fair, this project brings joy from the first stitch to the final knot.
So grab your hook, choose your favorite yarn, and start your own mini Shrek today. You’ll be amazed at how much charm and personality can come from just a little bit of yarn and a whole lot of love.