
Making a spooky-cute keychain is the fastest way to fall in love with amigurumi. This bright orange zombie bunny uses easy crochet patterns for beginners and follows an amigurumi keychain tutorial flow, so you can finish it quickly and proudly.
If you love playful Halloween crafts, this project is a great place to start. You will use a simple crochet bunny pattern, then turn it into a creative crochet keychain with a sturdy loop and ring. It is truly amigurumi for beginners because the shapes are small and forgiving. Best of all, it is one of those handmade crochet ideas that looks impressive, even when you are still learning the basics.

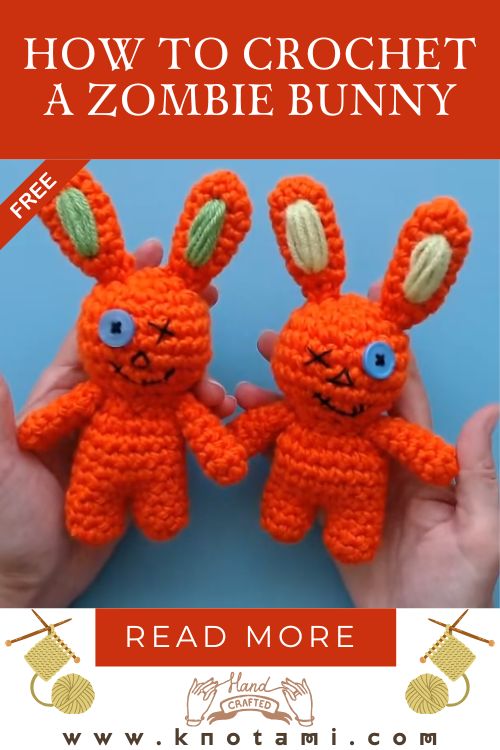
Easy Crochet Zombie Bunny Amigurumi Pattern for Beginners (Step-by-Step DIY Keychain Guide)
Why This Zombie Bunny is Perfect for Beginners
This project is beginner-friendly because it is built from easy, repeatable shapes.
Here’s why it works so well for early-stage learners:
- Mostly single crochet: It keeps the stitch work simple and consistent.
- Small size, quick finish: Great for building confidence without a huge time commitment.
- Forgiving “spooky” style: Slightly messy details can actually add character to a zombie bunny.
- Minimal fancy sewing: Basic whip-stitching is enough, and the joins do not need to look perfect.
- Fun and practical: You end up with a toy and a usable keychain.
In the YouTube video (linked above), you can also watch the shaping and assembly in real time, which is helpful if you learn visually.
Materials Needed
Gather your supplies first so the process feels calm and easy.
- Bright orange yarn (or any color you like), about a small amount (scrap-friendly)
- Small amounts of scrap yarn for details (inner ear color, tail, embroidery)
- Crochet hook that suits your yarn (a smaller hook helps keep stitches tight)
- Stitch marker (recommended for working in a spiral)
- Yarn needle (for sewing pieces together)
- Scissors
- Stuffing (fiberfill) or yarn scraps (great for small keychains)
- Safety eye (just one, for the “missing eye” zombie look) or embroidery thread/yarn for stitched eyes
- Button (optional) for a spooky, mismatched eye effect
- Keychain ring or lobster clasp
- Optional: embroidery floss for scars, mouth lines, or “patched” details
Safety note: If your keychain may be used by a child, stitched eyes are the safest option.
Step-by-Step Crochet Guide (simple & beginner-friendly)
This is a simplified, original guide inspired by the project flow shown in the video. It does not copy the pattern, but it explains the process clearly so you understand what to do and why.
Step 1: Crochet the Head (big and chubby)
Most of the “cute” comes from a slightly oversized head.
- Start with a magic ring (or any circle start you like).
- Increase evenly for a few rounds to form a flat circle.
- Crochet a few even rounds (no increases) to turn the circle into a bowl shape.
- Begin decreasing to close the head, leaving a small opening.
- Stuff the head firmly but not so much that stitches stretch.
- Close the opening and leave a long tail for attaching the head later.
Tip: Tight stitches matter more than speed. If you see gaps, go down a hook size.
Step 2: Make Two Short Legs (tiny tubes)
The legs are quick and beginner-friendly.
- Crochet two small tubes in the round with simple single crochet rounds.
- For one leg, fasten off.
- For the second leg, do not fasten off yet (you will use it to join the legs).
This creates a clean base and helps the bunny stand nicely as a plush, even before it becomes a keychain.
Step 3: Join Legs to Form the Body
This is a satisfying step because it suddenly looks like a character.
- With yarn still attached to the second leg, crochet into the first leg to connect them.
- Work single crochet stitches around both legs in one continuous round.
- Crochet a few rounds evenly to build the body height.
- Add a small amount of stuffing (or yarn scraps) so it stays light for a keychain.
- Make a few decreases to slightly shape the body, then fasten off.
Don’t stress about exact stitch counts here. The goal is a neat join with no big holes between the legs.
Step 4: Crochet Two Arms (simple and skinny)
Arms are usually narrow tubes and work up fast.
- Make two small tubes in the round with single crochet.
- Fasten off each arm and leave a long tail for sewing.
- Light stuffing is optional. Many makers just tuck the starting tail inside and keep arms soft.
Step 5: Crochet Two Long Ears + Add Inner Ear Detail
The ears give the bunny its signature look.
- Crochet two ear shapes in the round (slightly longer than the arms).
- Add a small decrease near the base so the ear pinches in slightly.
- Flatten the ears and use scrap yarn to embroider an inner-ear stripe (a simple whip stitch works well).
- Leave a tail for sewing.
For a zombie vibe, choose an unexpected inner ear color like pale green.
Step 6: Assemble the Bunny (easy sewing)
Now you bring all the parts together.
- Sew the head onto the body using the long tail from the head.
- Sew each arm at the side near the neck.
- Sew both ears to the top of the head, checking placement before you tighten knots.
The video is especially helpful for seeing where to place arms and ears so the bunny looks balanced.
Step 7: Add the Zombie Face (spooky-cute details)
This is where your zombie bunny comes to life.
- Attach one safety eye (or embroider one eye).
- Add a “missing eye” look with a button, stitched X, or empty stitched circle.
- Embroider a small mouth line, crooked smile, or scar stitches.
- Optional: add a tiny tail puff on the back.
Keep details simple. Clean embroidery often looks better than overly complicated features on a small keychain.
Step 8: Turn It Into a DIY Keychain
To make it a keychain, it needs a strong attachment point.
- Crochet a small loop on top (or sew a reinforced yarn loop at the top of the head).
- Thread the keyring or clasp through the loop.
- Double-knot and pull yarn ends into the head/body so nothing dangles.
Keychains get tugged, so strength is more important than invisible knots.
Tips for Beginners
A few practical tips will help your bunny look neat on the first try:
- Use a stitch marker so you don’t lose the start of your rounds.
- Keep your tension steady for smooth, even fabric.
- Stuff lightly for keychains so the finished piece stays small and portable.
- Pin parts before sewing (ears and arms especially).
- Hide tails inside as you go, which keeps finishing simple and tidy.
- Watch the YouTube video while assembling if sewing feels confusing.
Creative Variations (colors, styles, spooky ideas)
Once you finish one, you’ll probably want to make a whole set.
Color ideas
- Bright orange (pumpkin zombie bunny)
- Purple with green inner ears (classic Halloween combo)
- Sickly green with black details (extra “zombie”)
- White bunny with red stitched scars (cute-but-creepy)
Style ideas
- Add a tiny crocheted “patch” square on the head
- Embroider cracked lines near the eye for a stitched-up look
- Make one ear bent or shorter for a wonky zombie style
Spooky keychain add-ons
- A mini bell, tiny skull charm, or small bead “candy”
- A striped scarf in Halloween colors
- Glow-in-the-dark yarn accents for the inner ear or scars
Conclusion
This crochet zombie bunny amigurumi pattern is a fun way to learn the basics while making something you can actually use. With simple single crochet stitches, small parts, and beginner-friendly assembly, it’s a perfect first spooky project. Use the YouTube video as a visual guide, take your time with stuffing and sewing, and enjoy the process. Your first bunny won’t be your last.