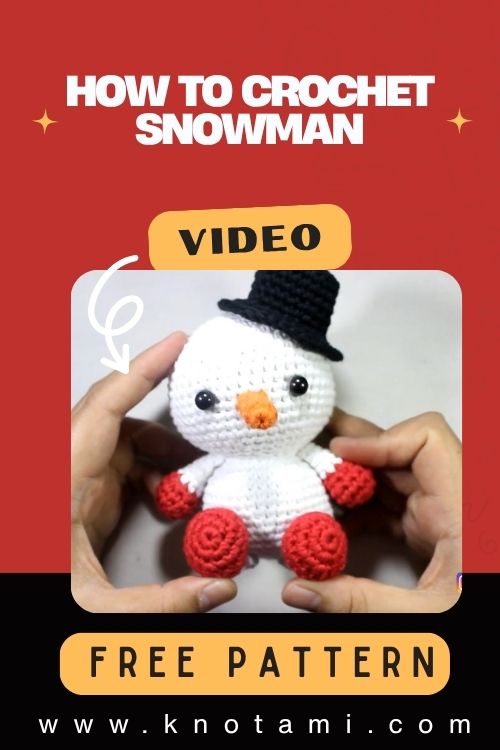
How to Crochet Snowman Amigurumi Pattern for Beginners
There’s something deeply magical about taking a simple ball of yarn and transforming it into a piece of art. Crochet isn’t just about creating stitches it’s about building comfort, crafting joy, and finding refuge in creativity. With each loop and pull, you’re creating something both tangible and heartwarming, something that can bring a smile to your face and warmth to your soul.
Today’s project How to Crochet Snowman Amigurumi Pattern for Beginners is a perfect symbol of that magic. This adorable snowman, with its sweet face and winter-ready outfit, embodies charm and creativity rolled up into one beautiful craft. Whether you’re making it for holiday décor or gifting it to someone special, this plush amigurumi snowman is guaranteed to melt hearts!
What makes this project even more exciting is its beginner-friendly structure. If you’re just starting your crochet journey, this pattern gives you the chance to practice essential stitches, shaping techniques, and simple assembly. And if you’re more experienced, there’s still plenty of room for creativity whether that’s mixing up colors, adding fun accessories, or experimenting with textures.
Most importantly, the rhythm of crocheting a soft, rounded snowman brings peace and satisfaction. It’s the perfect slow craft project where you get to enjoy the process stitch by stitch, all while imagining the joy it will bring someone when finished. This is more than just a DIY craft it’s handmade happiness.

Materials & Tools
To make your Crochet Snowman Amigurumi, you’ll need the following tools and materials:
Basic Materials
-
Yarn: Worsted weight (category 4) cotton or acrylic yarn in white, black, orange, and a fun color of your choice (e.g., red, blue)
-
Crochet hook: 3.5 mm (E/4) or 4 mm (G/6), depending on your yarn and tension
-
Stuffing: Polyester fiberfill
-
Safety eyes: 6 mm or 8 mm black safety eyes
-
Yarn/tapestry needle: For sewing parts together and weaving in ends
-
Scissors: For trimming yarn
-
Stitch markers: To mark the start of each round and keep track of stitches
Tips for Choosing Yarn
-
For best results, use yarn with smooth texture so the stitches stand out.
-
Lighter yarn colors make the snowman pop and show fewer flaws in stitching.
-
You can use cotton yarn for a firmer texture or acrylic for a softer, fluffy feel.
-
Don’t be afraid to mix colors add vibrant hues to the hat or scarf for a playful twist!
4. Step-by-Step Crochet Instructions
Below is a detailed breakdown of how to make your very own Crochet Snowman Amigurumi Pattern. These steps are inspired by the reference video without copying it, offering a friendly guide with expert instructions.
Before You Start
This pattern uses the following basic stitches:
-
MR – Magic Ring
-
SC – Single Crochet
-
INC – Increase (2 SC in same stitch)
-
DEC – Decrease (invisible decrease recommended)
-
BLO/FLO – Back/Front Loop Only
Let’s crochet a frosty friend!
Step 1: Crochet the Head
-
Round 1: Start with a magic ring, 6 SC into ring. (6)
-
Round 2: INC in each stitch. (12)
-
Round 3: SC 1, INC repeat around. (18)
-
Continue increasing until the head measures approx. 2.5 inches across.
-
Work even SC rounds until desired head height.
-
Insert safety eyes between rounds 8–9, about 5 stitches apart.
-
Lightly stuff with fiberfill.
Tip: Use stitch markers to mark the start of each round so you never lose track!
Step 2: Form the Neck & Upper Body
-
After finishing the head, decrease a round to shape the neck.
-
Work a few even rounds to build the neck height.
-
Start increasing again to widen the upper body, just like doing the head but in reverse.
Step 3: Build the Snowman Body
-
Once the neck is formed, continue increasing in the rounds to build the snowman’s rounded belly.
-
When you reach desired width (approx. 3.5–4 inches), work even rounds.
-
Stuff firmly, making sure it stands well!
-
Close the bottom using decreasing rounds.
Crochet the Accessories (Hat/Scarf/Carrot Nose)
-
Carrot Nose: Use orange yarn, work a small cone in SC, stuff lightly, and sew to the face.
-
Scarf: Chain 30–40, then SC in each stitch for 2–3 rows. Add fringe if desired!
-
Hat: Use black yarn. Work a flat circle for the base, then add height by working even rows. Change colors or add a pom-pom to add flair.
Crochet Arms & Assembly
-
Arms: Make two small tubes in white. Stuff lightly or leave unstuffed for bendability.
-
Attach arms to sides using yarn tail and needle.
Final Assembly
-
Sew scarf around neck, hide all tails inside.
-
Secure hat on top with small stitches.
-
Embroider a smile, add rosy cheeks using blush or pink yarn!
5. Customization Ideas
Want to personalize your snowman? Here are some fun options:
| Custom Style | Ideas |
|---|---|
| Holiday Theme | Red, green, gold accessories, tiny gifts in the hands |
| Pastel Version | Soft blue, pink scarf, white glitter yarn |
| Rainbow Snowman | Multi-colored scarf and buttons, rainbow hat |
| Fantasy Style | Add wings, a wizard hat, or a tiny magical wand |
| Cozy Look | Use chunky yarn for a fluffy, oversized snowman look |
Let your creativity melt away the limits this project is your snow canvas!
6. Advanced Tips & Troubleshooting
Level up your crafting game with these expert tips:
-
Use invisible decreases to avoid bumps in your rounds.
-
Keep stitches even by relaxing your grip and maintaining light tension.
-
Use back loop only for edging or shaping the snowman’s scarf or hat brim.
-
Troubleshooting wonky shapes? Redistribute stuffing and massage corners with your fingers.
-
If pieces wobble, add weighted beans or pebbles inside the base.
-
Avoid overstuffing the neck it can stretch and distort the shape.
-
Seam parts using whip stitch for invisible joins.
7. Care Instructions
Keep your plush snowman looking spotless with proper care:
-
Hand wash gently with cool water and mild soap.
-
Squeeze not twist to remove excess water.
-
Air dry on a flat towel.
-
Store away from direct sunlight to prevent yarn fading.
-
If gifting, wrap in tissue paper and a gift box for extra love.
8. Display & Gift Ideas
This snowman is more than just a toy it’s a memory.
-
Home décor: Place it on your mantle or tabletop for a cozy winter vibe.
-
Kid’s room: A comforting plushie to hug during bedtime.
-
Desk buddy: Brighten up your work-from-home setup.
-
Seasonal ornament: Hang mini snowmen on your Christmas tree.
-
Gift idea: Add a personalized tag and wrap it in a handmade gift box.
9. Benefits of the Crochet Snowman Amigurumi Pattern
Crocheting this snowman isn’t just fun it’s fulfilling:
-
Brings mindfulness and helps relieve stress.
-
Boosts your creativity and sense of accomplishment.
-
Gives you a thoughtful, eco-friendly handmade gift option.
-
Allows emotional bonding between crafter, toy, and receiver.
Crochet is truly a craft that keeps on giving!
10. Photography & Social Media Tips
Ready to show off your snowman? Here’s how to shine:
-
Use natural light: soft daylight makes the yarn glow.
-
Add warm props: snowflakes, mini trees, or candy canes.
-
Use solid backgrounds like linen or white board.
-
Take close-ups to capture stitch details and embellishments.
-
Share your process in short reels or step-by-step photos.
11. Project Summary Table
| Category | Details |
|---|---|
| Skill Level | Beginner–Intermediate |
| Estimated Time | 6–8 hours |
| Finished Size | 10–14 inches (depends on yarn) |
| Estimated Cost | $10–15 (materials only) |
12. Conclusion
Crafting a Crochet Snowman Amigurumi Pattern is more than following stitches and patterns it’s about creating joy, building memories, and sharing warmth with others. With each stitch, you’re adding more than just yarn you’re adding love, time, and intention. Whether it’s a holiday gift, a cozy décor piece, or a lovable toy for a child, this snowman is bound to bring smiles and seasonal cheer.
So grab that yarn, pick up your hook, and let your imagination take shape. Happy crocheting!