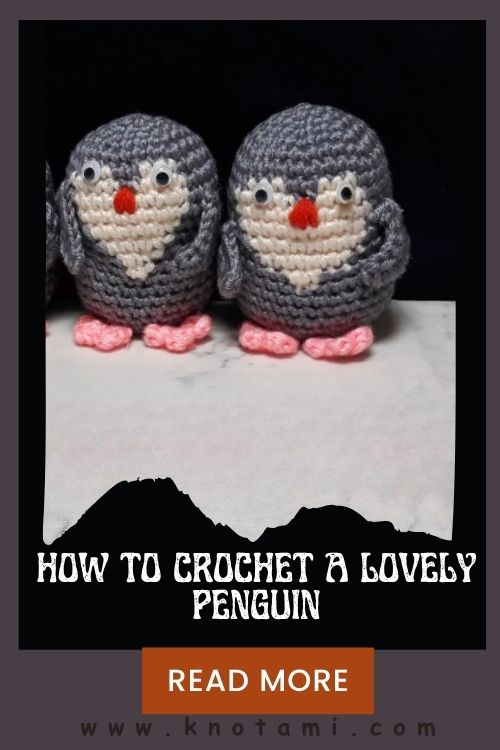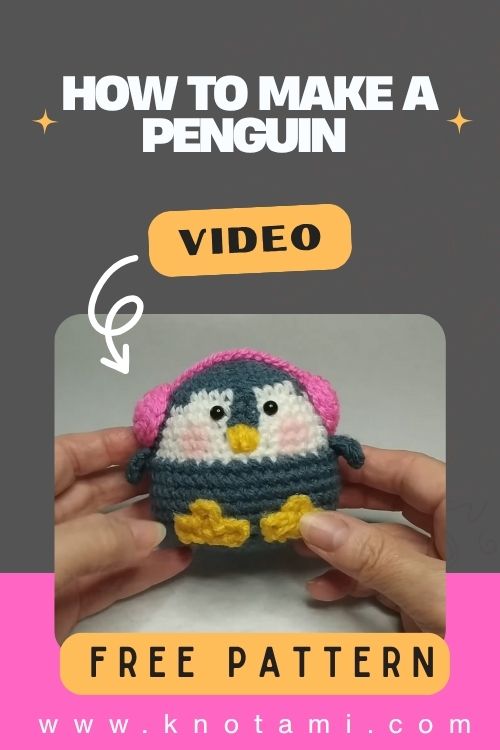
How to Make a Penguin | Adorable Crochet Amigurumi Pattern
If you’ve ever dreamed of crocheting something irresistibly cute and cozy, this How to Make a Penguin crochet amigurumi pattern will absolutely melt your heart. There’s something magical about creating your own tiny penguin soft round and full of charm that makes you smile every time you look at it. Handmade crafts like this one capture both creativity and warmth turning a simple ball of yarn into a delightful keepsake.
Crochet penguin amigurumi patterns are adored by both beginners and experienced crocheters because they combine simplicity with instant joy. Whether you’re making it as a handmade gift, a winter decoration or a playful plush for your desk, this little penguin fits perfectly into any setting. It’s quick fun and full of character.
The beauty of crocheting a penguin lies in its versatility you can play with colors, add scarves or hats or even turn it into a keychain. The adorable crochet penguin toy has become a favorite among amigurumi lovers because it captures both the whimsy of handmade art and the cozy vibe of wintertime crafting.
In this guide, you’ll learn everything step-by-step from the magic ring to finishing touches in a clear beginner-friendly way. So grab your yarn and hook, and let’s bring your penguin amigurumi to life!

Materials & Tools
Before we start crocheting our cute penguin let’s gather the supplies. Each item on this list is simple and beginner-friendly perfect for a cozy weekend project!
-
Yarn: Medium-weight (worsted) acrylic or cotton yarn works perfectly. You’ll need black (or dark grey) for the body, white for the belly, and a small amount of yellow or orange for the beak and feet.
Tip: Soft yarn makes your penguin extra cuddly! -
Crochet Hook: A 3.0 mm or 3.5 mm hook is ideal for this pattern. Smaller hooks keep your stitches tight, ensuring the stuffing won’t show through.
-
Fiberfill Stuffing: Use polyester fiberfill to give your penguin its round, plush shape. Don’t overstuff a little goes a long way!
-
Yarn Needle: Great for sewing parts together and weaving in the yarn ends neatly.
-
Scissors: For trimming yarn ends cleanly.
-
Stitch Markers: Super helpful to mark your rounds, especially when crocheting in continuous spirals.
-
Safety Eyes (optional): Use 6 mm or 8 mm eyes for a cute, expressive look. You can also embroider eyes with black yarn if you prefer a child-safe version.
-
Keychain Ring or Ribbon (optional): Perfect if you want to turn your penguin into a charm or hanging decoration.
Step-by-Step Instructions
Let’s start crocheting your adorable amigurumi penguin! Follow these easy steps and enjoy the process remember amigurumi is all about fun and creativity.
1. Start with a Magic Ring
Begin with your black yarn. Make a magic ring and crochet 6 single crochets (sc) into it. Pull the ring tight this forms the top of the penguin’s head.
2. Increase for the Head & Body
Continue crocheting in spirals:
-
Round 2: 2 sc in each stitch (12)
-
Round 3: (1 sc, 2 sc in next stitch) repeat around (18)
-
Round 4–6: Keep increasing evenly until your penguin’s head is about the size of a small plum.
This creates the adorable round shape of the body!
3. Build the Body
Once you’ve reached your desired size, crochet even rounds (no increases) to form the body’s height. Around 10–12 rounds is perfect for a small penguin.
4. Shape the Belly
Switch to white yarn and crochet 3–4 rounds to form the belly section. This color change adds the classic penguin look. Use the invisible color change method for a neat transition.
5. Add the Face
Attach safety eyes between rounds 7 and 8, about 6 stitches apart. Use yellow yarn to embroider a small triangle beak right in between the eyes.
6. Create the Wings
Using black yarn:
-
Chain 6, turn, and single crochet 5 back.
Make two identical wings and attach them to the sides of the body.
7. Make the Feet
With yellow or orange yarn:
-
Chain 4, turn, single crochet 3, and shape them slightly rounded.
Sew the two tiny feet under the body.
8. Stuff and Close
Fill your penguin gently with fiberfill stuffing. Once you’re happy with the shape, decrease each round by crocheting two stitches together until the hole closes. Fasten off and weave in the end.
9. Optional Touches
Want to make it even cuter? Add:
-
A tiny scarf or hat using leftover yarn.
-
A keychain ring on top.
-
Blush details with pink yarn or fabric paint.
And just like that your crochet penguin plush is ready to melt hearts!
Special Features & Pro Tips
Here’s what makes this penguin amigurumi pattern so special and some pro tricks to make it even better:
-
Beginner-Friendly Design: The whole project uses basic stitches single crochet increase, and decrease perfect for anyone new to amigurumi.
-
No-Sew Construction Option: You can crochet the wings directly onto the body if you prefer a cleaner seamless look.
-
Fast to Make: This penguin can be finished in under 2 hours once you get the hang of it.
-
Customizable Details: Try different yarn colors like pastel blue pink or grey for fun variations.
-
Use Stitch Markers: Keep track of your rounds easily without losing count.
-
Perfect Shape Trick: Lightly roll the stuffed body between your palms to smooth out any bumps before closing.
-
Photography Tip: For social media place your penguin on a snowy white background or near pine cones for an adorable winter aesthetic.
Uses & Creative Ideas
Once your little penguin is done, there are endless ways to enjoy it!
-
Cute Gift: Handmade penguins make heartwarming presents for friends, children, or anyone who loves plush toys.
-
Desk Buddy: Keep one by your computer it’s guaranteed to bring smiles on busy days.
-
Keychain Charm: Attach a metal ring and make it a portable piece of cuteness.
-
Home Décor: Display it on shelves, Christmas trees, or cozy winter setups.
-
Seasonal Collection: Make a family of penguins in different sizes or outfits a scarfed one a baby penguin, or even a Santa penguin for the holidays.
Handmade crochet creations like these remind us of the joy in slow crafting turning soft yarn into something filled with personality and warmth.
Conclusion
There’s something truly heartwarming about creating your own crochet penguin amigurumi. Every stitch carries creativity, care, and a bit of magic and when you hold your finished penguin in your hands, it feels like pure happiness.
Even if you’re a beginner, this How to Make a Penguin tutorial proves that you don’t need fancy skills to make something adorable and special. So grab your yarn, pour yourself a cup of tea, and let your imagination take flight (or waddle!) as you crochet your new penguin friend.
Happy crocheting and may your penguin bring warmth to your heart and home!