
There’s a special kind of magic that comes with crafting something entirely from yarn: each loop of thread, every gentle pull of the hook, draws imagination into reality. Crochet is more than a hobby it is a meditative experience, a journey of transforming soft skeins into tangible, heartwarming treasures. Whether you’re crafting alone or alongside beloved friends, the process nurtures creativity and offers a beautifully slow escape into calm and joy.
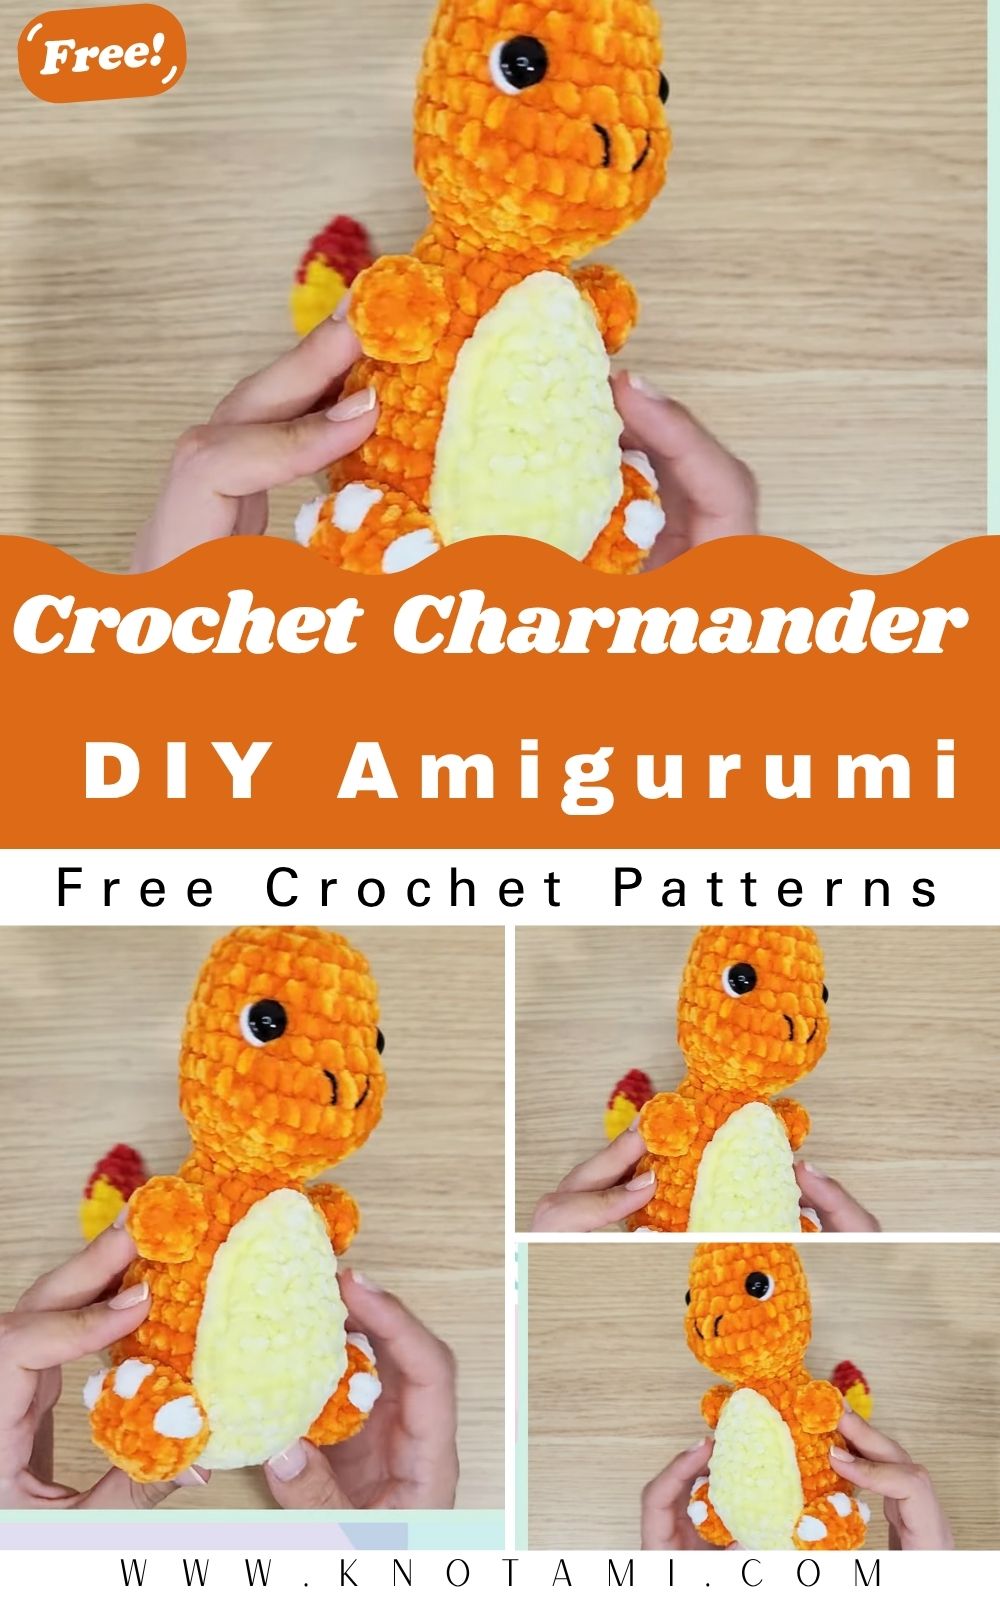
Today’s project celebrates one of the most beloved fictional creatures Charmander! This Mini Crochet Charmander Pokémon Amigurumi pattern brings a nostalgic spark to your craft table. With its iconic flame-tipped tail, round snout, and bright eyes, this handmade companion radiates pure cuteness. It stands small enough to fit on your palm but carries all the fiery charm of the original character. Whether displayed on a shelf or accompanying you wherever you go, this tiny stitched friend is guaranteed to brighten your day.
What makes this pattern particularly appealing is its flexibility for all skill levels. If you’re new to amigurumi, you’ll find the steps approachable and rewarding. If you’re experienced, you’ll enjoy the creative freedom mixing yarn types, modifying accessories, or adding personalized expressions. It’s a satisfying project that showcases both technique and imagination.
As your hands settle into the soothing rhythm of crochet, hours slip by with peaceful purpose. The sense of accomplishment when you’ve shaped the final flame and stitched on the last detail is deeply satisfying. This little Charmander becomes more than just a plush it becomes a reminder of peaceful moments and joyful crafting. Perfect for gifting, collecting, or decorating, this amigurumi invites you to slow down, savor the craft, and experience handmade artistry at its best.
Materials & Tools
Creating your miniature Charmander doesn’t require much just a few essential items and a spark of creativity.
Materials List
-
Yarn (Worsted/DK recommended):
-
Orange (body)
-
Yellow or cream (belly)
-
Red + yellow mix (tail flame)
-
-
Hook size: 2.5mm–3.5mm
-
Stuffing: Polyester fiberfill
-
Safety eyes: 6–8 mm
-
Tapestry needle (for sewing parts)
-
Scissors
-
Stitch markers
Choosing Yarn
For best results:
-
Use acrylic or cotton yarn both hold shape well.
-
Choose smooth yarn for clean stitch definition.
-
Classic Charmander colors are orange, yellow, and red, but feel free to explore imaginative palettes like pastel or neon.
The body needs enough firmness to stand proud while staying soft and cuddly.
4. Step-by-Step Crochet Instructions
Inspired by the project structure from the reference video but uniquely written from scratch.
1) Making the Head
-
Begin with a magic ring to form a seamless top.
-
Work increases in the round until a pleasing sphere size forms.
-
Insert safety eyes between early mid-rounds; adjust spacing for expression.
-
Crochet evenly for several rounds to build dimension.
-
Add light stuffing, using small amounts at a time.
-
Gradually decrease so the head closes neatly.
-
Shape slightly with your fingers, and ensure symmetry.
Tip: Add a tiny embroidered smile before full closure; it’s easier before attaching the head!
2) Forming the Neck & Upper Body
-
Continue from the head base no need to fasten off.
-
Work a slight decrease to shape the neck.
-
Add a few rounds without change to form structure.
-
Transition to gentle increases for the upper torso.
-
Stuff lightly to maintain a smooth curve.
Tip: Use stitch markers to keep track of increases and avoid leaning.
3) Building the Main Body
-
Continue increasing to reach Charmander’s belly width.
-
Switch to yellow/cream yarn for the belly panel if desired.
-
Work even rounds to shape the belly depth.
-
Start decreasing as you approach the lower body.
-
Continue stuffing to maintain firm but flexible shape.
Balance Tip: Hold the figure upright as you go adjust stuffing to keep it balanced.
4) Shaping or Attaching the Base (Legs)
Simple Leg Method:
-
Create two small tubes with tight sc rounds.
-
Stuff lightly; shape flat bottoms.
-
Sew evenly to the underside.
Base Option:
-
Create a round patch to close the underside neatly and help the plush stand.
Tip: Position legs carefully before sewing use pins to preview placement.
5) Creating Tail & Limbs
Tail
-
Crochet a slender tube in orange.
-
Fill loosely with stuffing.
-
Switch to yellow/red yarn to embroider or crochet the flame tip.
-
Curve the tail slightly for personality.
Arms
-
Crochet small tubes; lightly stuff.
-
Sew onto upper body evenly.
Tip: Adding a slight curve to arms gives playful expression.
6) Assembly & Positioning
-
Pin all body components before sewing.
-
Begin sewing from the back toward the front.
-
Check symmetry frequently.
-
Secure knots carefully and weave ends inside.
Tip: The neck area is a great place to reinforce joining; it’s hidden but sturdy.
7) Adding Final Touches
-
Add tiny embroidered nostrils.
-
Use small felt ovals for eyes or cheeks to customize look.
-
Consider a mini accessory (scarf, bow tie, or tiny Pokéball).
Finish Tip: Lightly brush yarn tips to soften appearance if using acrylic.
5. Customization Ideas
Charmander looks fabulous in many styles! Try experimenting:
Colors
-
Pastel pink or mint Charmander
-
Neon flame orange
-
Earthy tones oak brown, moss green
Yarn Types
-
Velvet yarn for plush softness
-
Variegated yarn for magical color fades
Themes
-
Holiday Charmander: Small Santa hat
-
Fantasy Charmander: Wings, mystical charm accessories
-
Rainbow Charmander: Multicolor stripes
Add-Ons
-
Tiny Pokéball
-
Backpack
-
Mini scarf or winter hat
-
Sleepy embroidered eyes
There’s no wrong way to personalize!
6. Advanced Tips & Troubleshooting
Create professional-looking amigurumi with these helpful insights:
-
Invisible decreases: Use front-loop decrease for smoother finish.
-
Even tension: Keep yarn tension consistent to prevent bulges.
-
Prevent twisting: Lay flat as you work or check after each round.
-
Fix uneven shapes: Add/remove stuffing to balance curves.
-
Proper stuffing balance: Insert in small bits for smooth, even fill.
-
Seamless joins: Use mattress stitch for clean attachment lines.
-
Color changes: Switch yarn before pulling the loop for neat transitions.
-
Pattern abbreviations: Keep a quick reference list nearby.
-
Safety eyes accuracy: Place before final head closure for easier alignment.
-
Secure sewing ends: Weave well to prevent unraveling over time.
7. Care Instructions
Handmade plushies last longest with gentle care.
-
Hand-wash in cool water
-
Use mild detergent
-
Do not soak for long
-
Squeeze water gently do not wring
-
Air-dry flat
-
Keep away from direct sunlight
-
Store in clean, dust-free space
-
Avoid pets (they love yarn!)
For gifting, consider packaging in breathable bags or boxes.
8. Display & Gift Ideas
Your Mini Charmander is endlessly versatile!
-
Home shelf display
-
Nursery décor
-
Desk companion
-
Keys or backpack charm
-
Christmas ornament
-
Birthday surprise
-
Party bag favor
-
Collector’s set piece
Pair with other handmade Pokémon for an extra special gift set.
9. Benefits of Making a Crochet Mini Charmander Pokémon
Crafting brings emotional and mental benefits too:
-
Encourages mindfulness
-
Releases stress through repetition
-
Builds fine motor skills
-
Offers meaningful sense of progress
-
Creates eco-friendly, sustainable gifts
-
Strengthens emotional bonds when gifted
-
Sparks creativity and joy
-
Inspires community connections through shared handmade art
Crochet amigurumi isn’t just a craft it’s a way to nurture calm and happiness.
10. Photography & Social Media Tips
Showcase your mini Charmander beautifully!
-
Use natural daylight
-
Shoot on wood, crochet mats, or clean pastels
-
Add props like yarn balls, plants, or tiny accessories
-
Use uncluttered backgrounds
-
Capture close-ups of textures and flames
-
Try multiple angles front, profile, holding in hand
-
Post on Instagram, Pinterest, TikTok
11. Conclusion
Creating a Mini Crochet Charmander Pokémon Amigurumi is a journey filled with gentle rhythm, creative spark, and deep satisfaction. From the first magic ring to the final stitched flame, every step allows your imagination to come alive, transforming yarn into something adorable, personal, and full of personality. Whether gifted to a devoted Pokémon fan or added to your own cherished collection, this tiny creature carries warmth, nostalgia, and cheer in every stitch.
Handmade projects like this invite us to slow down, savor simple joys, and celebrate creativity. So pick up your yarn, settle into your favorite cozy corner, and let your hands bring this fiery little friend to life. Happy crocheting and may your Charmander brighten hearts wherever it goes!