Easy Crochet Cute Rowlet Pokemon Amigurumi Pattern
Crocheting is a magical craft that allows you to transform simple yarn into tangible, heartwarming creations. Each stitch represents creativity and patience, turning a skein of yarn into something playful, adorable, and full of personality. The joy of holding a handmade plush or amigurumi is incomparable; it is the perfect blend of craft, love, and imagination, resulting in a small piece of art that can bring smiles and comfort.
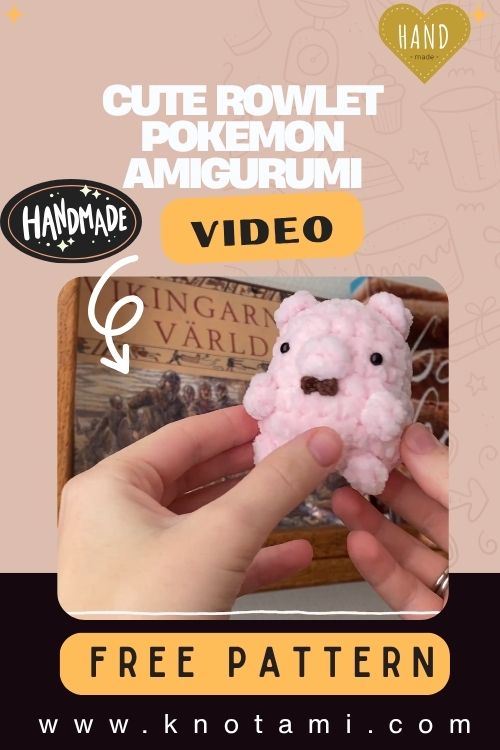
The Crochet Cute Rowlet Pokemon is a delightful project that perfectly embodies this charm. Inspired by the beloved Pokémon, Rowlet, this amigurumi plush features its round, owl-like body, tiny wings, and signature bow tie. The combination of soft yarn and carefully crocheted details makes this plush irresistibly cute, catching the attention of Pokémon fans and crochet enthusiasts alike.
This project is suitable for all skill levels. Beginners will enjoy learning essential techniques such as magic rings, single crochet, increases, and decreases, while more advanced crocheters can explore shaping, texture, and detailing. The design allows for creative freedom, enabling makers to customize colors, expressions, and even small accessories.
Beyond creating an adorable plush, crocheting the Rowlet is also a relaxing and mindful activity. The repetitive rhythm of stitches, the sense of progress as the plush takes shape, and the satisfaction of finishing a handcrafted item make it ideal for slow crafting. It is perfect for creating a handmade gift, decorating your space, or simply enjoying the process of making something from scratch.

Materials & Tools
To create your Crochet Cute Rowlet Pokemon gather the following:
-
Yarn: Light brown, cream, green, orange, and black acrylic or cotton yarn (worsted weight recommended).
-
Crochet Hook: Size G/4.0 mm or H/5.0 mm.
-
Stuffing: Soft polyester fiberfill for a plump, round shape.
-
Safety Eyes or Embroidery Thread: Black safety eyes (6–10 mm) or black yarn for eyes, optional white yarn for highlights.
-
Scissors: For clean cuts.
-
Tapestry Needle: For sewing parts together and weaving in ends.
-
Stitch Markers: To keep track of rounds and avoid twisting.
Tips for Materials:
-
Choose yarn with a smooth texture to highlight the small details.
-
Opt for contrasting colors for the beak, wings, and bow tie to make Rowlet’s features pop.
-
Even tension is key to achieving a consistent, balanced shape.
Step-by-Step Crochet Instructions
1. Making the Head
-
Start with a magic ring and crochet 6 single stitches.
-
Increase evenly in each round until the circle reaches roughly 2 inches in diameter.
-
Crochet several rounds without increasing to form the top of the head.
-
Insert safety eyes or embroider the eyes using black yarn.
-
Stuff lightly to maintain a rounded shape.
Expert Tip: Stuff gradually as you crochet to avoid lumps and create a firm, smooth surface.
2. Forming the Neck and Upper Body
-
Crochet a few rounds without increases to form the neck.
-
Slightly decrease stitches at the bottom of the head for a smooth transition to the body.
Expert Tip: Use stitch markers to maintain proper round alignment and prevent twisting.
3. Building the Main Body
-
Switch to light brown yarn for the main body.
-
Crochet in rounds, using increases and decreases to create Rowlet’s chubby, spherical shape.
-
Ensure the body is larger than the head to achieve the iconic round Pokémon look.
Expert Tip: Maintain consistent stitch tension; uneven stitches can distort the spherical shape.
4. Shaping or Attaching the Base
-
Crochet a flat circular base to help the plush sit upright.
-
Attach securely with a tapestry needle.
5. Creating the Wings, Beak, and Feet
-
Crochet two small wings and attach symmetrically on the sides.
-
Crochet a small triangular beak using orange yarn and attach under the eyes.
-
Create two tiny feet and attach at the bottom of the body for stability.
Expert Tip: Slightly curve wings or feet to give Rowlet a natural, animated posture.
6. Assembly and Positioning
-
Sew all parts securely using a tapestry needle.
-
Adjust placement carefully before final sewing for symmetry.
-
Weave in all yarn ends neatly for a polished finish.
7. Adding Final Touches
-
Add Rowlet’s signature green leaf bow tie using green yarn.
-
Embroider highlights in the eyes or subtle blush for extra charm.
-
Optionally add small accessories like tiny props or a mini scarf.
Customization Ideas
-
Alternative Color Schemes: Pastel Rowlet, rainbow-inspired, or holiday-themed colors.
-
Different Yarn Types: Soft plush or chenille yarn for extra cuddliness.
-
Themed Versions: Halloween, Christmas, or fantasy Pokémon variations.
-
Add-Ons: Tiny hats, bows, scarves, or embroidered patterns on the wings.
Advanced Tips & Troubleshooting
-
Use invisible decreases for smooth shaping transitions.
-
Maintain even stitch tension to avoid misshapen areas.
-
Prevent twists in rounds by counting stitches regularly and using markers.
-
Fix uneven shapes by strategically adding or skipping stitches.
-
Stuff evenly to balance softness with firmness.
-
Join limbs and features seamlessly using ladder stitch or whip stitch.
-
Read pattern abbreviations carefully to avoid mistakes.
-
Adjust small details like wings, feet, and bow tie before final sewing.
-
Embroider fine details with thin yarn or embroidery thread for clarity.
-
Ensure safety eyes are secure if giving to children.
Care Instructions
-
Hand wash gently with cool water and mild detergent.
-
Air dry flat to preserve shape.
-
Avoid direct sunlight to prevent color fading.
-
Store in a cool, dry space to prevent dust and damage.
-
Reshape plush after washing to maintain round, chubby proportions.
Display & Gift Ideas
-
Home Décor: Display on shelves, desks, or bedside tables.
-
Kid’s Room Accessory: A soft, safe companion for children.
-
Desk Companion: Adds playful charm to workspaces.
-
Holiday Ornament: Mini Rowlet plushes can be seasonal décor.
-
Personalized Gift: Perfect for Pokémon fans, children, or crochet enthusiasts.
Benefits of Making Crochet Cute Rowlet Pokemon
-
Relaxation & Mindfulness: Crocheting encourages focus and mental calm.
-
Stress Relief: Repetitive stitching alleviates tension and fosters relaxation.
-
Sense of Accomplishment: Completing each part is satisfying.
-
Eco-Friendly & Sustainable: Handmade gifts reduce reliance on mass-produced items.
-
Emotional Connection: Handmade creations carry thoughtfulness and personal touch.
Photography & Social Media Tips
-
Use natural daylight for vibrant, accurate colors.
-
Include props like yarn balls, baskets, or small Pokémon figures.
-
Soft, neutral backgrounds highlight Rowlet’s colors and textures.
-
Take close-up shots to emphasize stitches and facial details.
-
Experiment with angles to showcase round body shape and wings.
Conclusion
Creating the Crochet Cute Rowlet Pokemon is a fulfilling and enjoyable project that combines creativity, patience, and love for crochet. Each stitch brings this adorable Pokémon to life, resulting in a plush that is perfect for gifting, display, or personal collection. Whether you’re a beginner learning the basics or an advanced crocheter looking to refine your skills, this amigurumi pattern offers the perfect balance of challenge and delight. Embrace the soothing rhythm of crocheting, explore your creativity, and enjoy the satisfaction of transforming yarn into a soft, charming Rowlet that brings joy to anyone who sees it.
