
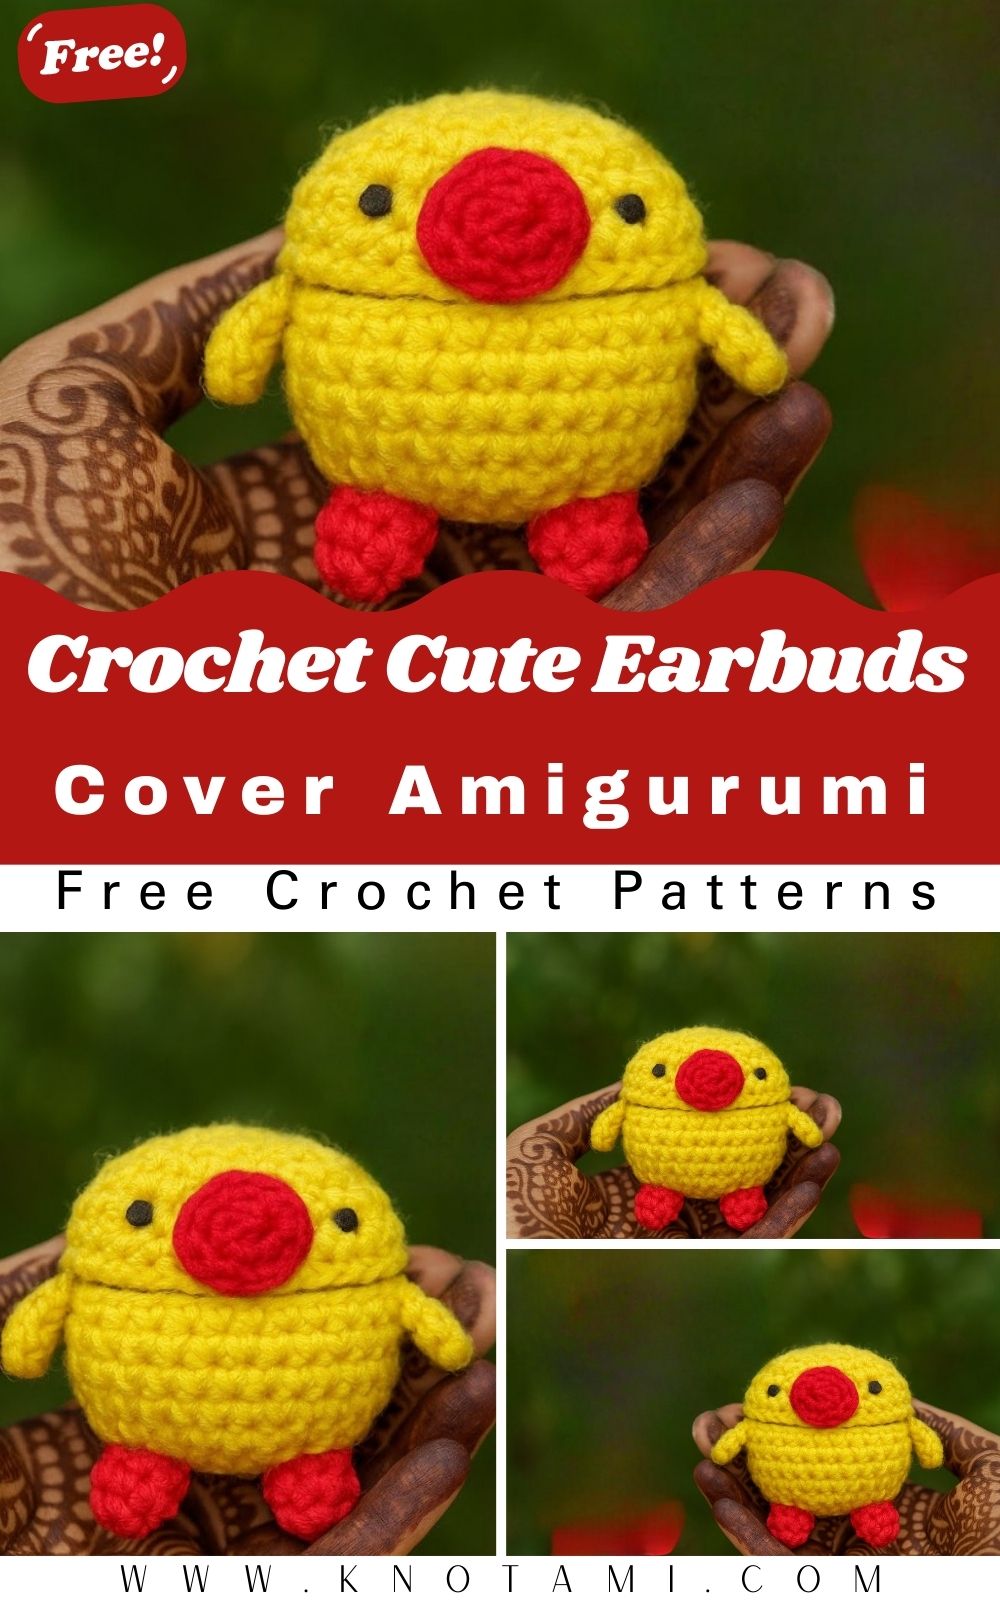
If you are looking for a way to add some personality to your tech, you have come to the right place. Creating a crochet earbuds cover amigurumi is a fantastic project because it combines functionality with pure cuteness. You can transform a plain, slippery plastic case into a soft, textured masterpiece that feels great in your hand. This project is perfect for using up small amounts of yarn while creating something that you will actually use every single day. Furthermore, it makes for a thoughtful, handmade gift for your friends or family members who never leave home without their music.
In this guide, you will learn how to master the stitches needed to fit your AirPod Pro perfectly. We will go over everything from the specific yarn colors used by the experts to the little tricks that keep the cover from sliding off. Because this is an amigurumi style project, the focus is on tight, clean stitches that give the case a professional look. You will find that the process is quite meditative and satisfying as you watch the rows build up. Let’s get your hooks ready and dive into the world of handmade tech protection!
After watching the embedded video above, you will have a much clearer picture of how the stitches should look. The video acts as a perfect visual companion to the written instructions provided below. Consequently, if you ever feel stuck on where to place your hook, you can simply scroll back up and re-watch the specific timestamp. Seeing the hand movements in real-time ensures that you won’t miss any of the subtle increases or decreases that create that snug, custom fit for your device.
Skill Level: Intermediate Beginner
This project is classified as an intermediate beginner level. While it primarily uses the single crochet stitch, you will need to be comfortable with working in the round and performing increases. Additionally, the assembly requires some basic sewing skills to join the top and bottom pieces together. However, do not be intimidated because if you can follow a pattern, you can certainly finish this beautiful crochet earbuds cover amigurumi.
Tutor’s Expert Suggestions
To achieve the best results, our tutor suggests paying close attention to your tension. If you crochet too loosely, the case might feel baggy and slide around. Therefore, keeping your stitches tight is essential. Another great tip is to use the specific yarn mentioned in the video, which is the 6th color of Idoll yarn, as it provides the perfect thickness. Furthermore, always use a stitch marker. It is very easy to lose your place when working in continuous rounds, and the marker acts as your North Star throughout the process. Finally, don’t skip the anti-slip stickers! They are the secret ingredient to making sure your hard work stays firmly attached to the AirPod case.
Materials Needed for Your Project
Before you start, make sure you have all your supplies organized on your workspace. You will need:
-
Crochet Hook: 2.50mm (though the tutor uses 2.20mm for a tighter fit, 2.50mm is recommended for most).
-
Yarn: Idoll yarn (Color #6 or your favorite alternative).
-
Stitch Marker: Essential for tracking the start of your rounds.
-
Tapestry Needle: For weaving in ends and sewing pieces together.
-
Scissors: For clean cuts.
-
Anti-Slip Stickers: To fix the crochet fabric to the plastic case.
Step-by-Step Guide to Your Crochet Earbuds Cover Amigurumi
Phase 1: Creating the Base (Bottom Part)
Initially, you will start by making 10 foundation chain stitches. Once you have your chain, make one extra chain to serve as your turning chain. Now, perform a single crochet in the 10th stitch from the hook. At this point, place your stitch marker in that first stitch so you don’t lose it. Proceed to do 1 single crochet in each of the next 9 stitches.
To turn the corner, you will work 2 single crochets into the same end stitch. This creates a rounded edge. Continue back down the other side of the chain by placing 1 single crochet in each of the 9 stitches. Finally, place one more single crochet in the very first stitch to balance the increase. Slip stitch to the first stitch to close the round.
Phase 2: Building Height
Chain 1 and then place 2 single crochets in the first stitch. Work 1 single crochet in each of the next 8 stitches. To create the wide curve of the AirPod Pro, you must do 2 single crochets into one stitch, repeating this 6 times around the curve. Then, work 1 single crochet in each of the next 8 stitches. Finish the round with 2 single crochets in each of the remaining 4 stitches. Slip stitch to close.
From the 3rd round to the 6th round, you will simply work 1 single crochet in each of the 28 stitches. This builds the walls of the bottom case. Once you reach the end of the 6th round, cut your yarn and leave a small tail to weave in later. You have now completed the bottom half of your crochet earbuds cover amigurumi.
Phase 3: The Top Cover (Lid)
The lid starts with 11 chain stitches. Work 3 single crochets into the first stitch to create a rounded top. Proceed with 1 single crochet in each of the next 2 stitches. To accommodate the hinge, chain 4 and skip a few stitches, then place a single crochet in the 3rd stitch.
Following this, work 3 single crochets into the end stitch to round the other side. You will continue to build the lid by repeating the increase patterns similar to the base. Specifically, you will work through rounds 4 to 10 by doing 28 single crochets in each round. This ensures the lid is deep enough to cover the top of the AirPod case completely.
Phase 4: Assembly and Finishing
Now that both pieces are finished, it is time to check the size. Slide your AirPod Pro into the bottom and top pieces. If they fit well, use your tapestry needle to hide any loose threads by sewing them into the back of the stitches.
To join the two pieces, move 3 stitches to the left from the center back. Sew the pieces together using the back loops only. This creates a functional hinge that allows the case to open and close smoothly. Finally, apply your anti-slip stickers to the inside of the crochet fabric and press them firmly onto the plastic case. Your crochet earbuds cover amigurumi is now complete!
Where Can You Use This Case?
This crochet earbuds cover amigurumi is not just for show; it is highly practical. You can use it while commuting on the train to protect your case from scratches in your bag. Additionally, it is perfect for students who want to distinguish their AirPods from their classmates’ identical white cases. If you are a traveler, the soft texture makes it easier to grip, reducing the chance of dropping it on a hard airport floor. Essentially, anywhere you take your music, this cover can go too, adding a layer of protection and a touch of home-made charm to your tech.
Tips and Tricks for Success
-
Count Your Stitches: Always count your stitches at the end of every round to ensure you still have 28. If the count is off, the case will be lopsided.
-
Use High-Quality Yarn: Cotton or cotton-blend yarns work best because they don’t stretch as much as acrylic, which helps the case stay snug.
-
Tension Control: If you are a loose crocheter, try using a smaller hook than the 2.50mm suggested.
-
Stitch Markers are Key: Do not rely on your memory; the marker is the only way to be sure of your round transitions.
-
Invisible Join: For a professional look, research the “invisible join” technique for the final slip stitch.
Common Mistakes to Avoid
One common mistake is skipping the anti-slip stickers. Because crochet fabric is naturally flexible, it will eventually slide off the smooth plastic of the AirPod case without some form of grip. Another error is making the foundation chain too tight. If the first row is too tight, the bottom of the case will curve inward too much and won’t sit flat. Also, many beginners forget to work in the back loops only during the sewing phase. If you sew through both loops, the hinge will be bulky and might prevent the case from opening all the way.
Frequently Asked Questions (FAQs)
Q1: Can I make this for regular AirPods instead of the Pro version?
Yes, but you will need to reduce the number of foundation chains. Since the regular AirPod case is narrower, starting with 6 or 7 chains usually works better.
Q2: What if I don’t have anti-slip stickers?
You can use a small dab of washable fabric glue or even thin double-sided tape. However, stickers are the cleanest option and won’t leave a permanent residue.
Q3: Is the Idoll yarn necessary?
Not at all. You can use any “Fine” or “Sport” weight yarn (Category 2 or 3). Just make sure it matches the 2.50mm hook size for the best results.
Q4: How do I clean my crochet earbuds cover amigurumi?
You should remove the cover from the AirPods first. Hand wash it in cool water with a tiny bit of soap, then let it air dry completely before putting it back on.
Q5: My case feels too big, what should I do?
If it is only slightly big, you can try shrinking it slightly with steam. If it is significantly big, you should restart with a smaller hook size like the 2.20mm mentioned in the video.
Final Thoughts on Your Handmade Journey
Taking the time to create a crochet earbuds cover amigurumi is a rewarding experience that blends modern technology with traditional craft. By following these steps, you have created a unique accessory that reflects your personal style. Moreover, you have learned valuable skills in amigurumi construction that you can apply to future projects. Remember that every stitch you made contributed to a more durable and beautiful home for your earbuds. Keep practicing, keep hooking, and enjoy the many compliments you will surely receive on your new handmade case! Writing this guide has been a pleasure, and I hope your project turns out exactly as you imagined. Happy crocheting!