Easy Crochet Kawaii Mushroom Boi Amigurumi Pattern Toy
There’s a quiet kind of magic in taking a skein of yarn and turning it into something full of personality. Crochet is a tactile meditation: your hook moves in a steady rhythm, loops become texture, and before you know it you’re holding a tiny handmade friend. That satisfying moment when you finish a piece when it smiles back at you with button eyes or embroidered cheeks is why so many of us keep a hook within reach.
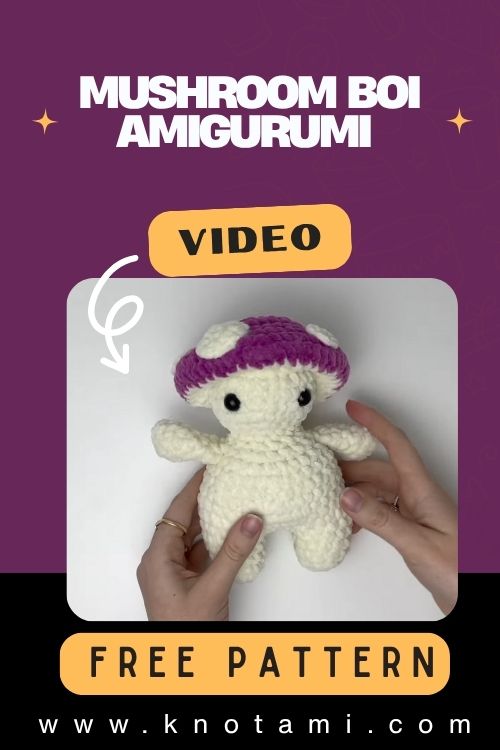
Meet the Crochet Kawaii Mushroom Boi: a plump, adorable mushroom character with big kawaii eyes, a cute blush, and tiny limbs that give it irresistible charm. This project balances simplicity and sweet design, making it perfect for anyone who loves small amigurumi projects. It’s compact, quick to make, and full of opportunities for creative customization striped caps, pastel bodies, or silly props like little scarves or crowns.
This pattern is beginner-friendly but still fun for advanced crocheters. You’ll practice core amigurumi skills working in the round, increases and decreases, simple shaping, and neat assembly while leaving room to experiment with texture, color, and accessories. The result is a polished, photogenic toy that’s perfect for gifting, collecting, or keeping on your desk for a daily smile.
Beyond the finished toy, crocheting the Kawaii Mushroom Boi is relaxing. The repetitive motion clears the mind, small visible progress keeps you motivated, and the final handmade object carries a personal warmth that store-bought items can’t match. Ready? Grab your hook and let’s make something cute.

Materials & Tools
Gather these supplies before starting to make your Crochet Kawaii Mushroom Boi.
-
Yarn:
-
Main cap color (e.g., red, pink, or pastel blue) worsted weight (#4) recommended.
-
Under-cap and body color (cream, beige, or light gray).
-
Accent color for spots, cheeks, or details (white, blush pink).
-
-
Hook: 3.0 mm–3.5 mm (use smaller than recommended yarn hook if you want tight amigurumi fabric).
-
Stuffing: Polyester fiberfill (a small bag will do).
-
Safety eyes: 8 mm–12 mm for an expressive kawaii look; alternatively embroider eyes for baby-safe toys.
-
Scissors and tapestry needle for sewing and weaving ends.
-
Stitch markers to mark the start of rounds.
-
Optional: blush/pastel pencils for soft cheek shading, small keychain hardware, or felt for tiny accessories.
Yarn & color advice: Smooth acrylic or cotton yarn shows stitches clearly and is easy to sew. Fuzzy or plush yarn gives a cuddly finish but hides stitch definition great for a squishy mushroom. For the classic mushroom boi, pair a bold cap (red/pink) with a soft neutral body and bright white spots for contrast.
Abbreviations & Notes
-
ch chain
-
sc single crochet
-
inc increase (2 sc in next stitch)
-
dec or sc2tog decrease (single crochet two together)
-
sl st slip stitch
-
Work in continuous rounds (spiral) unless stated; use a stitch marker.
-
Numbers in parentheses at the end of each round indicate total stitches.
Step-by-Step Crochet Instructions
Below is a clear, beginner-friendly step-by-step pattern for the Kawaii Mushroom Boi. Make sure to keep your tension slightly tight so stuffing doesn’t show.
1. Making the Cap (Top of the Mushroom Boi)
The cap is worked flat as a circle and then shaped into a bowl.
-
Magic ring, 6 sc into ring. (6)
-
R2: inc around. (12)
-
R3: (1 sc, inc) ×6. (18)
-
R4: (2 sc, inc) ×6. (24)
-
R5: (3 sc, inc) ×6. (30)
-
R6: (4 sc, inc) ×6. (36)
-
R7–R9: sc around (36) these rounds build depth of the cap.
-
If you want a wider cap, add one more increase round earlier. Stop when the diameter looks right for your desired boi size (about 3–5 inches depending on yarn/hook).
Adding spots: With contrasting yarn (white is classic), embroider or crochet tiny dots (make small rounds of 6 sc in a magic ring, fasten off, and sew on). Place spots evenly and playfully across the cap kawaii characters look best with asymmetric, whimsical placement.
2. Making the Under-Cap & Rim
To form the underside and rim that connects to the body:
-
Join undercap color to edge of cap.
-
R1: sc around the edge (36).
-
R2: sc around (36) or do one round of BLO (back loop only) to create a visible rim.
-
Optional: HDC (half double crochet) round for a thicker brim.
This creates the brim that will sit where the cap meets the mushroom’s head/body.
3. Building the Head & Upper Body
Work the head and body as a sphere/cylinder in the undercap color.
-
Magic ring, 6 sc. (6)
-
R2: inc around. (12)
-
R3: (1 sc, inc) ×6. (18)
-
R4: (2 sc, inc) ×6. (24)
-
R5–R8: sc around (24) build head height. Insert safety eyes between rounds 6–7 approximately 6–8 sts apart for a kawaii expression (adjust spacing to taste).
-
R9: (2 sc, dec) ×6. (18)
-
R10: (1 sc, dec) ×6. (12) this creates neck taper.
-
Continue to sc around to form the torso (adding rounds to reach desired body length), then slowly increase to create a soft belly if you want a more stout boi.
Stuffing: Stuff head firmly but not overstuffed. Add stuffing gradually as you go so it settles evenly.
4. Shaping the Lower Body & Base
-
After torso rounds, start decreasing to create a rounded base: (1 sc, dec) until about (12 sts).
-
Close with sc2tog until hole is nearly closed. Leave a tail for sewing if you plan to attach the cap separately. You can choose to seam cap and body together or sew them after both are finished.
5. Arms and Legs (Make 2 each)
Arms (make 2): Simple tubes that are sewn to the sides.
-
Magic ring, 6 sc. (6)
-
R2–R5: sc around (6) for a short arm. Stuff lightly. Flatten top and sew to side near the upper body.
Legs (make 2): Slightly wider than arms.
-
Magic ring, 8 sc into ring. (8)
-
R2–R6: sc around (8) longer rounds for short legs or fewer rounds for stubby feet. Slightly stuff and sew to the base.
Feet shaping: To create a rounded foot, add a round of increases then decrease at the toe in final rounds, or flatten and sc across both layers for a flat base.
6. Making the Face & Kawaii Features
-
Eyes: Insert safety eyes between rounds 6–7. Add a tiny white embroidered stitch on the eye for a kawaii sparkle. If using embroidered eyes, stitch a small oval and add white highlight thread.
-
Blush: Use pink yarn to stitch a small oval or use pastel pencils lightly on the cheeks (test on scrap yarn).
-
Smile: Embroider a small curved smile beneath the eyes with darker yarn for contrast. Tiny mouth = extra cute.
7. Assembly & Positioning
-
If cap and body are separate, center the cap on the head and stitch around the rim with matching yarn. Take matching loops from cap and head so seam is neat and invisible.
-
Sew arms symmetrically at shoulder height. Pin first to test placement.
-
Sew legs at the bottom ensuring boi sits balanced adjust stuffing or foot placement if it tips.
-
Attach any additional accessories (mini scarf, tiny backpack, mushroom buddy).
Balancing tip: If your amigurumi leans or won’t stand, add a small felt circle in the base or a few glass seed beads inside a small patch sewn into the lower body for weight.
Final Touches & Accessories
-
Tiny hat ribbon: Wrap a small ribbon around the cap rim and secure with a stitch.
-
Micro props: Crochet a petite sign, a star, or a tiny flower to give personality.
-
Keychain version: Stitch a small loop into the top seam and attach a keyring for a portable Mushroom Boi.
Customization Ideas
Personalize your Crochet Kawaii Mushroom Boi with these creative ideas:
-
Color palettes: Pastel Kawaii soft pink cap + cream body; Retro mustard cap + forest green spots; Neon bright color blocking for playful decor.
-
Yarn textures: Use plush yarn for a squishy boi; use cotton for a more sculpted look.
-
Size variations: Use DK yarn and 3.0 mm hook for a smaller boi, or bulky yarn and a 5.0 mm hook for a large plush.
-
Theme mashups: Make a “wizard boi” with a starry cape, a “holiday boi” with a tiny Santa hat, or a “space boi” with embroidered constellations.
-
Buddy sets: Create a mama mushroom, baby mushroom, or a mushroom family with matching color schemes.
Advanced Tips & Troubleshooting (8–10 Expert Tips)
-
Invisible decrease (dec): Use front-loop decreases to make shaping smooth (insert hook into front loop of next two sts and complete sc).
-
Even tension: Relax your grip and practice with a small swatch before starting tight stitches are key for amigurumi.
-
Preventing twist in rounds: Use a stitch marker and move it every round; recount often.
-
Fixing uneven shapes: Remove a few stitches, adjust stuffing, and resew if a section bulges.
-
Proper stuffing balance: Stuff in stages head, neck, torso so you can sculpt the shape as you go.
-
Seamless joining: Use ladder stitch or mattress stitch for joining pieces invisibly when possible.
-
Aligning spots and features: Lay cap and spots on a flat surface and arrange before sewing to avoid uneven placement.
-
Weaving ends securely: Thread the yarn tail through a tapestry needle and weave back and forth through multiple rounds to lock it.
-
Eye security: Use safety eyes with washers; for toys for small children, embroider eyes instead.
-
Blocking: Gently steam or shape pieces when slightly damp to even out stitches; test heat tolerance of yarn first.
Care Instructions
To keep your Crochet Kawaii Mushroom Boi looking adorable:
-
Hand wash in cool water with mild detergent.
-
Spot clean small stains with a damp cloth.
-
Air dry flat, reshaping while damp.
-
Avoid sunlight to prevent fading.
-
Storage: Store in a breathable bag; avoid plastic for long-term storage to prevent mildew.
Display & Gift Ideas
-
Home décor: Line a tiny shelf with a mushroom family for a woodland vignette.
-
Desk companion: Brighten your workspace small amigurumi make great mood boosters.
-
Nursery décor: Make a soft, baby-safe version without safety eyes.
-
Holiday ornament: Sew a loop into the cap seam and hang it as a tree decoration.
-
Handmade gift: Personalize with a ribbon or embroidered initial for a thoughtful present.
Benefits of Making Crochet Kawaii Mushroom Boi
Creating this little amigurumi brings more than a cute object:
-
Relaxation & mindfulness: Repetitive stitching reduces stress and promotes calm.
-
Creative joy: Small projects are quick wins that build confidence.
-
Sustainable gifting: Handmade items are personal and eco-friendlier than mass-produced toys.
-
Emotional connection: Gifting a handmade Mushroom Boi carries time and care priceless for recipients.
Photography & Social Media Tips
Share your cute Mushroom Boi with style:
-
Lighting: Photograph in natural window light for soft, even tones.
-
Background: Use neutral or wood backgrounds to make colors pop.
-
Props: Add yarn, hooks, or tiny plants to create cozy scenes.
-
Close-ups: Capture stitch detail and kawaii facial features
Project Summary Table
| Category | Details |
|---|---|
| Skill Level | Easy / Intermediate |
| Estimated Time | 3–8 hours (depending on size & details) |
| Finished Size | 3–6 inches (depending on yarn & hook) |
| Estimated Cost | $5–20 |
Conclusion
The Crochet Kawaii Mushroom Boi is a small, delightful project that delivers big smiles. It’s an ideal introduction to amigurumi for beginners and a satisfying, customizable make for experienced crocheters. From shaping the round cap to embroidering that cheeky smile, every stitch contributes to a tiny character full of personality. Make one as a quick gift, a portable happy charm, or a starter piece to a whole mushroom family.
Pick your favorite yarn, cue a cozy playlist, and enjoy the gentle rhythm of crochet. With each loop you create something warm, handmade, and uniquely yours one adorable Mushroom Boi at a time.