

There’s a special kind of calm that settles in when I curl up with a ball of yarn and a hook. The gentle rhythm, the quiet focus, the way a few simple stitches turn into something soft and cheerful, it’s the kind of creative therapy I look forward to at the end of a long day. Handmade pieces carry a warmth and personality you can feel, like a little hug woven right into the fabric.
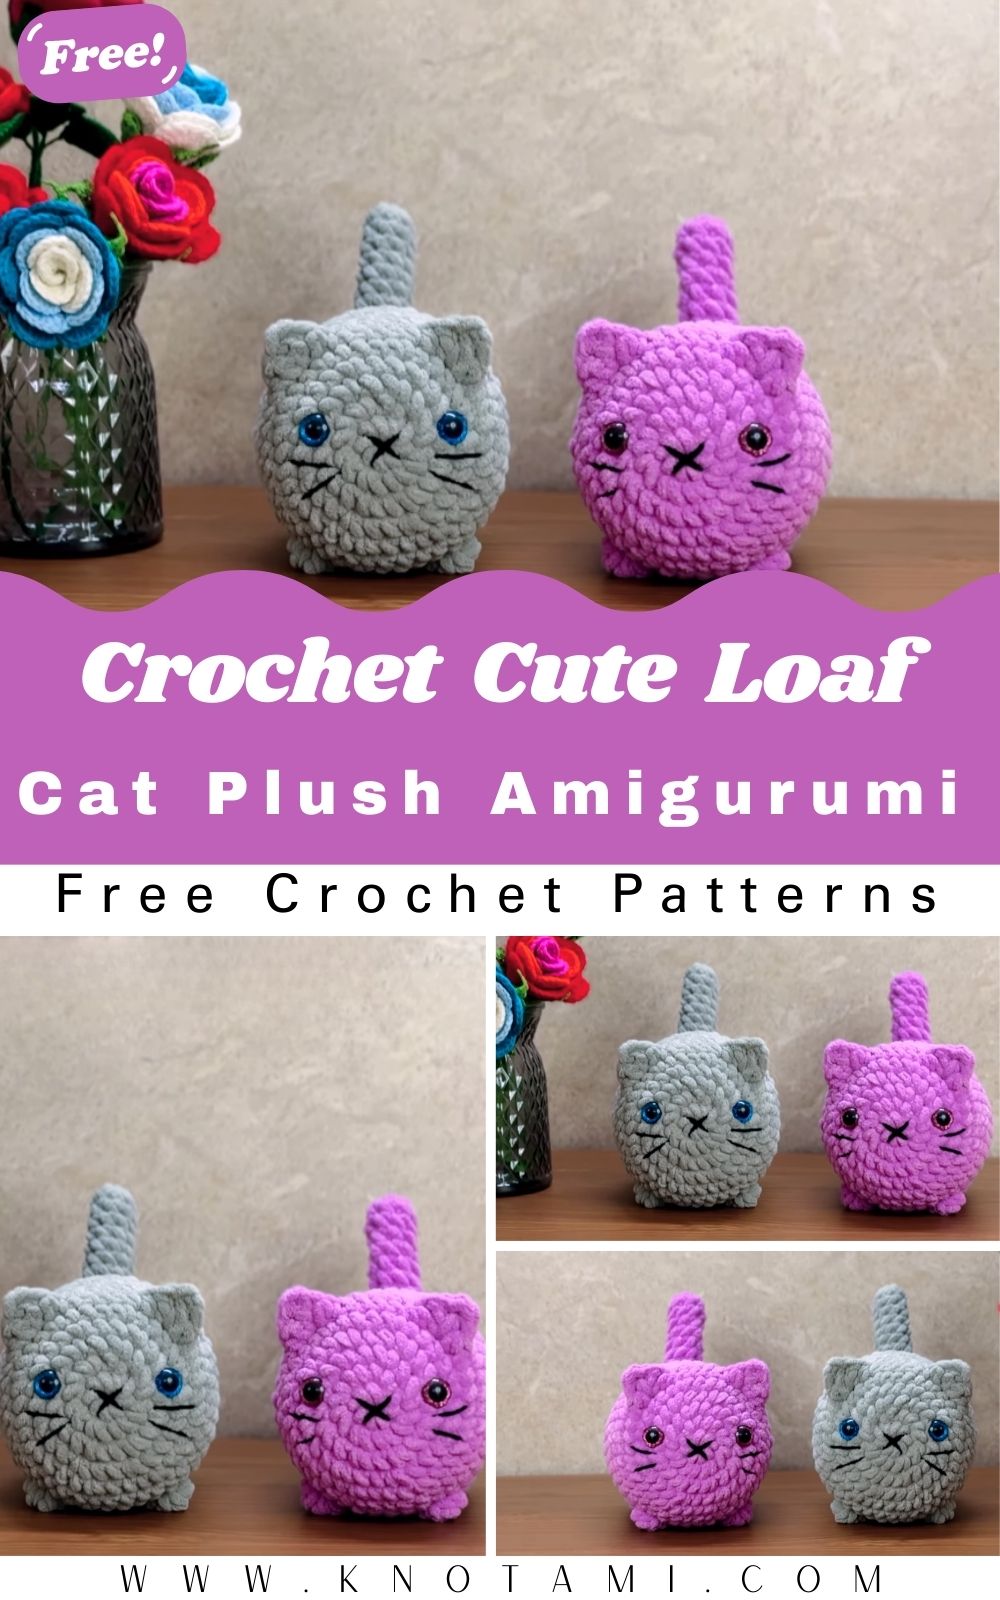
One of my favorite make-and-smile projects is this charming loaf-shaped kitty plump, paw-tucked, and delightfully squishy. The DIY Cute Crochet Loaf Cat Plush Amigurumi Project captures that iconic “bread loaf” pose every cat lover knows by heart. With its rounded body, tiny ears, and sweet, sleepy expression, this cuddly companion is as photogenic as it is huggable, perfect for gifting, displaying, or keeping by your side while you sip tea.
Materials & Tools
What You’ll Need
Here’s everything required to make your Crochet Loaf Cat Plush Amigurumi:
-
Yarn:
-
Main Color: Beige, cream, gray, or orange (for the cat’s body)
-
Accent Color: Pink or white (for nose, ears, and cheeks)
-
Optional: Contrasting yarn for stripes or patterns
-
-
Yarn Weight: Medium (4) worsted-weight yarn or soft velvet yarn for a plush look
-
Crochet Hook: 3.0 mm for regular yarn, or 4.0 mm for plush yarn
-
Stuffing: Polyester fiberfill or soft cotton filling
-
Safety Eyes: 8 mm to 10 mm (or embroider eyes for a safe alternative)
-
Tapestry Needle: For sewing and embroidery
-
Scissors: For clean finishing
-
Stitch Markers: To mark rounds and shaping points
Choosing Yarn & Colors
For a classic look, go for solid pastel tones like cream, gray, or tan. For a fun twist, mix multi-colored or variegated yarns to mimic real cat patterns like tabby stripes, calico spots, or tuxedo markings. If you prefer ultra-soft plushies, use Chenille or velvet yarn for that squishy, huggable feel.
Tip: Avoid overly slippery yarns when making small amigurumi parts, as they can make shaping tricky.
Step-by-Step Crochet Instructions
The pattern is worked in the round, mostly using single crochets (sc). This tutorial breaks it into easy, digestible sections.
Making the Head
-
Round 1: Create a magic ring and make 6 sc. (6)
-
Round 2: 2 sc in each stitch. (12)
-
Round 3: (1 sc, inc) around. (18)
-
Round 4: (2 sc, inc) around. (24)
-
Round 5–8: sc in each stitch (24). Thisforms the rounded head shape.
-
Round 9: (2 sc, dec) around. (18)
-
Round 10: (1 sc, dec) around. (12)
-
Round 11: Decrease around to close. (6)
Stuff firmly as you go, making sure the head feels soft but holds its shape.
Pro Tip: Place the safety eyes between rounds 5 and 6, about 5 stitches apart. Use a small bit of pink yarn to embroider the nose and a few lines for whiskers.
Forming the Loaf Body
This is where your cute cat loaf takes form, the slightly rectangular body with rounded corners.
-
Round 1: Magic ring, 6 sc.
-
Round 2: Inc in each stitch (12).
-
Round 3: (1 sc, inc) repeat (18).
-
Round 4: (2 sc, inc) repeat (24).
-
Round 5–12: sc around (24). This creates the loaf’s height.
-
Round 13: (2 sc, dec) around (18).
-
Round 14: (1 sc, dec) around (12).
Stuff evenly, shaping it into a soft rectangular pillow.
Shaping Tip: Slightly flatten the bottom before closing so your loaf sits flat and won’t roll over.
Attaching the Head to the Body
Using your tapestry needle, sew the head to the front center of the loaf body. Make sure it’s aligned straight and slightly tilted upward for a cute, curious expression.
Joining Trick: To avoid a visible seam, weave the needle through the front loops only when attaching parts.
Adding Ears
Ears (make 2):
-
Chain 3.
-
Sc in 2nd chain, hdc in next, fasten off.
-
Leave a long tail to sew onto the head.
Attach ears symmetrically, one on each side, near the top corners of the head. Slightly curve them forward for extra cuteness.
Making the Tail
-
Chain 8.
-
Sc in each chain back.
-
Fasten off, leaving a long tail for sewing.
-
Attach the tail to the back or side, slightly curled upward.
Customization Tip: You can embroider stripes or use two yarn colors twisted together for a realistic tail look.
Adding Paws (Optional)
To mimic the loaf pose, add two small front paws:
-
Magic ring with 6 sc.
-
Sc around for 2 rounds.
-
Stuff lightly and sew near the front bottom.
You can skip the back paws, return to the loaf form, they’re tucked in!
Final Assembly & Details
-
Attach all parts firmly.
-
Embroider sleepy eyes or curious open eyes
-
Add pink blush circles using felt, embroidery, or pastel chalk.
-
Use white yarn to create subtle fur highlights if desired.
Customization Ideas
Crochet is all about creativity. Make your Loaf Cat Plush reflect your personality!
Color & Theme Ideas
-
Classic Cat: Gray or cream with a white muzzle and a pink nose.
-
Tabby: Mix brown, tan, and black yarns for stripes.
-
Fantasy Cat: Try pastel rainbow yarn for a dreamy look.
-
Holiday Cat: Red-and-green scarf for Christmas or a pumpkin orange costume for Halloween.
-
Galaxy Cat: Use black or dark purple yarn with specks of silver thread for a magical night-sky look.
Yarn Variations
-
Velvet Yarn: For soft, plush texture.
-
Cotton Yarn: For clean stitch definition.
-
Acrylic Yarn: For easy care and budget-friendly crafting.
Accessories
-
Mini scarf, bowtie, or bell collar.
-
Tiny crochet fish or yarn ball beside it.
-
A miniature blanket underneath for a cozy catnap corner.
Creative Idea: Turn your loaf cat into a series, The Bread Loaf Collection,n including a chocolate cat loaf, strawberry cat loaf, and cream puff loaf!
Advanced Tips & Troubleshooting
Even if you’re a crochet pro, these expert tips will help you perfect your plush:
-
Invisible Decreases: Always insert the hook into the front loops only for a seamless look.
-
Keep Tension Consistent: Uneven tension can distort your loaf’s symmetry.
-
Use Stitch Markers: Mark the start of each round to stay on track.
-
Avoid Twisting Rounds: Ensure your first stitch always aligns vertically with the previous round.
-
Shape as You Stuff: Add stuffing slowly, shaping as you go.
-
Seamless Joins: Sew parts through the inside loops only for invisible attachment.
-
Use Blush Safely: If adding pastel or makeup blush, apply with a small brush and avoid water contact.
-
Pattern Reading: Familiarize yourself with abbreviations like sc (single crochet), incincrease,a nd dec decrease.
-
Fix Uneven Shapes: Use steam blocking to gently reshape your finished cat.
-
Keep Fur Neat: Trim any yarn fuzz carefully with small scissors for a tidy finish.
Care Instructions
Your adorable loaf cat deserves love and care!
-
Wash Gently: Hand wash only in lukewarm water with mild detergent.
-
Avoid Soaking: Dip and squeeze gently; do not twist.
-
Drying: Press lightly with a towel, reshape, and air dry flat.
-
No Heat: Avoid dryers or direct sunlight to prevent yarn fading.
-
Storage: Keep in a cool, dry place, preferably on a shelf away from dust.
Bonus Tip: Store your plush in a mesh bag when traveling to keep it clean and fluffy.
Display & Gift Ideas
There are so many ways to display and share your Crochet Loaf Cat Plush:
-
Home Décor: Place it on your bed, sofa, or bookshelf.
-
Kids’ Room: Makes a safe and cuddly play companion.
-
Desk Buddy: Brightens up your workspace instantly.
-
Gift Idea: Perfect for birthdays, cat lovers, or handmade gift exchanges.
-
Seasonal Display: Add themed props for the holiday, such as a Santa hat, Easter bow, or spooky bat wings.
Gift Packaging Idea: Wrap your loaf cat in a small kraft box lined with tissue paper, and include a handwritten Handmade with Love tag.
Benefits of Crochet Loaf Cat Plush
Crochet isn’t just an art, it’s therapy. Here’s what makes this project so rewarding:
Mindfulness & Relaxation
The repetitive motion of crocheting helps quiet your thoughts and promotes focus, a meditative experience that brings calm.
Stress Relief
Feeling anxious or tired? Creating something cute by hand releases dopamine, easing your mind with each stitch.
Sense of Accomplishment
Finishing a plush project gives a real sense of pride. Holding your completed cat is proof of patience turned into art.
Eco-Friendly Gifting
Handmade gifts reduce waste and carry a personal touch that store-bought products can’t match.
Emotional Connection
Every handmade item carries a bit of your heart. Whether you gift it or keep it, this loaf cat will always be a piece of you.
Photography & Social Media Tips
Show off your adorable Loaf Cat online with these photography tricks!
-
Lighting: Use soft daylight near a window for natural shadows.
-
Backgrounds: Choose simple ones, hite, pastel, or wooden surfaces.
-
Props: Add yarn balls, coffee mugs, or mini plants for cozy vibes.
-
Angles: Take flat lays, side profiles, and close-up shots of the face.
-
Focus: Highlight the plush texture and tiny details.
-
Editing: Keep it bright but natural, adjust warmth slightly for a cozy look.
Reel Idea: Film your cat “rising like bread” show progress clips from yarn ball to finished loaf!
Conclusion
The DIY Crochet Cute Loaf Cat Plush Amigurumi Project is more than just a fun craft; it’s a cozy, heartwarming journey of creativity and comfort. With every stitch, you’re not just making a plush; you’re creating a tiny, adorable companion full of charm and love.
Whether you’re gifting it to a cat lover, decorating your room, or simply enjoying the slow, relaxing rhythm of crocheting, this project reminds you how joyful handmade art can be.