
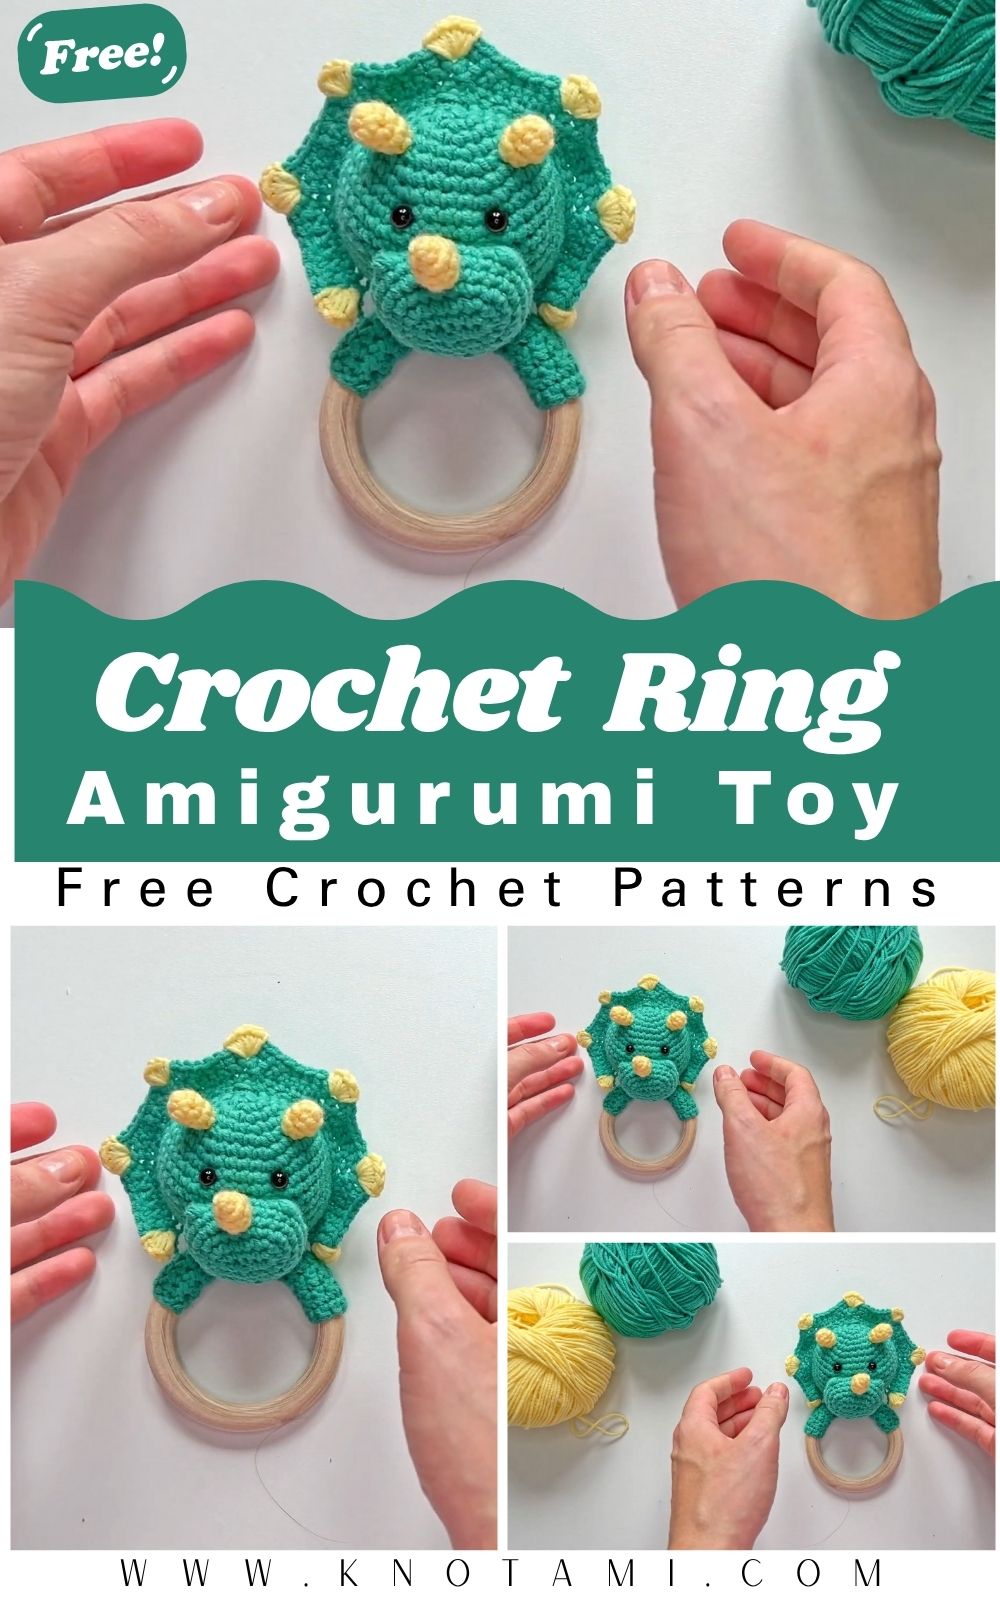
A cute and safe handmade gift for little children is always extra special. This charming Triceratops-shaped crochet teething ring is a wonderful and practical project. Babies absolutely love soft, chew-safe, and rattling toys.
This easy crochet project combines a classic wooden teething ring with a charming dinosaur head that also functions as a rattle. It’s an excellent beginner-friendly project that feels incredibly rewarding while creating something truly special and beautiful. Whether you’re new to amigurumi or an experienced crocheter looking for a quick and fun weekend project, this pattern brings big smiles. In this detailed guide, every step is explained with clear instructions and helpful tips so you can easily make your own adorable Triceratops teething toy.
Brief Explanation of the Crochet Project
This project is a baby rattle and teething ring in one. You crochet a soft Triceratops head (complete with horns and a frilled neck shield) and attach it securely to a wooden ring. Inside the head, a small rattle ball provides a gentle sound to entertain the baby. The wooden ring offers a safe, natural surface for teething, while the dinosaur head is easy for tiny hands to grasp.
It’s a wonderful handmade crochet idea that’s gender-neutral, educational (hello, dinosaurs!), and safe when made with baby-friendly materials. The finished toy is lightweight, portable, and perfect for baby showers, newborn gifts, or your own little one’s playtime.
Skill Level
Beginner to Intermediate.
If you’re comfortable with basic stitches like single crochet, increases, decreases, and magic rings, you’ll do great. The head is made in separate pieces (snout, horns, neck frill) and sewn together, which is a fantastic way to build confidence with amigurumi assembly. Even first-time rattle makers can succeed with this easy crochet project.
Required Materials and Supplies
Gather these simple supplies before you start — most are easy to find online or at your local craft store.
Yarn Type:
- Alize Cotton Gold Hobby or similar 100% cotton yarn (sport or DK weight) in two colors: main body color (e.g., green or gray for the dinosaur) and accent color for horns/frill. Cotton is soft, washable, and safe for babies. Use about 50-70g total.
Hook Size:
- 2.0 mm crochet hook (or size that gives you a tight stitch to prevent stuffing from showing through).
Extra Tools:
- Wooden teething ring (about 7 cm / 2.75 inches diameter) — choose untreated, baby-safe wood.
- Small rattle ball or bell (securely enclosed for safety).
- Polyester fiberfill stuffing.
- Yarn needle (tapestry needle) for sewing and weaving ends.
- Scissors.
- Stitch markers.
- Optional: embroidery thread for eyes/nostrils if you prefer stitched features over safety eyes.
Crochet Stitches and Abbreviations Used (US Terms)
- MR — Magic Ring
- sc — Single Crochet
- inc — Increase (2 sc in the same stitch)
- dec — Decrease (sc 2 stitches together)
- sl st — Slip Stitch
- ch — Chain
- st(s) — Stitch(es)
- FO — Fasten Off
We’ll also use turning chains for the flat neck frill piece.
Step-by-Step Crochet Instructions
1. Crochet the Horns (Make 3: 1 large nasal horn + 2 smaller forehead horns)
For each horn: Round 1: MR, 3 sc in ring. Pull tight. (3 sts) Round 2: Inc in each st around. (6 sts) Rounds 3-4: Sc in each st around. (6 sts) For the larger horn, add one extra round of 6 sc. Sl st, FO, and leave a long tail for sewing. Make two identical, smaller horns.
2. Crochet the Snout
Follow a separate snout tutorial style (common in these patterns): Start with MR and build a rounded shape with increases, then work even rounds. Add nostrils by embroidering or crocheting small details. Leave a long tail. Stuff lightly later.
3. Crochet the Neck Frill (Shield)
Chain 38. Row 1: Sc in 2nd ch from hook and across (37 sts). Ch 1, turn. Subsequent rows: Work increases at edges and in the middle sections to create a fan/frill shape with peaks. Repeat the pattern of inc, sc sequences about 5-6 times per row for the dimension. Add decorative edging by working 3 sc into the “rise” stitches for texture. FO and weave ends.
4. Crochet the Main Head/Body Base
Use the linked basic body pattern style: Start with MR, increase gradually to form a rounded head shape that fits nicely on the ring. Leave an opening for stuffing and attaching the ring/snout.
5. Assembly
- Stuff the head and snout lightly with fiberfill. Insert the rattle ball before closing.
- Sew the snout to the head, positioning nostrils opposite where the eyes will be.
- Attach the neck frill to the back of the head.
- Sew horns in place: a large one between the nostrils, smaller ones on the forehead.
- Secure the wooden ring by crocheting or sewing a cover/attachment loop if needed, or stitch the head firmly to the ring.
- Embroider or add safety eyes (use caution with babies under 3 — embroidered is safer). Weave in all ends securely.
Helpful Beginner Tips
- Keep tension tight for amigurumi to avoid gaps.
- Use stitch markers at the start of each round.
- Stuff gradually as you go — not too firmly for a soft chew toy.
- Test the rattle sound before fully closing.
- Always double-check seams for baby safety — no loose threads! This crochet tutorial is designed to be relaxing, so take breaks and enjoy the process.
Common Mistakes and Solutions
- Uneven rounds: Count stitches carefully at the end of each round.
- Horns too floppy: Add a tiny bit of extra stuffing or use slightly thicker yarn.
- Frill curling: Block it lightly with steam or adjust the hook size.
- Ring attachment loose: Sew multiple times around for security.
- Visible stuffing: Switch to a smaller hook or tighter tension.
Pattern Customization Ideas
Make this crochet pattern your own!
- Change colors for a pink “girl” dino or blue tones.
- Add embroidered eyelashes or rosy cheeks.
- Swap the Triceratops for other dinos by adjusting horn count.
- Make a matching lovey blanket for a complete gift set.
- Use organic bamboo yarn for extra softness.
These handmade crochet ideas are endless and perfect for personalizing baby gifts.
Size and Color Suggestions
The finished toy is approximately 15-20 cm (6-8 inches) including the ring — ideal grasping size for babies 0-12 months.
Color Ideas:
- Classic green body with beige horns and frill.
- Gray with white accents for a modern look.
- Pastel yellow or purple for fun, gender-neutral vibes. Use bright, contrasting colors to stimulate the baby’s vision.
FAQ Section
Is this teething ring safe for babies?
Yes, when made with 100% cotton yarn, a safe wooden ring, and securely sewn parts with no small loose pieces.
How do I wash it?
Hand washes gently in cold water and air dry. Avoid machine washing the rattle component if possible.
Can beginners really make this?
Absolutely! Break it into small sessions — one piece per evening.
What if I don’t have a rattle ball?
A small bell wrapped securely in fabric works, or skip it for a quiet version.
How long does it take?
About 3-5 hours total, spread over a couple of sittings.
Conclusion
You did it! Your very own Enchanting Crochet Triceratops Teething Ring is ready to delight a special baby. This easy crochet project not only hones your skills but creates a treasured, one-of-a-kind toy full of love.
Whether you gift it or keep it for your family, every stitch adds joy. I’d love to see your creations — tag your photos on social media and share in the comments below.
Ready for more? Try my other dinosaur friends or explore more beginner crochet patterns on the blog. Happy hooking, and thank you for crafting with me.