
There’s a special kind of joy that comes from transforming a simple strand of yarn into something soft, round, and full of charm. Crocheting is more than a craft it’s an art form that allows your creativity to come alive in the palm of your hands. Each loop and stitch builds not only the fabric of your creation but also a sense of satisfaction and peace. When your hook dances through yarn to form cute little plushies, it’s pure magic.
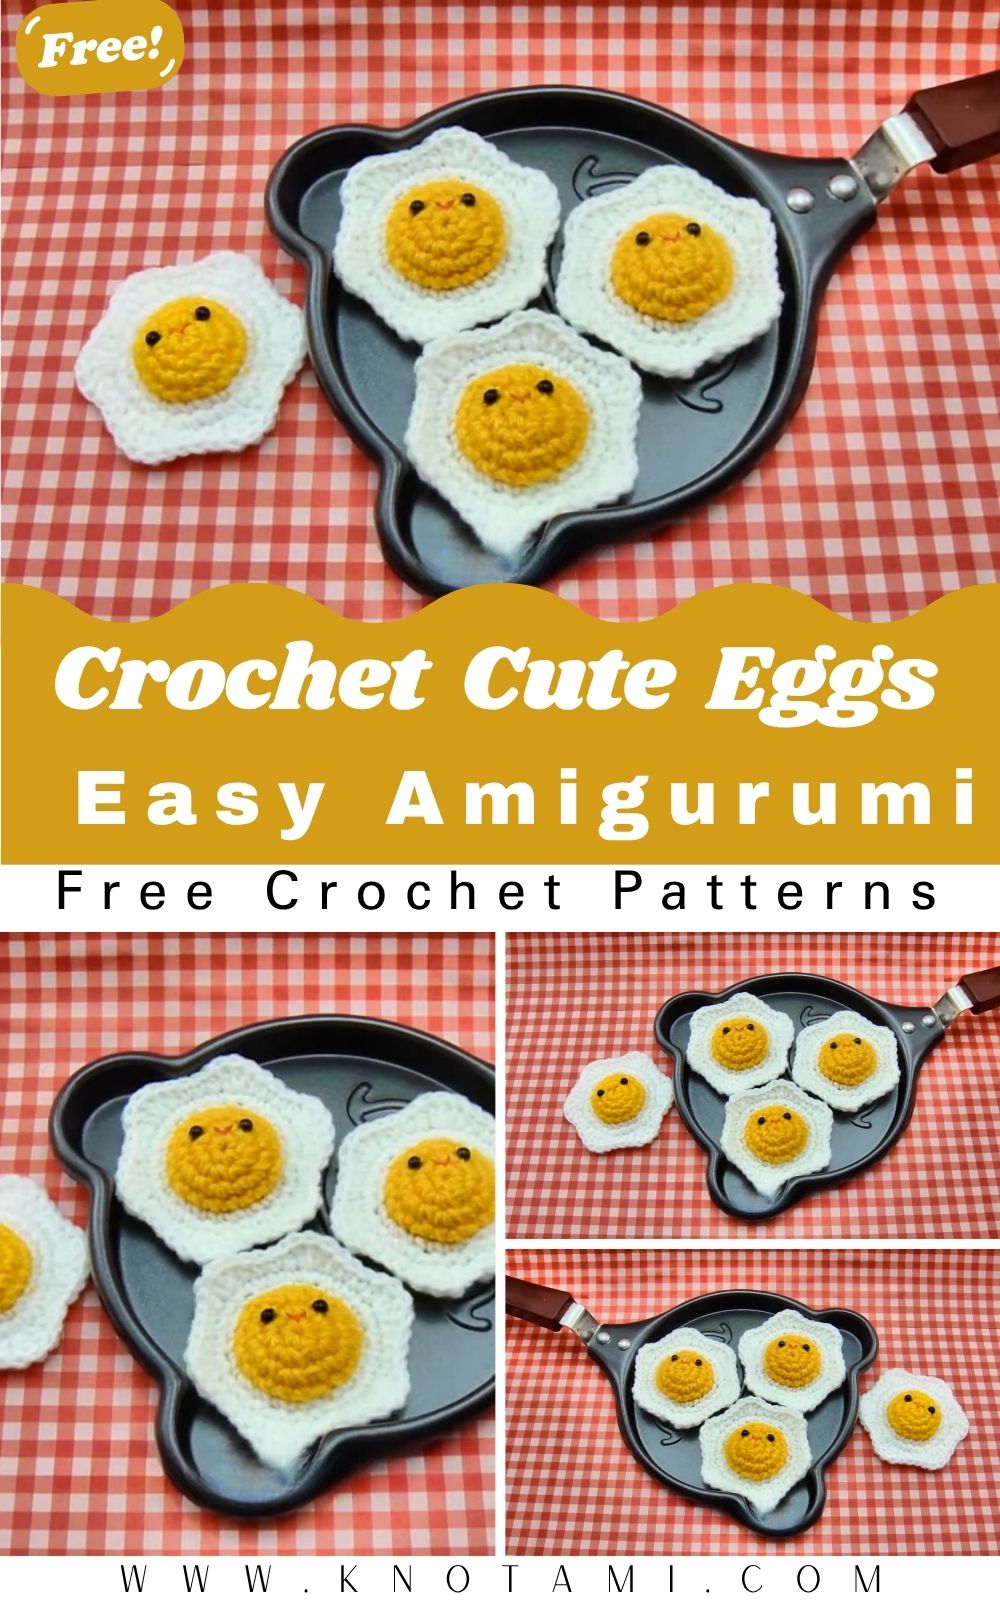
The Crochet Cute Eggs Amigurumi Pattern captures that magic beautifully. These little eggs aren’t just for Easter they’re delightful all year round. Their smooth, rounded shape and customizable colors make them ideal for decorating, gifting, or simply brightening up your workspace. Whether displayed in a basket, used as keychains, or made into smiling characters, these crochet eggs add a sprinkle of joy wherever they go.
This project is perfect for everyone from beginners looking for a quick, confidence-building win to advanced crocheters seeking a relaxing, stress-free project. You’ll get to explore simple techniques like increases and decreases while enjoying creative freedom with color combinations and expressions. It’s a wonderful pattern to use leftover yarn scraps too!
There’s something calming about crocheting repetitive shapes like these. The rhythm of each stitch becomes meditative a quiet, mindful escape from the busyness of the day. By the time you finish, you’ll not only have a set of adorable little eggs but also the warm satisfaction of having made something meaningful with your own hands. These eggs truly embody the spirit of slow crafting heartfelt, soothing, and made with love.
Materials & Tools
You don’t need much to make these adorable eggs just a few essential crochet supplies!
Materials List:
-
Yarn: Soft cotton or acrylic yarn in DK or worsted weight
-
White or cream (base color)
-
Optional accent colors (pastel, bright, or speckled tones)
-
-
Crochet hook: 2.5 mm to 3.0 mm (adjust for your yarn weight)
-
Stuffing: Polyester fiberfill or cotton stuffing
-
Safety eyes: 6 mm black eyes (optional, if you want to add a face)
-
Tapestry needle: For sewing and weaving in ends
-
Scissors: For cutting yarn neatly
-
Stitch marker: To track the beginning of each round
Yarn Choice Tips:
For crisp, well-defined stitches, use 100% cotton yarn perfect for smooth, round shapes. Acrylic yarn creates softer, squishier eggs that are great for toys. If you’re making decorative eggs, experiment with sparkly or variegated yarns for extra charm. Pastel shades make for a cute, spring-like look, while bold colors add a fun, modern twist.
Step-by-Step Crochet Instructions
Here’s a beginner-friendly walkthrough to make your own cute crochet egg amigurumi.
Making the Top (Head Section)
Start with a magic ring and make 6 single crochets (sc) inside it. This forms the very top of your egg. Continue crocheting in the round, increasing evenly to form a dome shape.
Example pattern outline:
-
Round 1: 6 sc in magic ring (6)
-
Round 2: inc in each stitch (12)
-
Round 3: (1 sc, inc) x 6 (18)
-
Round 4: (2 sc, inc) x 6 (24)
-
Round 5: (3 sc, inc) x 6 (30)
You should now have a smooth, rounded top resembling the upper curve of an egg.
Pro Tip:
Keep your tension even too tight and the surface may wrinkle, too loose and stuffing may peek through.
Forming the Middle Body
Work several rounds without increasing this forms the egg’s body height. You can make your egg shorter or taller depending on how many rounds you add (typically 6–8 rounds).
Add safety eyes now if desired, spacing them evenly. You can also embroider tiny smiles or blush cheeks for personality.
Pro Tip:
Insert the safety eyes before stuffing and closing it’s much easier to position them at this stage!
Shaping the Lower Body
To form the bottom taper of the egg, start decreasing gradually.
Example decrease pattern:
-
(3 sc, dec) x 6 (24)
-
(2 sc, dec) x 6 (18)
-
(1 sc, dec) x 6 (12)
Add stuffing before closing completely firm enough to hold shape but soft enough to feel squishy.
Finish with a final round of decreases until the hole closes. Fasten off and weave in ends with your tapestry needle.
Pro Tip:
Stuff gradually and evenly push small tufts at a time to avoid lumps. Shape with your fingers to get that perfect egg curve.
Adding the Base or Optional Details
For a decorative version, crochet a small base or nest for your eggs. Use brown or tan yarn:
-
Make a flat circle with 6 sc in magic ring, increasing each round by 6 until you have a desired diameter (about 6–8 cm).
This base helps your eggs sit upright and adds a cute presentation touch.
You can also crochet mini cracks or a chick peeking out from one egg using yellow yarn for the inner shell.
Optional Accessories & Final Touches
Want to make your eggs come alive? Add a few creative extras!
-
Crochet tiny bunny ears for an Easter egg.
-
Stitch a bow tie or flower for decoration.
-
Add embroidered eyes and a smile for a kawaii-style egg.
-
Use pastel thread to sew tiny zigzag lines for a “painted” egg look.
Each small detail adds a unique personality to your creation!
Assembly and Positioning
If you’ve made multiple eggs, arrange them in a crochet basket, egg carton, or on a display tray. Attach small magnets or keychain loops if you want to turn them into practical accessories.
Expert Tip:
For perfect balance, shape each egg slightly oval and flatten the bottom with your hand after stuffing. This helps them sit upright without rolling away.
Customization Ideas
Crochet eggs are one of the easiest projects to customize! Here are some fun variations to try:
Color Themes
-
Pastel Dream: Soft pink, mint, lavender, and cream tones for spring vibes.
-
Bold & Bright: Red, yellow, blue, and orange for kids’ room decor.
-
Minimal Chic: Neutral beige, gray, and white for a modern, aesthetic look.
-
Easter Delight: Speckled yarn or painted embroidery for festive baskets.
Yarn Variations
Try fuzzy yarn for a textured egg, metallic yarn for luxury decor, or eco-friendly cotton for sustainable gifting.
Themed Versions
-
Easter Bunny Egg: Add ears and a little face.
-
Chick Inside Egg: Crochet half shells and a small yellow chick peeking out.
-
Rainbow Egg: Change colors every few rounds for a striped effect.
-
Holiday Ornament: Add a hanging loop with ribbon or twine.
Add-ons
-
Tiny hats, bows, or scarves
-
Mini crochet flowers or beads
-
Embroidered initials for personalization
Advanced Tips & Troubleshooting
Even a simple pattern like this can look professional with the right techniques.
-
Invisible Decreases: Insert hook into the front loops of the next two stitches to make neat, gap-free decreases.
-
Consistent Tension: Keep your grip light and rhythm steady; uneven tension can distort shape.
-
Avoid Twisting Rounds: Always mark the first stitch of each round to track progress accurately.
-
Fix Uneven Shapes: Reshape by rolling between your palms or adjusting stuffing placement.
-
Proper Stuffing: Fill gently in layers to prevent bumps. Use a chopstick or blunt tool to push stuffing evenly.
-
Seamless Joining: Use the invisible finish (slip stitch + hidden yarn tail) to avoid visible seams.
-
Reading Patterns: Understand abbreviations sc (single crochet), inc (increase), dec (decrease), sl st (slip stitch).
-
Yarn Splitting Fix: If strands separate, try a smaller hook or twist the yarn tighter as you work.
-
Secure Ends: Weave yarn tails in multiple directions to lock them in place.
-
Surface Embroidery: Add decorative lines or initials carefully using thin yarn and a tapestry needle.
Care Instructions
Keep your crochet eggs looking perfect with these simple care tips:
-
Hand wash gently using cool water and mild detergent.
-
Do not twist or wring press water out gently.
-
Air dry flat on a towel; reshape while damp.
-
Avoid direct sunlight to preserve color vibrancy.
-
Store safely in a breathable fabric bag or on display shelves away from pets.
For long-term display pieces, a light dusting with a soft brush keeps them looking new!
Display & Gift Ideas
These cute crochet eggs are incredibly versatile here are some fun ways to show them off or gift them!
-
Home Décor: Place in a decorative bowl or crochet basket for seasonal charm.
-
Kid’s Room: Brighten up a nursery or playroom with colorful egg plushies.
-
Desk Friend: Keep one by your workspace as a stress-relief fidget or cheerful mascot.
-
Holiday Ornament: Hang them on Easter branches or Christmas trees for a whimsical touch.
-
Gift Set: Combine with mini crochet chicks or bunnies for a themed present.
Bonus Idea: Create an Egg Family with different facial expressions happy, sleepy, surprised for a cute handmade collection.
Benefits of Making Crochet Cute Eggs Amigurumi
Crochet isn’t just about making things it’s about feeling good while doing it. Here’s what you’ll gain:
-
Relaxation & Mindfulness: The steady rhythm of stitching brings calmness and focus.
-
Stress Relief: A few minutes of crocheting can ease tension after a busy day.
-
Sense of Accomplishment: Finishing a project gives you tangible proof of creativity and patience.
-
Eco-Friendly Gifting: Handmade gifts reduce plastic waste and promote sustainable crafting.
-
Emotional Connection: Every stitch carries your time and care a handmade gift always feels more special.
Crocheting these eggs can even become a family tradition gather loved ones for a fun weekend crafting session!
Photography & Social Media Tips
Want your cute crochet eggs to shine online? Here’s how to capture their best angles!
-
Use Natural Light: Photograph near a window with indirect daylight.
-
Soft Backgrounds: Neutral tones like beige, white, or wooden textures make colors pop.
-
Add Props: Use baskets, flowers, yarn skeins, or crochet hooks for cozy composition.
-
Show Variety: Arrange a few eggs together in different colors for an eye-catching shot.
-
Close-Ups: Highlight the stitch detail and surface texture.
-
Creative Angles: Top-down photos work great for flat lays, while side angles show dimension.
Conclusion
Crocheting your own Cute Eggs Amigurumi is one of the most rewarding and relaxing projects you can try. From their soft round shape to the joy of choosing colors, each step feels creative and fulfilling. These little eggs embody everything we love about crochet simplicity, beauty, and the heartfelt satisfaction of making something by hand.
Whether you create them as holiday decorations, adorable gifts, or cheerful home accents, each egg carries a piece of your creativity. So grab your favorite yarn, settle into your favorite crafting spot, and start stitching one loop at a time. Soon, you’ll have a basket full of colorful, handmade happiness that will make anyone smile.