
There’s a quiet, satisfying magic in watching yarn transform beneath your fingertips. Crochet lets you shape imagination into something you can hold soft, textured, and full of warmth. With each stitch, a little structure begins to take form, whether it’s a plush toy, cozy accessory, or decorative piece. And when that structure turns into a tiny house a miniature symbol of comfort and creativity the result feels both magical and deeply personal.
Meet the Crochet Tall House Amigurumi
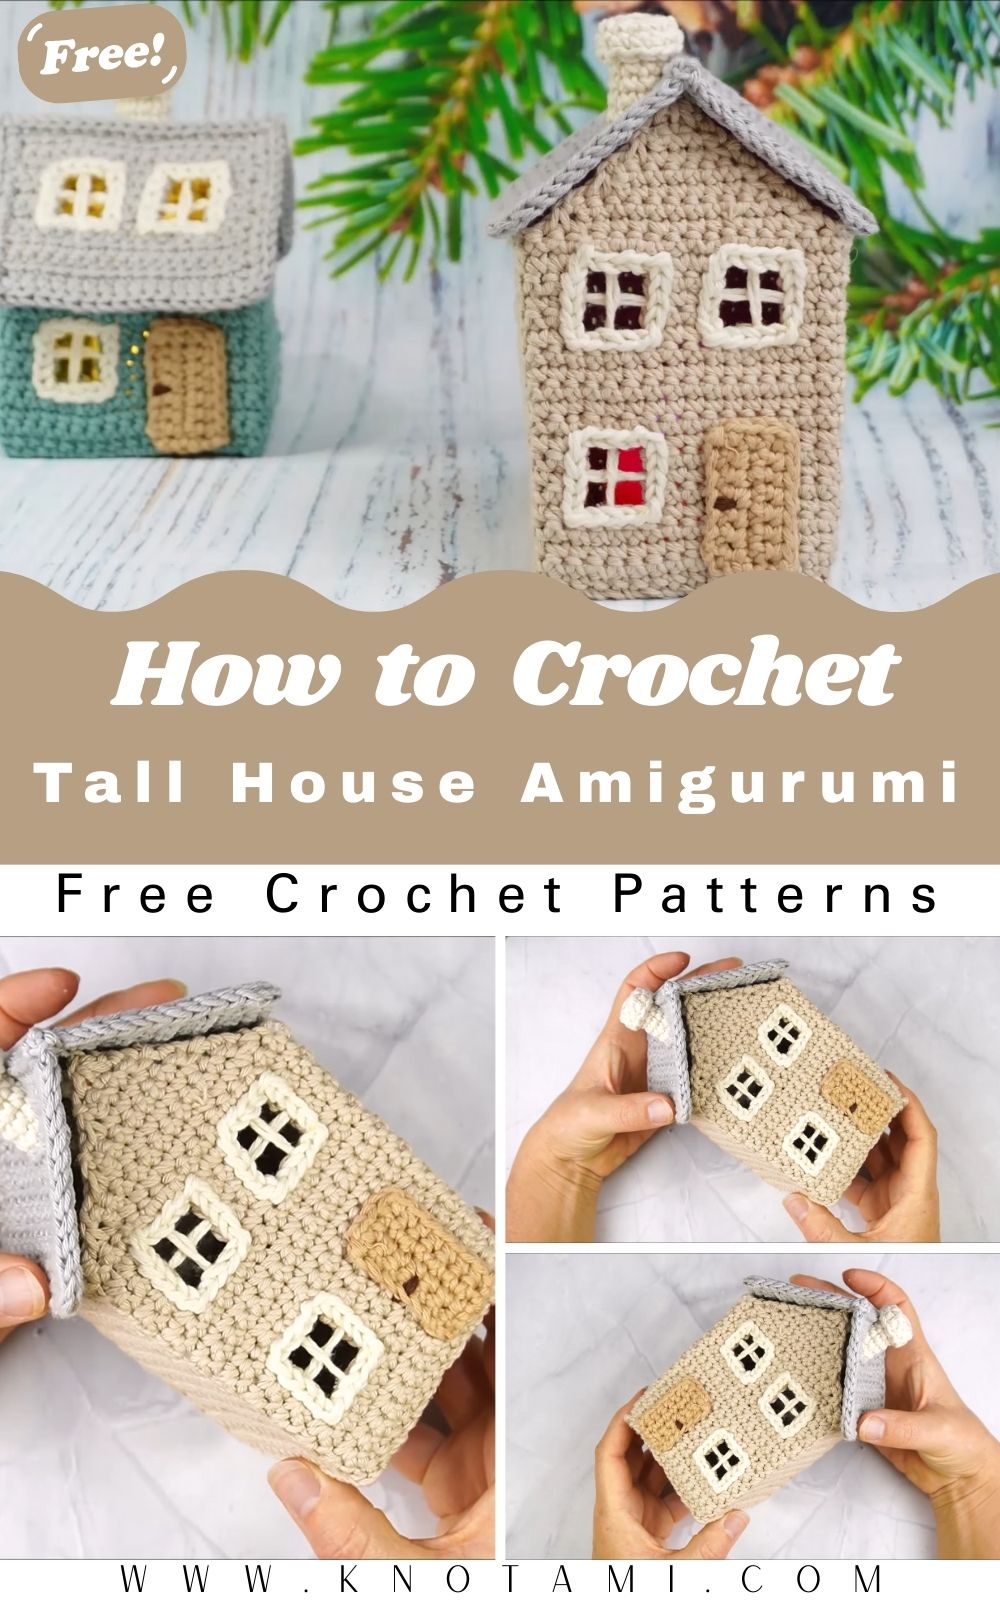
The Crochet Tall House Amigurumi Pattern is one of those enchanting projects that instantly sparks joy. Standing tall and adorable, it captures the charm of storybook cottages and fairytale villages. With its stackable structure, tiny windows, slanted roof, and whimsical proportions, it’s the kind of crochet creation that feels alive with character. Perfect as a home décor accent, a playhouse accessory, or a thoughtful handmade gift this project turns yarn into art.
A project for every skill level
This tall house amigurumi is simple enough for beginners to follow yet open to infinite creativity for experienced crocheters. You’ll learn shaping, color changes, and some light embroidery or appliqué details. Best of all, it’s a forgiving pattern no two houses need to look the same! That flexibility makes it the perfect practice for working in the round and experimenting with textures, tones, and decorative flair.
Crochet as calm, creativity, and care
Few things are more soothing than the rhythm of crochet. The repetitive motion invites mindfulness, allowing you to lose yourself in the steady rhythm of hook and yarn. As the tall house grows round by round, you’ll feel that familiar sense of calm and quiet accomplishment. When finished, you’ll have a charming piece that carries your effort, care, and imagination a tiny handmade home that truly feels alive.
Materials & Tools
To crochet your own Tall House Amigurumi, gather the following essentials:
-
Yarn: DK or light worsted weight (category 3) yarn. Cotton or cotton-acrylic blend works best for structure.
-
Main body: choose a house color (cream, beige, gray, or pastel tones)
-
Roof: a contrast color (red, brown, or blue)
-
Windows & Door: small scraps in darker or accent shades
-
-
Hook: 2.5mm–3.0mm crochet hook for tight, clean stitches.
-
Stuffing: Premium polyester fiberfill for smooth shape retention.
-
Tapestry needle: For sewing parts, weaving ends, and embroidering details.
-
Scissors: Sharp for cutting yarn cleanly.
-
Stitch markers: To mark the start of each round.
-
Pins: For positioning roof, door, or window appliqués.
-
Optional: Small beads, felt, or embroidery floss for extra details.
Choosing the perfect yarn & colors
For crisp edges and defined stitches, go with 100% cotton. If you want a softer, cozier look, try a cotton-acrylic blend.
Color combos can completely change the mood:
-
Classic Cottage: Cream base + Red roof + Brown door
-
Spring Pastel: Mint base + Pink roof + Yellow windows
-
Rustic Stone House: Taupe base + Charcoal roof + Cream windows
Texture lovers can mix yarn types too smooth for walls, fuzzy for roofs. Always keep tension even to maintain shape.
Step-by-Step Crochet Instructions
Let’s begin building your miniature home from the ground up.
1. Making the Base
The base provides structure and stability for your tall house.
-
Round 1: Start with a magic ring, 6 single crochets (6).
-
Round 2: Increase in each stitch (12).
-
Round 3: (1 sc, inc) x6 (18).
-
Round 4: (2 sc, inc) x6 (24).
-
Round 5: (3 sc, inc) x6 (30).
-
Continue increasing until the circle matches the diameter you want for your house bottom (usually 6–7 cm wide).
-
When ready, make one round of back-loop-only sc to create the foundation wall edge.
Expert tip: Use a stiff base yarn or add a cardboard circle between layers for a perfectly flat base.
2. Building the House Body
Now we create the tall cylindrical shape of the house.
-
Rounds 1–15: Single crochet in each stitch around (no increases).
-
Change colors halfway up to create a two-tone effect (for example, cream lower walls and pastel upper walls).
-
-
Keep sides straight and check stitch counts regularly.
-
Lightly stuff as you go it helps maintain shape.
-
If adding windows or doors with yarn or felt, embroider or attach before closing the top.
-
Window: Chain 6, sc in 2nd ch and across, turn, repeat 3 more rows. Sew onto house wall.
-
Door: Chain 8, repeat for 5 rows, round top edge with sc.
-
Polish tip: Use tiny cross-stitches for windowpanes, or felt cutouts for added contrast.
3. Forming the Roof
The slanted roof gives your tall house its character and charm.
-
Switch to roof color.
-
Work continuous rounds while decreasing gradually:
-
Round 1: (3 sc, dec) x6
-
Round 2: (2 sc, dec) x6
-
Round 3: (sc, dec) x6
-
Round 4: dec around (6).
-
-
Before fully closing, add a bit more stuffing the roof should be firm enough to stand but not stiff.
-
Fasten off and weave in ends.
-
Optionally, add a small chain loop or crochet chimney on top.
Chimney (optional):
-
ch 6, join into ring.
-
sc in each stitch for 6–7 rows.
-
FO and sew at an angle near the roof’s edge.
4. Adding Windows, Doors & Details
This is where the magic happens adding details to bring your house to life.
-
Windows:
-
Create small squares or ovals using colored yarn scraps or felt.
-
Embroider cross-stitches to form panes.
-
Outline with slip stitches or surface crochet for definition.
-
-
Door:
-
Make a rectangle slightly taller than it is wide.
-
Add a French knot for a doorknob.
-
-
Roof tiles:
-
Use surface slip stitches to create scalloped rows on the roof.
-
Alternate colors for a tiled effect.
-
Tip: Keep spacing balanced measure before sewing. A symmetrical layout keeps the house feeling tidy.
5. Assembly & Positioning
-
Place the base flat on a table.
-
Stuff the house body evenly firm but not bulging.
-
Align the roof and pin in place.
-
Sew the roof to the body using whip stitch or mattress stitch.
-
Add optional attachments like chimneys, flowers, or shrubs.
Balancing Tip: If your house leans, shift stuffing or insert a small plastic disc at the bottom for extra support.
6. Adding Final Touches & Accessories
Now that your structure stands tall, finish with cute embellishments!
-
Crochet a tiny flower garden at the base (magic ring flowers).
-
Add curtains with embroidery thread or fabric scraps.
-
Place a mini welcome sign using felt and embroidery.
-
Attach tiny LED fairy lights inside (battery operated) for a magical glow.
Each small detail adds charm and turns your crochet project into a real miniature wonder.
Customization Ideas
Your tall house can take any form cozy cottage, fantasy tower, pastel apartment, or even a haunted Halloween home!
Color Inspirations
-
Classic Storybook Cottage: Beige + red roof + dark brown accents.
-
Fairy Tower: Lavender + gold + moss green.
-
Winter Chalet: White + navy roof + silver details.
-
Holiday Gingerbread: Brown + white icing borders + candy-colored windows.
Yarn & Texture Experiments
-
Try fuzzy or boucle yarn for a rustic, stone-like wall.
-
Use sparkly metallic thread for roof shingles or fairy windows.
-
Mix cotton and wool for an earthy, cottage-core finish.
Add-Ons & Themes
-
Holiday edition: Add wreaths or string lights.
-
Spring version: Crochet vines, flowers, or birds on the roof.
-
Fairy fantasy: Include mushrooms, moss, or mini characters.
Creativity is endless every house becomes a one-of-a-kind handmade world.
Advanced Tips & Troubleshooting
Even pros face little quirks with amigurumi structures. Here’s how to keep yours flawless:
-
Invisible decreases: Insert hook through front loops of two stitches, yarn over, pull through both loops, then yarn over and pull through again. Keeps fabric smooth.
-
Keep stitch tension consistent: Uneven tension = crooked walls. Adjust hand grip as needed.
-
Avoid twisted rounds: Always mark the first stitch and move your marker each round.
-
Prevent slanting: Rotate your piece periodically as you crochet; this keeps shape even.
-
Stuffing evenly: Add fiberfill little by little using a chopstick or the blunt end of your hook.
-
Clean color changes: On the last yarn-over of the previous stitch, pull through with the new color.
-
Neat seaming: Use a ladder stitch for seamless joins invisible and professional-looking.
-
Fixing tilt or bulge: Reshape gently and massage stuffing with your hands.
-
Symmetry check: Before sewing the roof, ensure all details (windows/door) line up.
-
Structural support: For taller builds, slip a straw or wooden dowel inside the center to prevent collapse.
Care Instructions
Keep your tall crochet house looking crisp and clean for years:
-
Hand wash gently in cool water with mild detergent.
-
Do not wring squeeze lightly between towels.
-
Air dry flat on a towel away from sunlight.
-
Reshape while damp to restore structure.
-
Avoid moisture storage to prevent yarn stretching.
-
Dust gently with a soft brush or handheld air blower.
For display pieces, consider coating the base with clear fabric stiffener for extra longevity.
Display & Gift Ideas
The Tall House Amigurumi isn’t just fun to make it’s a showstopper to display and gift!
Display Ideas
-
Home décor: Place on shelves, mantles, or side tables as whimsical mini architecture.
-
Crochet village: Create multiple houses of varying sizes to form a handmade neighborhood.
-
Seasonal display: Add miniature trees, snow, or flowers depending on the season.
-
Kid’s room: Pair with crochet animals or dolls for storytelling playtime.
Gift Ideas
-
New home present: Perfect handmade housewarming gift with a note saying, “May your new home be full of warmth.”
-
Holiday centerpiece: Add a tall house or two to your Christmas village setup.
-
Personalized touch: Stitch initials or the family name on the door.
-
Teacher or coworker gift: Simple, thoughtful, and memorable handmade décor.
No matter the reason, your crochet tall house will spread smiles and warmth.
Benefits of Making a Crochet Tall House Amigurumi
1. Relaxation & Mindfulness
Crochet slows your pace, helping you focus on each repetitive movement a natural form of meditation.
2. Stress Relief Through Crafting
Building something from scratch channels anxious energy into productive calm. The act of making a house itself feels symbolic grounding and comforting.
3. A Sense of Accomplishment
Watching the structure rise, round after round, fills you with pride. You’re not just crocheting stitches you’re creating art.
4. Eco-Friendly Gifting
Handmade items use minimal materials and last long. They encourage thoughtful, sustainable gifting over store-bought décor.
5. Emotional Connection
Handmade projects hold emotion. Whether you craft it for yourself or gift it, your time and creativity make it special a little home filled with love.
Photography & Social Media Tips
Ready to show off your tiny house to the world? Here’s how to capture it beautifully:
-
Natural light: Morning or late afternoon sunlight makes colors pop.
-
Soft background: Neutral fabrics, wooden tables, or pastel backdrops keep focus on your creation.
-
Add props: Yarn skeins, crochet hooks, or mini plants create cozy vibes.
-
Angles: Photograph from slightly below eye level for a towering perspective.
-
Close-ups: Highlight details windows, stitches, roof tiles, or doors.
-
Group shot: Display your tall house among other amigurumi for scale.
-
Video reel: Film a 360° spin or stuffing/assembly timelapse to engage followers.
-
Consistent palette: Match tones across posts use the same lighting or filters.
-
Captions that connect: Share what inspired your color choice or design idea.
Conclusion
Creating your own Crochet Tall House Amigurumi is more than a craft it’s an experience. With just yarn, a hook, and a little imagination, you can build a miniature world filled with comfort and charm. Every stitch adds warmth, every color tells a story, and every finished detail transforms simple materials into something deeply meaningful.
Whether displayed on your shelf, gifted to a loved one, or shared online with fellow makers, this tiny handmade house stands as a reminder of creativity and calm a soft symbol of home, hope, and heart.
So grab your yarn, settle in, and start building your little tall house today one cozy stitch at a time.