
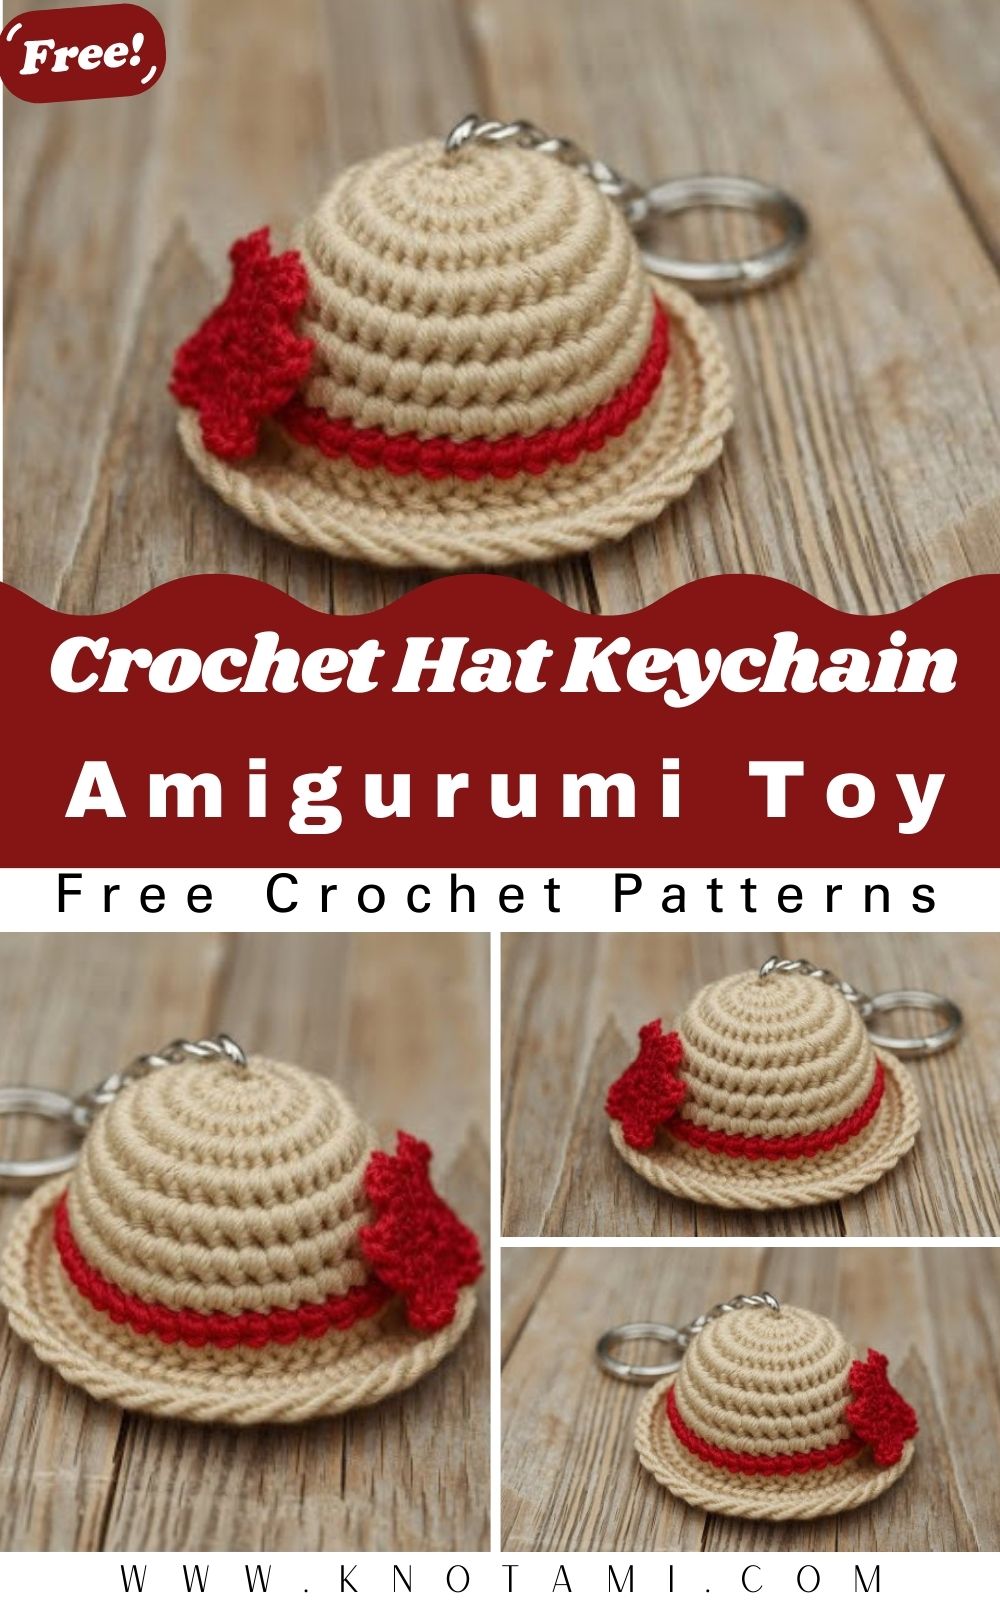
First I made one, then another and before I knew it, five more that very same evening! This little crochet hat keychain pattern is so fun and satisfying that you just can’t get enough of it.
Look, when I first spotted a mini crocheted hat dangling from someone’s bag at a craft market, I stood there staring for an embarrassing amount of time. It was maybe 4 centimeters tall, had a little pompom on top, and was clipped to a keychain ring like it owned the place. I had to learn how to make it immediately. That was months ago. Since then I’ve gifted these to basically everyone I know, sold a few at local craft tables, and still reach for this pattern whenever I need something that actually finishes in one sitting. No fluff here just the real steps, from the first magic ring to clipping on the hardware at the end.
So What Even Is This Project?
A Crochet Hat Keychain is a miniature stuffed hat worked in continuous rounds, shaped with simple increases and decreases, lightly filled so it holds its form, then clipped to a split ring or swivel clasp. It falls under amigurumi, which is the Japanese craft style of crocheting small stuffed objects. Tight stitches, no visible holes, compact shapes that’s the whole vibe.
What makes the hat version so popular is mostly how versatile it turns out to be. Full witch-hat look with black and purple? Easy. Cozy winter version in cream with a red pompom? Also easy. Stitch someone’s initial onto the brim and suddenly you’ve made a personalized gift that looks way more effortful than it was.
Quick facts:
- Finished size: roughly 4 to 5 cm tall about the height of your thumb
- Worked top-down, crown first
- Total time: 45 minutes to about an hour and a half
- Clips onto bags, keys, zipper pulls, or even gift tags
Who Can Actually Make This?
Beginners genuinely, not in a “we say beginner but mean intermediate” kind of way. If you’ve crocheted any small project before and understand what a magic ring is, even loosely, you have enough foundation to follow this. The stitch list is short. The shaping is logical. There are no tricky color changes mid-round or complicated stitch combinations.
The one thing worth practicing before you start: the magic ring. If it still feels awkward, do five practice rings on scrap yarn before casting on for the actual hat. By ring five it will feel completely normal.
Intermediate crocheters will get through this quickly and likely spend more time picking yarn colors than actually stitching.
Full Supplies List
Yarn
Three colors works nicely, though one color for the whole hat is completely valid too.
- Main body color – the hat itself. Terracotta, cobalt, sage green, deep burgundy whatever speaks to you.
- Brim color – can match the body or contrast it. A light brim on a dark hat tends to look really clean.
- Accent color – for a bow, pompom, or stripe. Optional, but adds personality fast.
Fiber matters here. Fingering or sport weight cotton is the best call for a keychain that gets regular handling. Cotton doesn’t stretch out of shape the way acrylic does, so the hat stays looking like a hat after weeks of being clipped to a bag. If acrylic is all you have, that’s okay
Just size your hook down more aggressively than you would normally.
Hook
2.5 mm or 3 mm. Nothing bigger. I know it feels almost uncomfortably small, but that’s the point amigurumi needs a dense, tight fabric. A looser hook means visible gaps and a hat that doesn’t hold its dome shape properly.
Other Supplies
- A small pinch of polyester fiberfill
- Tapestry needle
- Sharp scissors
- Stitch marker — or a small loop of scrap yarn, same function
- One keychain split ring, lobster clasp, or swivel clip
- Optional: 4 mm safety eyes, seed beads, embroidery floss, small buttons, felt scraps
Stitches Used
Short list. That’s part of what makes this pattern work so well for beginners.
- Magic ring – starts every amigurumi piece; closes the center so there’s no hole at the crown
- Single crochet (sc) – the only stitch used in the main body of the hat
- Increase (inc) – two sc worked into one stitch; used to widen the piece
- Decrease (dec) -two stitches pulled together into one; used for shaping
- Slip stitch (sl st) – used once at the very end to finish the brim
- Basic hand sewing – for attaching decorations and securing the keychain ring
Pattern Instructions — Step by Step
Step 1: Crown of the Hat
Start here. Everything builds from the top down.
Round 1 — Magic ring, work 6 sc inside it. Pull tail to close. Mark this first stitch. (6)
Round 2 — Inc in every stitch around. (12)
Round 3 — [Sc 1, inc] all the way around. (18)
Round 4 — [Sc 2, inc] all the way around. (24)
Round 5 — Sc in every stitch. No shaping. (24)
Round 6 — Sc in every stitch again. (24)
After Round 6 the crown is finished. It should look like a shallow bowl domed in the middle, curved at the edges. That’s correct. Set it aside and move on.
Step 2: Hat Sides
Four straight rounds with no shaping just building height.
Rounds 7 through 10 — Sc in every stitch across all four rounds. (24 stitches each)
After Round 10, stop, add the stuffing, then continue. Push a small pinch of fiberfill up into the crown — roughly grape-sized. You want the dome to feel lightly padded, not packed. Then keep going.
Step 3: The Brim
If you’re switching to a contrast color, do it right before Round 11. The color join happens cleanly between rounds.
Round 11 — [Sc 1, inc] around. (36)
Round 12 — [Sc 2, inc] around. (48)
Round 13 — Sc all the way around, no shaping. (48)
Slip stitch into the next stitch. Cut yarn and pull the tail through. Leave a tail long enough to weave in properly. The brim will splay outward naturally press it flat with your hands and it’ll hold that position.
Step 4: Adding Details
Totally optional. A plain hat looks great. But if you want to add something:
Bow – Cut about 15 cm of accent yarn. Tie a bow. Stitch it to the brim front with your tapestry needle, knot at the back, trim.
Pompom -Wrap yarn around two fingers 20 times. Slide the bundle off, tie tightly around the center, snip the loops open, fluff into a ball. Sew to the crown.
Stripe band -Before Round 11, work 2 rounds in a different color, then switch back for the brim. Gives a horizontal stripe around the hat body.
Embroidery – Use floss and a thin needle to stitch stars, initials, or small hearts directly onto the hat surface.
Step 5: Finishing
Ends: Run each tail through several nearby stitches in different directions using the tapestry needle. Trim close to the surface.
Keychain ring: Cut 10–12 cm of sturdy yarn, thread it through 3–4 stitches at the hat crown, loop both ends through the keychain ring, and double-knot. A tiny dab of clear craft glue on the knot adds extra hold.
Shape it: Press the brim flat one final time. Cotton yarn holds shape with just a light press. For extra firmness, mist lightly with water, reshape, and leave flat to air dry.
The hat is done.
Time Budget Recap
- Gathering supplies: 5–10 minutes
- Crown rounds (1–6): 12–18 minutes
- Side rounds (7–10): 10–15 minutes
- Brim rounds (11–13): 8–12 minutes
- Decoration (bow, pompom, etc.): 5–20 minutes
- Weaving ends and attaching the ring: 8–12 minutes
Total time: 50 minutes to 1 hour 30 minutes
New to amigurumi? Block out two hours and don’t watch the clock. Already done something similar before? You might finish in under an hour. Either way, this is a one-sitting project, which is genuinely rare in crochet and one of the reasons people keep coming back to it.
Basic Tips for a Smooth Make
Not the generic tips. The real ones:
Let the hook feel slightly too small.
A little resistance when pulling loops through is correct. That friction means tight fabric, which is exactly what amigurumi needs. If the hook glides through easily, size down.
Move your stitch marker every round without exception.
Amigurumi spirals continuously there’s no visual break between rounds. Skip the marker once and you’ll spend several minutes counting backward trying to orient yourself. Not worth it.
Don’t over-tighten the magic ring on
Round 1. Keep it slightly open while you work your stitches, then pull the tail snug after Round 2. Trying to tighten everything before you start makes Round 1 way harder than it needs to be.
Add stuffing after Round 10, not after the brim.
Once the brim increases start, the opening gets wider but also more awkward to control. Stuff before Round 11 while the opening is still circular and manageable.
Crochet over your yarn tails when joining new colors.
Lay the tail along the previous row and work your stitches over it for the first 6–8 stitches. Saves you from having extra ends to weave in later.
Cotton feels stiff when you first start crocheting with it.
That’s normal it softens as you go. Don’t switch yarns because the first few rounds feel tight. Stick with it.
Ways to Customize This Pattern
Color Combinations Worth Trying
- Deep navy with a cream brim and a small yellow star embroidered on clean and very wearable
- All black with a tiny silver bead at the crown minimal and consistently popular at craft markets
- Sage green body with a terracotta brim, an earthy palette that suits every season
- Every round in a different pastel, no repeats childlike and completely charming
- Warm cream with a tan brim and a small brown bow it genuinely looks like a tiny hot chocolate
Small Accessories That Work at This Scale
- A simple crocheted sunflower: magic ring, 6 sc, slip stitch in back loops for petals, brown button center
- A felt leaf cut with scissors and glued on with fabric glue
- A small vintage button is stitched flat onto the brim as a decorative accent
- Seed beads threaded along the brim edge with sewing thread for a sparkle finish
Adjusting the Size and Shape
Add 3 extra rounds in Step 2 for a taller top-hat silhouette. Remove 1 round from Step 2 for a shorter, wider-looking hat. Skip stuffing entirely and flatten the hat for a brooch or patch. Use sewing thread and a 1.5 mm hook for an even tinier version genuinely doll-scale.
Common Questions
What yarn is actually best for this?
Cotton, specifically fingering or sport weight. For a keychain that gets handled every day, you want a fiber that doesn’t stretch, doesn’t pill easily, and holds color well. Acrylic works in a pinch but tends to lose shape faster with repeated contact.
How do I get the hat firm enough?
Three factors: hook size (smaller creates denser fabric), stuffing amount (light, not packed solid), and fiber type (cotton behaves better than most acrylics for shape retention). For extra firmness post-finishing, dissolve a little fabric starch in water, dip the hat briefly, squeeze out the excess, reshape by hand, and dry it flat.
How long does this really take?
See the Time Budget Recap section above. Honest answer for a first attempt: plan for 90 minutes. After you’ve made two or three, you’ll likely finish in 60 minutes or less.
Can I sell finished hats made from this?
Check the original creator’s terms before selling anything. Most independent designers allow finished item sales with credit given. Selling the pattern itself as your own work is a separate issue entirely.
What if my brim is floppy instead of flat?
Usually means either the yarn is too light, the hook was too large, or the stitch tension was loose. A fabric starch treatment fixes most of it after the fact. For future hats, try going down half a hook size.
Final Thoughts
This Crochet Hat Keychain project isn’t going to challenge you technically and it isn’t supposed to. What it gives you is a finished, handmade object in under two hours that makes people react. The kind of thing where someone picks it up off your bag and goes “wait, you made this yourself?” and you get to say yes, with yarn the width of thread and a hook barely bigger than a toothpick.
Start with whatever yarn is closest to you right now. Pick two colors that feel right. Follow the steps. The magic ring is the hardest part and it only takes a few minutes to feel comfortable. Everything after that is just single crochets and moving your stitch marker up.
Make one. Then make six more. Your friends are going to start requesting them, so you might as well get ahead of it now.