
There’s a special kind of joy in watching simple yarn turn into something you can actually use and adore. Crochet feels like a blend of creativity and calm, a quiet space where your color choices and stitch decisions become a little reflection of you. With every stitch, the story grows, and this charming milk carton–inspired bag is a sweet reminder of how whimsical handmade can be.
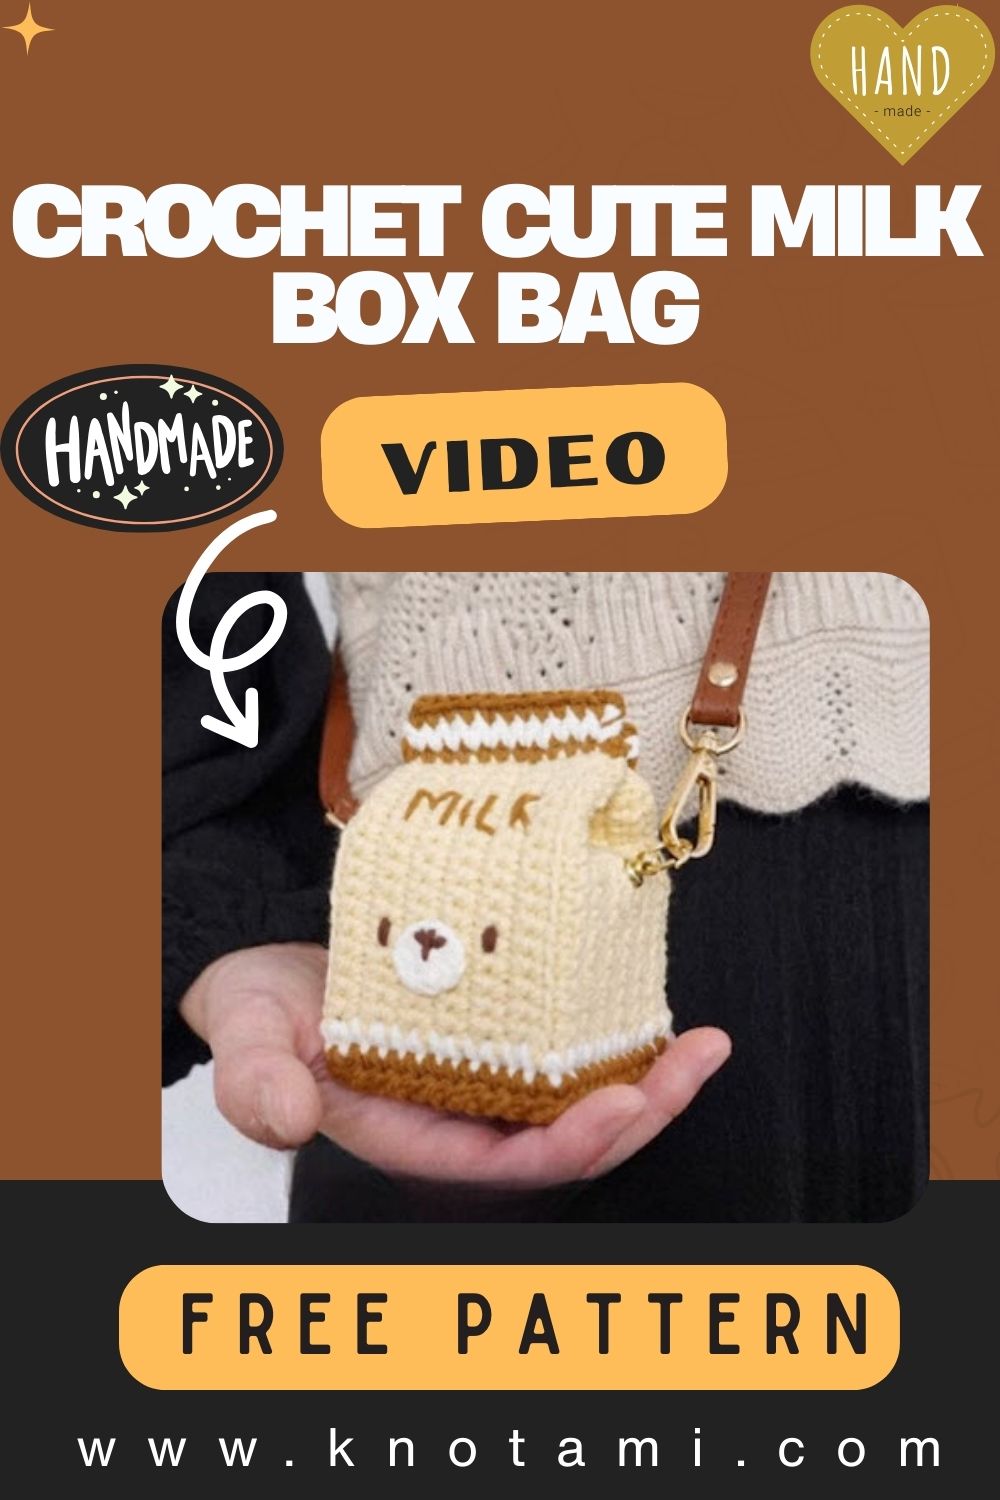
Think of a soft, cube-shaped bag with retro milk-box vibes, bold colors, cute lettering, and a handy strap or top handle. It’s practical enough to carry as a mini handbag, stash your hooks and markers, or display on a shelf as a conversation piece. It photographs beautifully, turns heads in the best way, and brings a sprinkle of nostalgia to any outfit or craft corner.
Best of all, making it is wonderfully soothing. The steady rhythm of your hook, the cozy feel of yarn in hand, and the moment you see those neat sides take shape make for the perfect unplugged pastime. It’s a slow-and-steady project that rewards your patience with a unique, giftable treasure you’ll be proud to say you made.

Materials & Tools
Before you dive into making your milk box bag, make sure you have all the right tools and materials on hand.
You’ll Need:
-
Yarn:
-
Main color: White or cream (milk carton body)
-
Accent colors: Red, blue, or pastel shades for lettering and borders
-
Yarn weight: Worsted (Medium 4) or Cotton DK (Light 3) for structure
-
-
Crochet Hook: 3.0 mm – 3.5 mm for a firm, dense stitch
-
Stitch Markers: To mark panel corners or round transitions
-
Tapestry Needle: For sewing panels and embroidering details
-
Scissors: Sharp pair for clean cutting
-
Measuring Tape: To ensure symmetry of panels
-
Optional: Lining fabric, magnetic clasp, zipper, or strap hardware for finishing touches
Choosing Yarn and Colors:
For this bag, a sturdy cotton yarn is ideal it holds shape well and provides a crisp texture for boxy designs. If you prefer a softer, puffier look, go for acrylic yarn. You can use pastel colors (pink, mint, sky blue) for a cute aesthetic or bold shades (red, navy, yellow) for a retro feel.
Pro Tip: Mix matte and glossy yarn textures to create contrast between the bag’s body and its lettering or border for a professional finish.
Step-by-Step Crochet Instructions
Let’s start building your adorable Crochet Milk Box Bag step by step!
1. Making the Panels (Front, Back, and Sides)
The bag is formed from six panels: front, back, two sides, bottom, and top flap.
-
Foundation Chain:
-
Chain 21 (or adjust based on desired bag size).
-
Row 1: Single crochet (sc) in second chain from hook, continue across. (20 sts)
-
Row 2–25: Turn, ch 1, sc in each stitch. (20 sts)
This creates one rectangular panel (front). Repeat this process to make four panels (front, back, and two sides).
-
-
Bottom Panel:
-
Chain 21, work 10–12 rows of sc to form the base rectangle.
-
-
Top Flap (optional lid):
-
Chain 21, sc 15–20 rows depending on how long you want the lid to be.
-
Expert Tip: Use tighter tension to make panels sturdy enough to stand upright. You can also double up the yarn for added thickness.
2. Joining the Panels
Once all panels are ready:
-
Line them up and whip stitch the edges together with a tapestry needle.
-
Begin by joining the front to the sides, then add the back and bottom panels.
-
Leave the top open or attach your flap.
Pro Tip: Use slip stitches or single crochet joins for visible, textured seams it adds charm and durability!
3. Adding the Handle or Strap
For a cute handbag-style milk box:
-
Chain 80–100 (depending on your desired strap length).
-
Work one row of single crochet across the chain for thickness.
-
Sew the ends securely to the sides of the top flap or upper body.
Alternatively, attach a metal chain or strap with D-rings for a modern, polished look.
4. Embroidering or Crocheting the Milk Design
This is the fun part decorating your bag!
Option 1: Crochet Letters and Shapes
Use contrasting yarn to crochet small letters:
-
Chain the needed length for each letter (“MILK,” “LOVE,” etc.)
-
Sew or glue them onto the front panel.
Option 2: Embroidered Design
With a tapestry needle, embroider MILK, a small cow face, or a cute heart using simple chain stitches.
Design Ideas:
-
Blue or red text for a retro carton look.
-
Add kawaii-style eyes or cheeks for extra cuteness.
-
Embroider STRAWBERRY MILK or CHOCOLATE MILK depending on your color theme!
5. Creating the Inner Lining (Optional)
For extra strength:
-
Cut fabric slightly smaller than the bag dimensions.
-
Sew the sides of the lining together.
-
Hand-stitch it inside the crochet bag.
Tip: Choose cotton fabric in matching or pastel tones. A gingham or polka dot pattern gives a playful, finished look!
6. Adding the Finishing Touches
-
Sew a small button or magnetic clasp under the flap for closure.
-
Add keychains, charms, or small bows for personalization.
-
Use hot glue to attach a small patch or felt heart.
Now you’ve got a milk box bag that’s functional and aesthetic perfect for carrying essentials like keys, lip balm, or crochet hooks!
Customization Ideas
The joy of crochet lies in creative freedom here’s how you can make your milk box bag even more unique:
1. Color Variations
-
Classic Milk Carton: White body, blue borders, and red text.
-
Strawberry Milk: Pink body with white accents and cute heart embroidery.
-
Chocolate Milk: Brown tones with cream stripes.
-
Rainbow Edition: Use gradient yarn or different colors for each panel.
2. Different Yarn Types
-
Cotton: Sturdy and structured for boxy shape.
-
Acrylic: Soft and flexible, ideal for casual tote style.
-
T-shirt Yarn: Chunky and modern look, adds sturdiness.
3. Embellishments
-
Add pom-poms, tassels, or felt appliqués.
-
Crochet a small straw accessory and attach it to the top flap for realism!
-
Sew on mini hearts or fruit motifs for themed editions (banana, melon, chocolate).
Advanced Tips & Troubleshooting
Even though this bag is beginner-friendly, these expert techniques will help polish your work:
-
Invisible Decrease: Insert hook through front loops only of next two stitches; pull through keeps edges smooth.
-
Consistent Tension: Use the same pressure on yarn to maintain symmetry across panels.
-
Prevent Curling Panels: Block pieces by gently stretching and steam pressing before assembly.
-
Sturdy Shape: Double-strand your yarn or line the inside with plastic canvas.
-
Even Edges: Always count stitches at row ends missing one can distort the cube shape.
-
Seamless Joining: Use mattress stitch for a clean, invisible seam.
-
Letter Embroidery: Lightly sketch the design on the bag with chalk before stitching.
-
Color Transitions: When switching colors, carry the yarn neatly along the wrong side to avoid loose strands.
-
Avoid Sagging: Reinforce the bottom with cardboard or plastic mesh.
-
Finishing Touch: Steam-block the finished bag for perfect shape retention.
Conclusion
Creating your own DIY Crochet Cute Milk Box Bag is more than just a crafting project it’s a celebration of creativity, patience, and joy. From forming the sturdy panels to embroidering the whimsical MILK logo, every step brings satisfaction and charm.
The finished bag isn’t just adorable; it’s a statement piece a reminder that handmade art can be both functional and fashionable. Whether you’re crocheting for yourself, a friend, or a little one, this project promises endless smiles and admiration.