
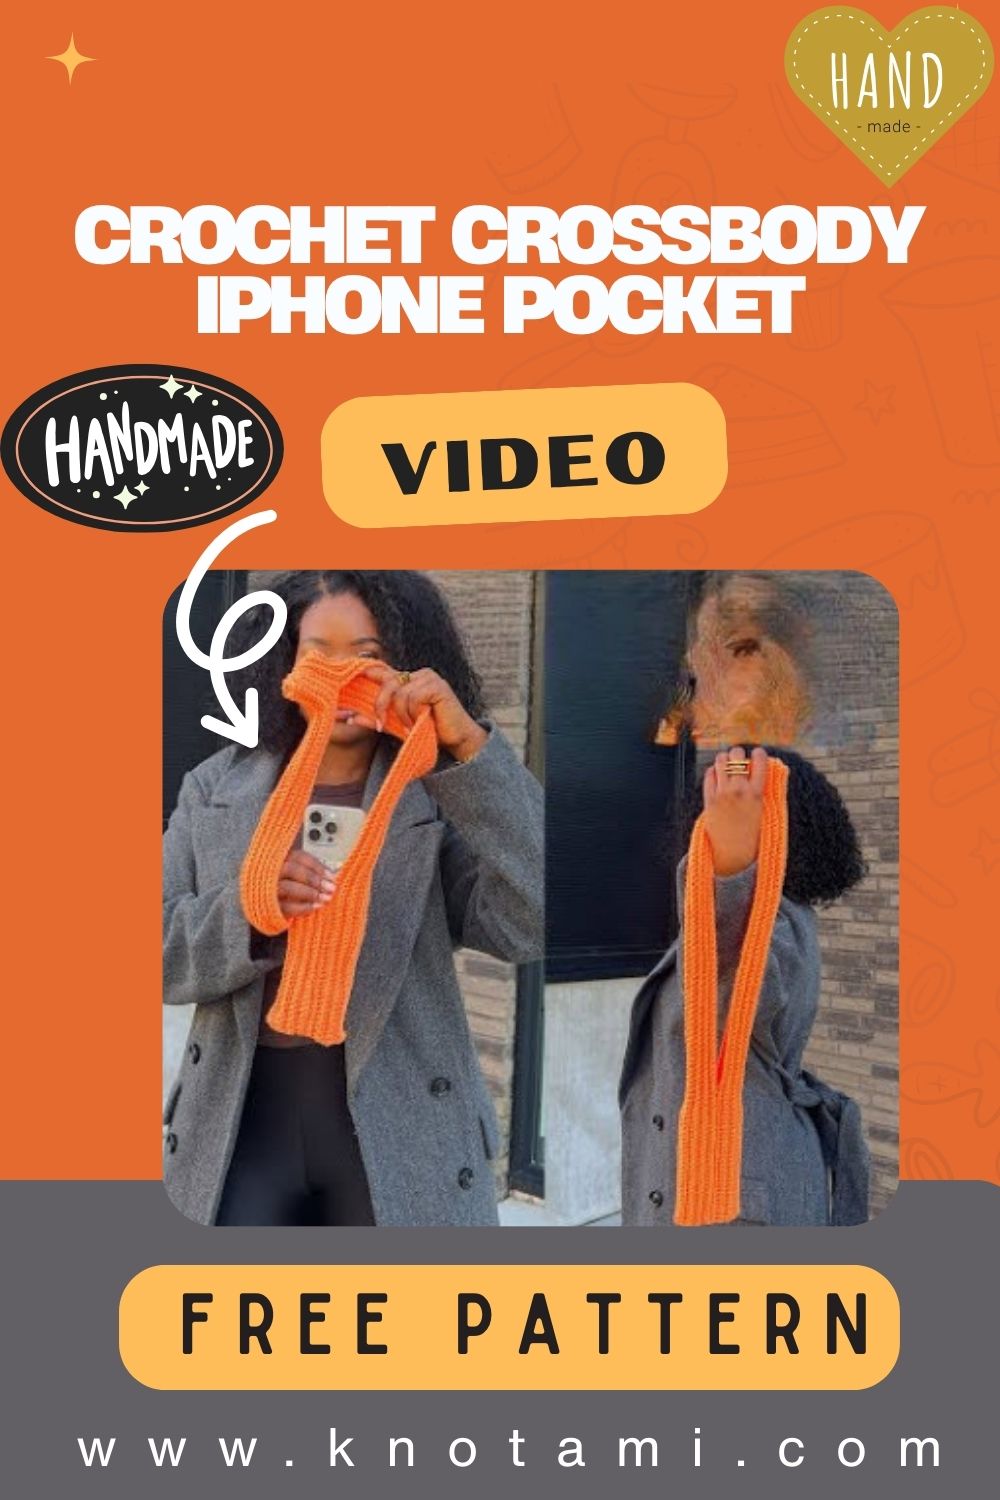
Craft the Natural Crochet Crossbody iPhone Pocket Pattern, boho-cool, hands-free, and stash-busting. Quick make, snug fit, adjustable strap, everyday chic for markets, walks, and coffee runs.
Keep your phone close with this Natural Crochet Crossbody iPhone Pocket Pattern. Featuring clean, earthy style and a slim profile, this beginner-friendly design uses sturdy cotton or linen yarn, an adjustable strap, and a simple, secure closure.

Customize the pocket to fit any iPhone model, add a card sleeve, or keep it minimalist for ultra-light carry. Perfect for hands-free days, markets, and travel, this quick project works up fast and makes a thoughtful, eco-minded gift. Durable stitches and a natural palette pair easily with casual outfits.
Uses:
- Hands-free errands, dog walks, and festivals
- Travel essentials like ID, cards, and earbuds
- Minimalist everyday carry for quick trips
Natural Crochet Crossbody iPhone Pocket Pattern (Beginner-Friendly + Video Guide)
Looking for a simple, stylish, and practical make? This natural crochet crossbody iPhone pocket pattern is the cozy-meets-minimal project you’ll reach for again and again. It works up quickly, it’s beginner-friendly, and it keeps your phone snug, hands-free, and scratch-free. Even better, it uses clean, earthy textures that look good with everything. As you’ll see below, the steps are short, the stitches are basic, and the results are effortlessly chic. So, let’s begin and, importantly, let’s keep it clear, catchy, and truly easy to read.
To blend SEO naturally: if you’re searching for a Natural Crochet Crossbody Crochet iPhone Pocket Pattern, this guide gives you exactly that without fuss, without bulk, and without confusing steps.
Materials and Exact Measurements
- Yarn: Medium-weight (category 4) cotton or cotton blend. Natural shades (oat, sand, taupe, or ecru) enhance the “natural crochet crossbody” aesthetic.
- Hook: 4 mm crochet hook (size up if you choose a thicker yarn).
- Scissors
- Tapestry needle (for weaving in ends)
- Stitch markers (2–4) for alignment
- Measuring tape
- Optional: Clip or ring if you want a detachable strap
Exact size targets (customize with your phone in hand):
- Pocket interior height: your phone’s height + 0.5 in (1.3 cm) for a secure top edge.
- Pocket interior width (flat): your phone’s width − 0.25 in (0.6 cm) for gentle negative ease so it hugs the phone without gapping.
- Top mini seams: approximately 10 stitches deep per side (about 1–1.25 in / 2.5–3 cm, depending on gauge) to create the pocket opening profile.
- Strap (crossbody): 45–55 in (114–140 cm), depending on height and how low you like it to sit.
From the video reference:
- Foundation chain: 95 chains (this establishes the length of each panel along the phone’s height).
- Rows: 15 rows of single crochet in the back loop (for springy rib texture and light stretch).
- Panels: Make 2 identical panels (front and back).
- Seams: Use slip stitch for joining to avoid bulk; center the seams.
- Top shaping seams: work approximately 10 stitches down from the top edge on both sides to form the “pocket” look and maintain structure at the opening.
Tip: Because everyone’s tension differs, align your measurements with your actual phone. The pattern is intentionally flexible and remains beginner-friendly.
Abbreviations (US Terms)
- ch = chain
- sc = single crochet
- BLO = back loop only
- sl st = slip stitch
- st(s) = stitch(es)
Gauge and Sizing Tips
- Although gauge isn’t critical for this project, consistency is. The fabric should feel firm enough to protect your phone yet flexible enough to slide it in and out easily.
- If your sc fabric feels floppy, go down a hook size. Conversely, if it feels stiff and hard to fold, go up a hook size.
- Because you’re working sc in BLO, the fabric naturally has a bit of horizontal stretch. Therefore, aim for a slightly snug fit around the width; it will ease perfectly with use.
- Before seaming, wrap a panel around your phone to test the width. If it’s too narrow, add 1–3 rows. If it’s too wide, remove 1–2 rows.
Before You Start: Watch the Video (Optional)
- Video: https://youtu.be/2JFIrQ-FG4k
- Following along visually can be reassuring, especially when you’re aligning panels and centering seams.
Step-by-Step Instructions: Body and Construction
Because beginners appreciate clear timing, each step includes an estimated making time. Times may vary with yarn, tension, and experience.
- Foundation Chain and First Row (Panel 1)
- Chain 95 for the panel length. Then ch 1 more for the turning chain.
- Row 1: Starting in the second chain from the hook, sc across. You’ll have 95 sc at the end.
- Time: 20–25 minutes
- Why: The 95-chain length corresponds to the vertical length of your pocket. If you prefer a taller pocket, you can chain more; if you want it shorter, chain fewer. Moreover, this makes it simple to size up for larger phones.
- Rows 2–15: Build Texture with BLO
- Ch 1, turn. Work 1 sc in the BLO of each stitch across. Repeat this row to create the ribbed texture.
- Maintain 95 sc per row.
- Repeat until you have 15 rows total.
- Time: 60–80 minutes
- Note: Working BLO adds a subtle rib that looks natural and provides a little stretch. Consequently, your pocket will “hug” the phone nicely without being stiff.
- Make Panel 2 Identical to Panel 1
- Repeat Steps 1–2 to create a second panel with the same stitch count and row count.
- Check that both panels are the same size; adjust by adding or removing a row if needed.
- Time: 60–80 minutes
- Tip: Lay both panels flat and align their edges. If one is smaller, add rows until they match. Thus, your seams will meet perfectly.
- Prep for Seaming: Align and Center
- Place panels with wrong sides facing out (ridges visible and seams will be inside after turning right-side out).
- Use stitch markers to match corners and to mark where your phone height ends along the side edges. This helps you stop sewing at the correct spot.
- Time: 5 minutes
- Because seam placement matters, center the future side seams so they’ll sit at the middle of the pocket’s front and back rather than at the edge. Therefore, the finished look is cleaner and less bulky.
- Seam the First Side with Slip Stitch
- Attach yarn at the bottom corner through both panel edges.
- Sl st through both layers along the side edge, working upward until your phone’s top height mark (the point where the pocket opening begins).
- Keep tension even so the seam stays flat.
- Time: 10–15 minutes
- Why slip stitch: It creates a strong, low-profile seam that doesn’t add bulk. As a result, the pocket lies flatter and looks cleaner.
- Fit Check, Then Seam the Second Side
- Slide your phone iintotest the fit. If it feels loose, you can either add a reinforcing sl st row slightly deeper or remove a row from each panel and reseam.
- Now repeat the same slip-stitch seam on the opposite side, ensuring both sides stop at the same height for an even opening.
- Time: 10–15 minutes
- Tip: Count your stitches from the bottom so both sides match perfectly. Consequently, your opening will be symmetrical.
- Seam the Bottom Edge
- Turn the pocket so the bottom edge is aligned and flat.
- Attach yarn at one bottom corner; sl st through both layers across to the other corner. This securely seals the base so your phone won’t slip out.
- Time: 10–12 minutes
- Additionally, weave in the bottom seam’s starting tail for extra reinforcement.
- Shape the Top Opening with Short Seams
- For the “iPhone pocket” profile shown in the video, you’ll add short seams at the top edges.
- From each top corner, count about 10 stitches inward and mark that point. Repeat on the opposite side so the depths match.
- Fold and align the top edges; then s, stitch from the corner down to the 10th stitch on each side. This leaves a neat central opening.
- Time: 10–12 minutes
- Because these short seams add structure, the opening stays tidy and better resists stretching.
- Create the Crossbody Strap (Simple, Sturdy, and Natural)
- Although the video focuses on the pocket body and seams, you can add a beginner-friendly strap as follows:
- Option A (flat cord): Ch 180–220 (45–55 in / 114–140 cm). Then,sl st back along the entire chain to create a strong strap. Fasten off.
- Option B (slim i-cord look): Ch to desired length, then work sc through back bumps only; the strap will look rounder and feel thicker. Fasten off.
- Attach the strap ends securely at the top side seams (where the short seams begin). Sew over several stitches for strength.
- Time: 25–40 minutes
- Tip: Try the bag on crossbody before finalizing the strap length. Therefore, you can shorten or lengthen to your exact preference.
- Weave in Ends and Turn Right-Side Out
- Weave in all tails neatly on the wrong side.
- Turn the pocket right-side out so seams sit inside and look clean from the outside.
- Give it a gentle steam or block if needed to relax the stitches.
- Time: 10–15 minutes
Total estimated making time: 2.5–4 hours for most beginners (often less than a day), depending on your pace.
Basic Tips for Beginners
- Start with a lighter natural color (oat, sand, or cream). Because darker yarn can make stitches hard to see, choosing a neutral shade makes counting easier.
- Count often. Therefore, you’ll keep 95 sc per row consistent and avoid accidental increases or decreases.
- Use markers. Place them at corners and top-depth marks (the 10-stitch point). Consequently, your seams will be even.
- Keep your slip stitches relaxed. A tight sl st seam can pucker the edges; a gentle hand keeps everything flat.
- Test the fit mid-process. With one side sealed, try your phone inside before completing the opposite side. As a result, you can adjust the width early.
Common Mistakes and How to Avoid Them
- Mistake: Working through both loops instead of BLO on rows 2–15.
Fix: Always insert the hook into the back loop only. This creates the correct ribbed texture and controlled stretch. - Mistake: Overly bulky seams.
Fix: Use slip stitch, not single crochet, for joining. Consequently, your edges lie flat. - Mistake: Misaligned top-depth seams.
Fix: Count 10 stitches down on both sides and mark before seaming. Then, seam to the markers to keep the opening even. - Mistake: Pocket too loose.
Fix: Remove 1 row from each panel or reseam 1–2 stitches deeper on each side. The BLO fabric will still stretch pleasantly. - Mistake: Strap stretching over time.
Fix: Use a firm stitch (sl st cord) and sew the strap into several stitches at the top. Additionally, consider cotton yarn for less stretch.
Variations You’ll Love
- Textured switch: Prefer a slightly smoother look? Use regular sc (through both loops) instead of BLO. Alternatively, alternate BLO and FLO rows for a subtle ridge pattern.
- Two-tone natural: Work one panel in light oat and the other in warm sand for a chic reversible look.
- Card sleeve add-on: Before seaming panels together, crochet a mini rectangle (same width, about 8–10 rows tall) and stitch it to the front panel as a card pocket.
- Button or toggle: Add a loop at the top center and a wooden button on the front for a rustic, secure closure.
- Detachable strap: Add small rings at the top corners and use a clip-on strap. As a result, you can swap lengths or colors depending on your outfit.
Why This Pattern Works (And Looks So Natural)
- The single crochet in BLO delivers a clean rib that feels organic, holds shape, and adds just enough flexibility. Moreover, slip-stitch seams keep everything trim, which means no bulky edges snagging in your bag or on your clothes. With a neutral palette, the Natural Crochet Crossbody Crochet iPhone Pocket Pattern pairs effortlessly with weekend looks, travel outfits, and market days.
Detailed Sizing Guide
Because phones vary, here’s how to nail your fit:
- Height: Measure your phone from bottom to top. Add 0.5 in (1.3 cm). Ensure your foundation chain (95 or adjusted) equals that height when relaxed—not stretched.
- Width: Lay your phone across the panel’s rows. If the panel width equals your phone width or is up to 0.25 in (0.6 cm) narrower, you’re golden. The ribbing will stretch slightly to accommodate it.
- Depth: If you use a bulky case, add 1–2 rows to each panel to prevent over-tightness.
- Opening: Keep those top short seams symmetrical at about 10 stitches. Therefore, the pocket won’t flare at the top.
Example adjustments:
- Smaller phones: Try 90 chains and 13–14 rows.
- Larger phones: Try 98–100 chains and 16–18 rows.
- Always test with your actual phone before sealing the second side and bottom.
Care and Durability
- Hand wash in cool water with gentle soap; reshape and lay flat to dry.
- Because cotton is durable, it resists pilling and wears well against daily use.
- If using linen or a cotton-linen blend, expect a slight soften-and-stretch effect over time, which many people love for a relaxed, natural look.
Troubleshooting at a Glance
- Panel curling? Loosen your tension slightly or block lightly before seaming.
- Uneven top edges? Count your stitches on both sides and redo the top-depth seams to match. With stitch markers, this becomes easy.
- Strap twisting? As you sslide backalong the chain, check every few inches and untwist the chain before continuing.
- Seams showing on the outside? Turn the pocket right-side out when you’re done; the seams should sit inside and disappear.
Quick Recap (So You Finish Confidently)
- Make two identical panels: ch 95, work 15 rows sc BLO, turning with ch 1 each row.
- Seam both sides with sl st up to your marked phone height.
- Seam the bottom closed with sl st.
- Add top short seams about 10 stitches down on each side for structure.
- Attach a sturdy strap using a sl st cord or similar method.
- Weave in ends, turn right-side out, and enjoy your natural crochet crossbody iPhone pocket.
Warm Closing (And Video Link Again)
You’ve just created a useful, beautiful accessory with simple stitches and smart finishing, exactly what a Natural Crochet Crossbody Crochet iPhone Pocket Pattern should be: clear, quick, and stylish. Because this make is so approachable, it’s also a perfect gift project that you can finish in an afternoon.
If you’d like, share your version in natural shades, add a card sleeve, or try a two-tone look. Either way, you’ll love how polished it feels with such beginner-friendly steps.