
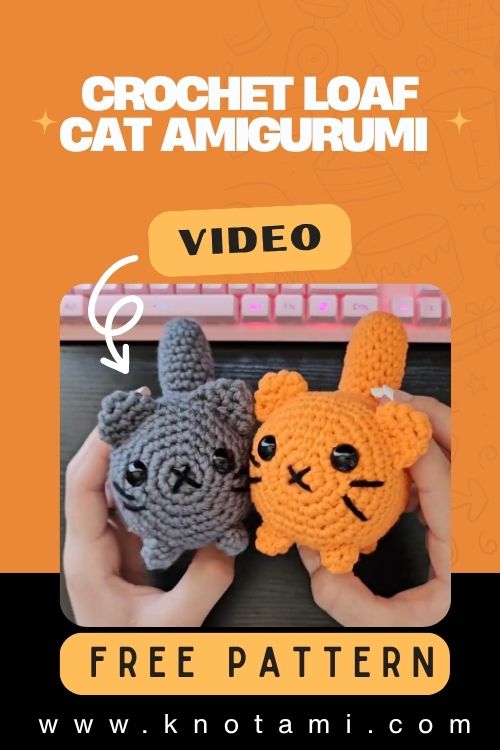
Loaf-shaped cats are the definition of cozy, cute, fluffy, chonky, and perfectly tucked in. If you’ve ever watched your cat curl up like a little bread loaf and thought, I need a crochet version of that, this DIY Crochet Loaf Cat Pattern is for you. This beginner-friendly amigurumi is a delightful project that captures the charm of a relaxed kitty in yarn form.
The Crochet Loaf Cat trend has taken the amigurumi world by storm, and it’s easy to see why. With its compact, rounded shape and soft, squishy texture, it’s the ultimate comfort project and a total crowd-pleaser among cat lovers and handmade gift fans alike. Whether you’re crafting to decorate your room, sell at a craft fair, or surprise a friend, this pattern brings endless joy.

Materials & Tools
Before you start crafting your loaf-shaped feline, let’s get your materials ready. Here’s everything you’ll need for this adorable crochet project:
Yarn
Choose a medium-weight (worsted weight/category 4) yarn for the body. Cotton yarn gives a neat look while acrylic yarn makes the plush extra soft and squishy. You can go for classic cat colors like beige, white, or gray or get creative with pastels or bright hues!
Crochet Hook
Use a 3.0 mm to 4.0 mm hook depending on your yarn thickness. A smaller hook helps keep your stitches tight so that the stuffing doesn’t show through.
Fiberfill Stuffing
This is what gives your loaf cat its signature plump and cozy shape. Use soft polyester fiberfill to stuff it evenly and firmly.
Stitch Markers
Perfect for keeping track of rounds, especially when crocheting in a spiral. They’re small, inexpensive, and save you from losing your place mid-row!
Yarn Needle & Scissors
Use these to weave in ends neatly and cut yarn after finishing. A yarn needle with a large eye makes threading thick yarn easy.
Optional Accessories
-
Safety Eyes (8–10 mm) for an adorable expression.
-
Embroidery Thread if you prefer stitching eyes or a smile.
-
Keychain Rings or Clasps to turn your loaf into a portable charm.
-
Blush or Fabric Paint for adding cute cheek details.
Step-by-Step Instructions
Let’s bring your Crochet Loaf Cat Amigurumi to life! Follow these simple, beginner-friendly steps.
1. Start with the Magic Ring
Begin with a magic ring (or adjustable loop). Work 6 single crochets (sc) into the ring this forms the base of your loaf cat. Pull tight to close.
2. Increase and Shape the Body
Work in continuous rounds.
-
Round 2: 2 sc in each stitch (12)
-
Round 3: 1 sc inc repeat (18)
-
Round 4 7: Keep increasing until your base looks like an oval loaf.
Once the bottom shape is ready continue crocheting even rounds without increases to build height. This forms the cute, chunky body of your loaf cat.
3. Create the Ears
To form tiny ears, you can crochet two small triangles separately:
-
Chain 4, sc in each stitch back.
-
Work decreases at the start of each row until a small triangle forms.
Sew them neatly to the top corners of the loaf.
4. Add Arms and Tail (Optional)
Make small ovals or bobbles for paws and attach them to the front sides. For the tail, crochet a short tube or chain and sew it to the back.
5. Stuff and Close the Plush
Once your loaf body is the desired length fill it with fiberfill. Make sure it’s firm but still squeezable. Use a yarn needle to close the opening with invisible stitches.
6. Add the Face Details
Insert safety eyes about 3 4 stitches apart or embroider sleepy eyes and a little smile. Add pink blush to the cheeks for extra charm.
7. Finishing Touches
Trim excess threads, shape the loaf gently with your hands, and admire your squishy creation. Congratulations your DIY Crochet Loaf Cat is ready!
Special Features & Pro Tips
This adorable crochet loaf cat pattern stands out for so many reasons:
-
No-Sew Simplicity: Many versions use continuous stitching meaning minimal sewing perfect for beginners.
-
Fast and Fun: You can finish your loaf cat in under 2 hours! Great for last-minute gifts.
-
Customizable Colors: Try classic gray tabby white kitty, or even pastel dessert loaf shades like mint or strawberry pink.
-
Bobble or Puff Stitch Texture: Add cute bread loaf ridges with bobble stitches for a unique twist.
-
Use Stitch Markers: They’ll help you keep track of rounds and ensure your loaf stays symmetrical.
-
Firm Stuffing: For a perfectly loafed look, stuff gradually and shape as you go.
-
Surface Embroidery: Add whiskers, stripes or tiny paws to personalize your cat.
Pro tip: If you plan to sell or gift your crochet loaf cats, consider adding a little handmade tag or charm it makes your amigurumi feel even more special!
Uses & Creative Ideas
Once your Crochet Loaf Cat Amigurumi is ready there are countless ways to enjoy it:
-
As a Cute Gift: Perfect for birthdays, holidays or cat-loving friends.
-
Home Décor: Place it on your desk shelf or bed for instant cozy vibes.
-
Keychain or Bag Charm: Make mini versions using thinner yarn and attach key rings.
-
Custom Themes: Try seasonal designs Halloween loaf cats with tiny hats or Christmas loafs with scarves!
-
Plush Collection: Create a full loaf family with different colors and facial expressions.
Each loaf cat you make tells a tiny story of warmth love and creativity.
Conclusion
Crocheting your own DIY Crochet Loaf Cat is one of those projects that reminds us why we love handmade crafts so much. It’s cute, fast, and incredibly satisfying to see your little loaf take shape stitch by stitch. Whether you’re new to amigurumi or an experienced crocheter, this pattern is a joyful way to relax, de-stress, and create something irresistibly adorable.
So grab your yarn hook and cozy blanket and let your imagination loaf freely! You’ll end up with not just a plush toy but a little bundle of happiness made entirely by you.