
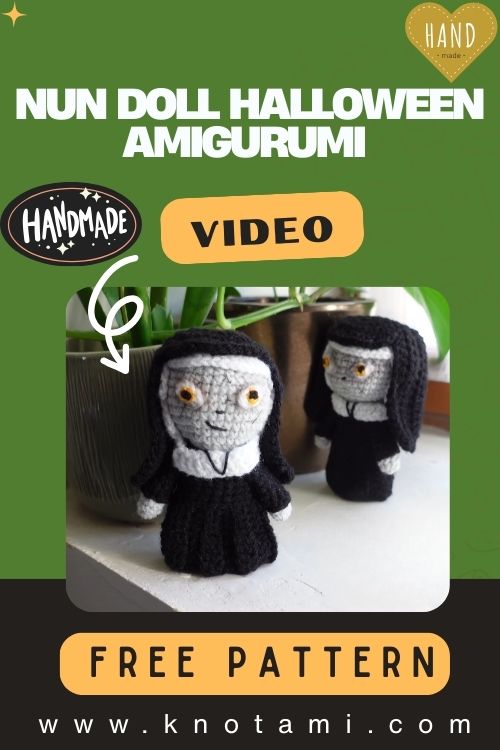
If you love Halloween makes that are cute, slightly eerie, and quick to finish, this Halloween nun doll crochet pattern is a perfect addition to your spooky season project list. It’s a palm-size mini amigurumi plush with a gray-toned face, golden-yellow eyes, and a minimalist expression that feels charmingly creepy. This tutorial walks you through each piece step by step: head, dress-style body, simple arms, white collar, and a classic black veil. The shapes are intentionally clean and beginner-friendly, so you can focus on getting a neat finish and playing with the spooky details.
This Halloween Nun Doll Crochet Pattern | Mini Amigurumi Plush Tutorial teaches you how to crochet an original mini doll inspired by a nun silhouette, styled for a playful Halloween vibe. The design is compact and balanced: a rounded, slightly oval head, a grey face for that “haunted” tone, and yellow eyes that pop against the dark outfit. The body is built as a simple cylinder to resemble a long nun’s dress, making it easy to assemble and sturdy enough for display.

This pattern is suitable for crocheters who enjoy small amigurumi projects, Halloween decor, and character-style dolls that don’t require complicated shaping. It’s especially fun if you like adding personality through tiny facial details, whether you choose a sweet smile, a neutral look, or a subtly spooky expression.
What makes this doll unique is the strong contrast: black veil and dress, crisp white collar, and bright eyes on a muted face. It looks great as a desk buddy, a shelf collectable, or a handmade Halloween gift. You’ll also be able to customise it easily with different eye styles, glow yarn accents, or a keychain loop.
Materials Needed
- Grey yarn (face/head)
- Black yarn (nun dress body + veil/head covering)
- White yarn (collar)
- Yellow yarn (for stitched eyes) or yellow safety eyes (6–8 mm)
- Black embroidery thread (mouth, optional eyelids/eyebrows)
- Fiberfill stuffing
- Crochet hook (2.75–3.5 mm; choose smaller than yarn label for tight stitches)
- Yarn needle (sewing and weaving in ends)
- Stitch marker
- Scissors
Optional (helpful but not required):
- A small amount of white felt for eye highlights
- Fabric glue if using felt (stitching is still recommended for durability)
Abbreviations
- MR: Magic Ring
- sc: Single crochet
- inc: Increase (2 sc in one stitch)
- dec: Decrease (single crochet 2 stitches together; invisible decrease recommended)
- sl st: Slip stitch
- ch: Chain
- FO: Fasten off
- BLO: Back loop only
- FLO: Front loop only
- st: Stitch
- rnd: Round
Helpful Notes
- Work in continuous rounds unless stated otherwise.
- Use a stitch marker in the first stitch of each round.
- Stuff evenly in small pieces to avoid lumps.
- Use invisible decreases for a cleaner amigurumi surface.
- Finished size may vary depending on yarn weight, hook size, and tension.
Step-by-Step Crochet Pattern (Original, Round-by-Round)
Construction overview: Head (grey) + Body/Dress (black) + Arms (grey) + Collar (white) + Veil/Hood (black).
Stitch counts are shown in [brackets] at the end of each round.
H2: Head (Grey) round, slightly oval
Rnd 1: MR 6 sc [6]
Rnd 2: inc in each st [12]
Rnd 3: (sc 1, inc) x6 [18]
Rnd 4: (sc 2, inc) x6 [24]
Rnd 5: (sc 3, inc) x6 [30]
Rnd 6: (sc 4, inc) x6 [36]
Rnd 7–9: sc around (3 rounds) [36]
Face shaping detail (subtle oval):
To make the head slightly oval and less perfectly round, add one gentle increase in a spaced way, then stabilise.
Rnd 10: sc 8, inc, sc 17, inc, sc 9 [38]
Rnd 11: sc around [38]
Rnd 12: sc around [38]
Now begin closing.
Rnd 13: (sc 4, dec) x6, sc 2 [32]
Rnd 14: (sc 3, dec) x6, sc 2 [26]
Rnd 15: (sc 2, dec) x6, sc 2 [20]
Start stuffing firmly, shaping the face so the front is smooth.
Rnd 16: (sc 1, dec) x6, sc 2 [14]
Rnd 17: dec x7 [7]
FO, close the opening, weave in the end.
H2: Body (Black) simple cylindrical nun dress
Start at the bottom of the dress.
Rnd 1: MR 6 sc [6]
Rnd 2: inc in each st [12]
Rnd 3: (sc 1, inc) x6 [18]
Rnd 4: (sc 2, inc) x6 [24]
Rnd 5: (sc 3, inc) x6 [30]
Rnd 6: sc around [30]
Rnd 7: sc around [30]
Rnd 8: sc around [30]
Rnd 9: sc around [30]
Create a slight taper toward the neckline:
Rnd 10: (sc 3, dec) x6 [24]
Rnd 11: sc around [24]
Rnd 12: (sc 2, dec) x6 [18]
Rnd 13: sc around [18]
Stuff the body firmly, especially the base for stability.
Rnd 14: (sc 1, dec) x6 [12]
FO is leaving a long tail for attaching the head.
Note: This construction gives a long-dress silhouette without needing separate legs, keeping it clean and cute.
H2: Arms (Make 2) (Grey) small and simple
Rnd 1: MR 6 sc [6]
Rnd 2: sc around [6]
Rnd 3: sc around [6]
Rnd 4: (sc 1, dec) x2 [4]
Rnd 5: sc around [4]
FO is leaving a long tail.
Lightly stuff just the hand end (optional). Flatten the open edge before sewing.
H2: Collar (White) simple neck band
Work in rows to create a small strip.
Ch 19 (adjust to fit your doll’s neck if needed)
Row 1: sc in 2nd ch from hook and across [18]
Row 2: ch 1, turn, sc across [18]
FO leaving long tails for sewing.
Optional pointed front look: After Row 2, add (ch 2, sl st in same st) at each end to mimic tiny collar tips.
H2: Veil / Head Cover (Black) nun hood style
This piece is made as a flat oval that wraps over the head, then stitched in place.
Ch 10
Rnd 1 (work around the chain):
- sc in 2nd ch from hook, sc 7, 3 sc in last ch,
- working on the other side of the chain: sc 7, 2 sc in last ch [20]
Rnd 2: inc, sc 7, inc x3, sc 7, inc x2 [28]
Rnd 3: sc 1, inc, sc 9, (sc 1, inc) x3, sc 9, (sc 1, inc) x2 [36]
Rnd 4: sc around [36]
Rnd 5: sc around [36]
FO leaving a long tail for sewing.
This creates a rounded “cape” shape that frames the face. You can make it longer by adding another round of sc around.
Face Details (eyes, mouth, optional spooky look)
H3: Eye Placement
- Mark the centre front of the head.
- Place eyes between Rnd 9 and Rnd 11 (depending on your preferred look).
- Space them 4–5 stitches apart for a cute but eerie stare.
H3: Yellow Eyes (Two Options)
Option A: Safety eyes (fastest)
- Use 6–8 mm yellow safety eyes.
- Insert before the head is completely closed (ideally before Rnd 15).
- Secure washers inside the head.
Option B: Stitched eyes (child-friendly)
- Using yellow yarn or embroidery thread, stitch two small ovals.
- Add a tiny black vertical stitch in the centre for a “glowing” pupil effect.
H3: Mouth Embroidery
- Use black embroidery thread to stitch a small smile or neutral line.
- For a spooky-neutral expression: stitch a short straight line with tiny upturns at the ends.
- Optional: add subtle eyelids with black thread (a short curve above each eye).
Assembly Instructions
Attach Head to Body
- Ensure both pieces are firmly stuffed.
- Centre the head on the narrowed top of the body.
- Pin in place, then sew around using the long tail from the body.
- Stitch firmly, this is the main stress point.
Sew on Arms
- Attach arms at the sides of the body around Rnd 10–11 of the body (mid-upper area).
- Angle them slightly forward for a sweet mini-doll pose.
Add the White Collar
- Wrap the collar strip around the neck seam.
- Overlap ends at the back and sewn down.
- You can tack the front edge with 1–2 stitches, so it lies flat.
Position and Stitch the Veil
- Centre the veil over the head so the face opening frames the eyes and mouth.
- The veil should start near the top of the head and drape toward the neck.
- Sew along the sides near the “temples,” then stitch the lower edge near the neck/collar area.
- Leave the front open to keep the hood effect.
Final Shaping
- Gently press and shape the head and body for a smooth silhouette.
- Check symmetry from the front: eyes level, veil even, collar centred.
Finishing Tips
- Use a slightly smaller hook than usual to avoid gaps (especially on the grey face).
- Weave ends deep inside and change direction while weaving to lock them in.
- Pin every piece before sewing; small dolls show placement mistakes more clearly.
- Keep embroidery minimal; tiny stitches look cleaner at this scale.
- If the veil edge curls, add one more round of sc or lightly steam the veil only (avoid direct heat on acrylic).
Customisation Ideas
- Cute version: softer grey (or pale beige), smaller smile, wider eye spacing.
- Spooky version: darker grey face, angled embroidered brows, narrower smile.
- Different eye colours: amber, red, neon green, or white “ghost eyes.”
- Glow-in-the-dark yarn: use it for the eyes, collar edge, or a tiny cross charm.
- Keychain version: add a loop on top of the veil; use tighter stuffing and embroidered eyes.
- Larger plush version: Use bulky yarn and scale up the hook size while keeping stitches tight.
Beginner Tips
- Count stitches at the end of every round—amigurumi is all about consistent shaping.
- Stuff gradually and shape as you go; do not wait until the very end.
- If sewing feels intimidating, use pins and sew in small sections, checking alignment often.
- Practice invisible decrease on a scrap circle first—it makes a big difference visually.
Common Mistakes (and fixes)
- Gaps in stitches (stuffing shows): switch to a smaller hook and tighten tension.
- Head looks lumpy: use smaller stuffing pieces and distribute evenly.
- Eyes look uneven: mark positions with pins and count stitches between them.
- Veil slides backward: add a few hidden stitches near the temples and at the neck.
- Collar won’t lay flat: shorten the collar chain slightly or tack the front corners down.
- Doll won’t sit flat: add more stuffing to the base or flatten the bottom while closing.
Care Instructions
- Spot clean with a damp cloth and mild soap.
- If needed, gently hand-wash, press out the water with a towel, and air-dry fully.
- Store away from direct sunlight and moisture.
- If the doll is for a child under 3, avoid safety eyes and use embroidered eyes instead.
FAQ Section (6 FAQs)
1) Is this Halloween nun doll crochet pattern beginner-friendly?
Yes, especially if you’ve made a basic amigurumi ball before. The stitches are simple; the main focus is neat assembly and clean face placement.
2) Can I use a different yarn weight?
Absolutely. DK or worsted is easiest. If you use plush/chenille yarn, switch to embroidered eyes for safety and clarity.
3) Can I make it bigger?
Yes. Use thicker yarn, or add one increase round to the head and body (then add a matching straight round) for a larger scale.
4) Can I avoid safety eyes?
Yes. Stitched eyes are great for a spooky look and are safer for small children.
5) How do I make it look more spooky?
Try a darker gray face, smaller mouth, slightly angled eyebrows, and tighter eye spacing for a more intense expression.
6) Can I sell finished dolls made from this pattern?
In most places, you can sell finished handmade items you make yourself. Avoid using trademarked names in listings; use wording like “Halloween nun-inspired doll.”
Conclusion
This mini Halloween nun doll amigurumi is a quick, satisfying project with just the right balance of cute and creepy. The simple dress, crisp white collar, and classic black veil create a recognisable silhouette, while the grey face and yellow eyes lend it a subtle, spooky charm. If you’re looking for a beginner-friendly Halloween crochet doll that stands out from pumpkins and ghosts, this one is a fun make you’ll want to crochet more than once.