

There’s something truly magical about the way yarn transforms under your hands from soft, colorful strands into something full of life and character. Crochet isn’t just about making things; it’s about the quiet joy that comes with crafting something tangible, something that reflects your creativity and care. Every loop and stitch carries emotion the patience of crafting, the rhythm of the hook, and the satisfaction of watching a tiny creature come alive through your fingertips.
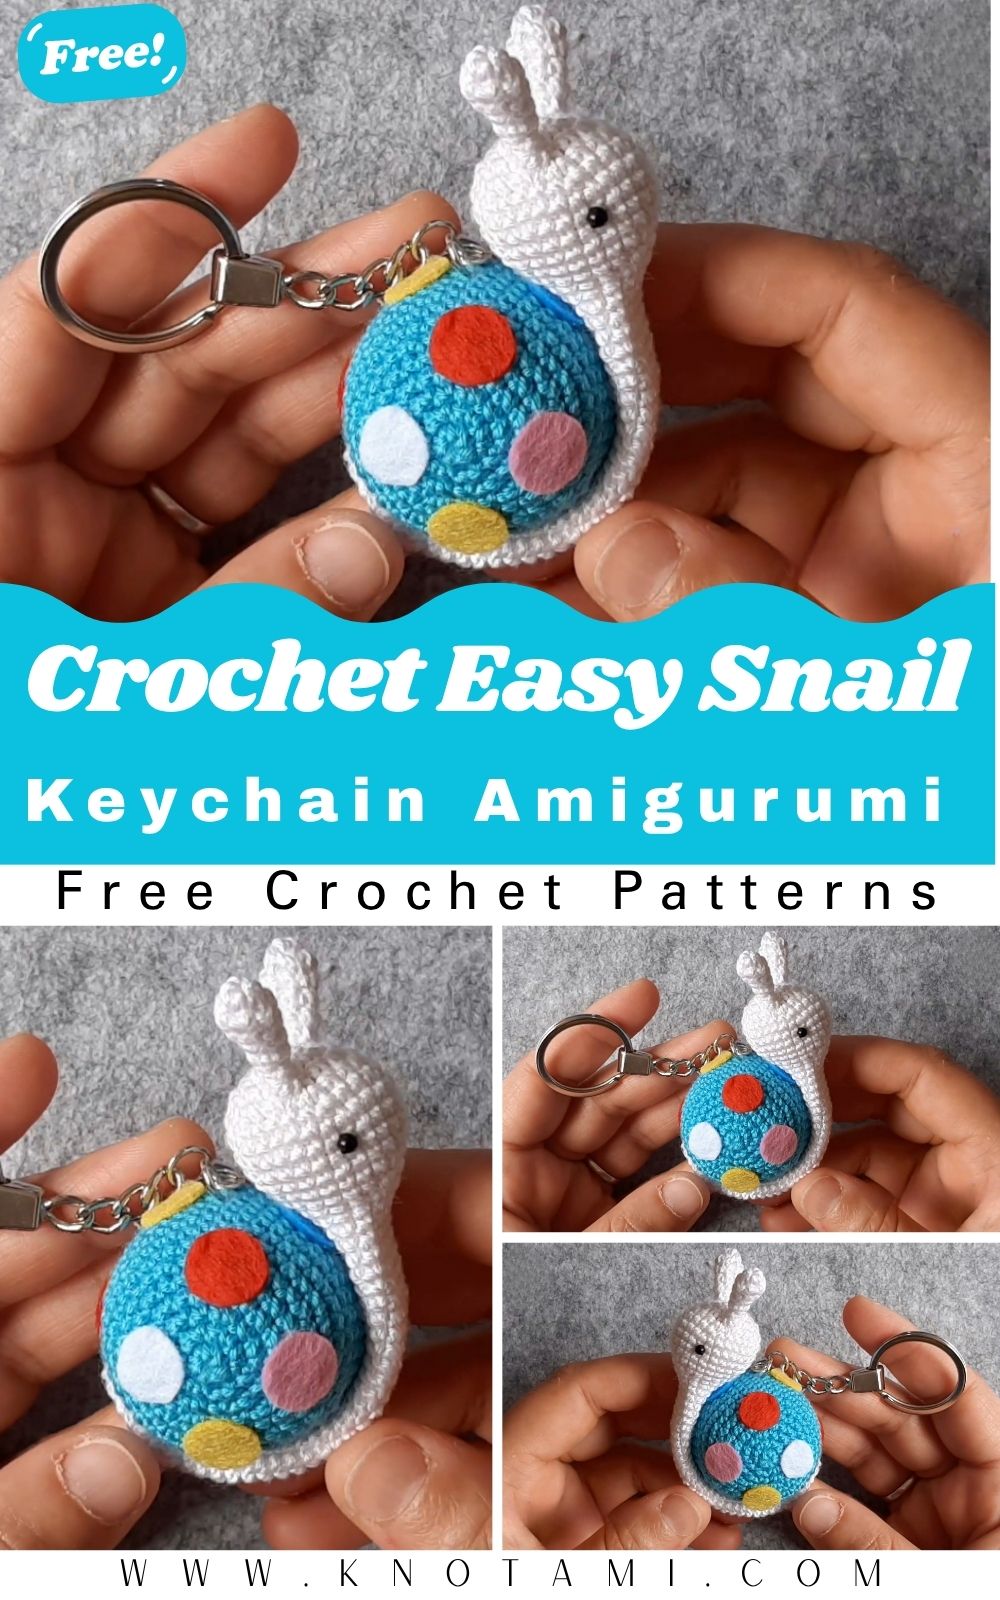
Among the many delightful crochet projects out there, the DIY Crochet Easy Snail Keychain Amigurumi is a small yet irresistibly charming one. It’s cute, quick, and full of personality. The tiny coiled shell, gentle smile, and miniature antennae make this snail an adorable addition to your keys, bags, or workspace. Despite its simplicity, it captures a cozy handmade magic that never fails to make people smile.
Whether you’re a beginner learning the basics of amigurumi or a seasoned crocheter looking for a stress-free project, this snail pattern offers a balance of fun and creativity. Its simple rounds and shapes are approachable, while the color and detailing options let you experiment freely from realistic earthy tones to whimsical rainbow shells.
Crocheting a little snail like this is more than a craft; it’s a form of slow art. The soft repetition of stitches invites calm, and finishing a project so tiny yet expressive gives you a rush of pride. This pattern is perfect for mindful crocheting, weekend relaxation, or creating handmade gifts that radiate warmth and care.
Materials & Tools
Before we dive into stitching, let’s prepare everything you’ll need to make your Easy Crochet Snail Keychain Amigurumi.
Supplies List
-
Yarn: Use 100% cotton or acrylic yarn in two colors one for the body and another for the shell. Choose DK (light worsted) weight for small, neat stitches.
-
Hook: 2.5 mm or 3.0 mm crochet hook adjust size depending on your yarn.
-
Stuffing: Polyester fiberfill or cotton stuffing for the snail body.
-
Safety eyes: 6 mm or 8 mm round black safety eyes (or embroider them for child-safe toys).
-
Tapestry needle: For sewing parts and weaving ends neatly.
-
Scissors: Sharp, small pair for precision cutting.
-
Stitch markers: To mark the start of each round.
-
Keychain ring: Optional, but perfect for turning it into a portable charm.
Yarn & Color Tips
Pick yarns that complement each other for example:
-
Soft beige or pastel yellow for the body
-
Vibrant turquoise, pink, or lilac for the shell
-
Use contrasting tones to make the spiral shell pop
Cotton yarn holds its shape better, giving your snail a defined structure, while acrylic yarn adds a soft, plushy feel. Avoid fuzzy or velvet yarns for small amigurumi, as they can hide stitch visibility.
Step-by-Step Crochet Instructions
Let’s bring your little snail to life! Follow these detailed steps and remember, patience and even tension are the keys to perfect amigurumi.
Making the Head
-
Start with a magic ring using the body color.
-
Work 6 single crochets (sc) into the ring.
-
Pull tight and join in the first stitch to form a circle.
-
Continue increasing in each round:
-
Round 2: 2 sc in each stitch (12 sts)
-
Round 3: (1 sc, inc) around (18 sts)
-
-
Add safety eyes between rounds 3–4, spaced evenly.
-
Lightly stuff the head to keep it rounded.
💡 Tip: Don’t overstuff a firm but flexible head helps the neck sit naturally later.
Forming the Neck and Upper Body
-
Crochet 1 sc in each stitch for the next 3–4 rounds.
-
Slightly decrease one stitch on each side to shape a gentle curve (this forms the neck).
-
Add a touch more stuffing as you go.
Tip: To make a smooth curve, shape the neck gently with your fingers after stuffing this ensures a natural transition from head to shell.
Building the Main Body
-
Continue crocheting evenly for 4–5 more rounds to elongate the body.
-
Start light decreases toward the back for a tapering effect.
-
Once the shape looks snail-like (rounded front, slimmer end), fasten off and weave in ends.
💡 Tip: Use your thumb and forefinger to press the body slightly flat before attaching the shell this helps it balance better.
Creating the Shell
Now for the fun part the signature spiral shell!
-
With your chosen shell color, chain 25–30 stitches.
-
Starting in the second chain from the hook, work 3 single crochets in each stitch all along this makes the strip curl naturally.
-
Once you reach the end, roll the spiral tightly from one end to form a coil.
-
Stitch the coil in place using your needle.
Tip: Adjust coil tightness for different shell styles a tight coil looks cute and compact, while a looser one gives a whimsical, swirled effect.
Assembling the Snail
-
Position the shell on the upper back of the body, aligning the narrow end of the body under the center of the coil.
-
Stitch securely using matching yarn.
-
Ensure the shell is slightly tilted upward for a lively look.
Tip: Anchor the shell in 3–4 key points so it doesn’t wobble. Use small, tight whip stitches for a clean finish.
Adding Antennae
-
Cut two short yarn strands (around 2.5 inches each).
-
Insert them on top of the head and secure by knotting.
-
Add a tiny drop of fabric glue at the base for firmness.
Optional: You can crochet mini antennae using chain stitches and slip stitches for a sturdier look.
Final Touches
-
Embroider a small smile below the eyes with black thread.
-
Attach a keychain ring using the top of the shell.
-
Optionally, add blush with pink thread or fabric paint.
Tip: To make your snail stand upright, press the bottom slightly flat or add a tiny pebble inside the base before closing.
Customization Ideas
Your little snail can have endless personalities! Here are creative ideas to make it uniquely yours:
-
Color Play: Try pastel shells with white bodies, or bold contrasts like mint green and coral.
-
Textured Yarn: Use variegated or self-striping yarn for a magical rainbow spiral.
-
Holiday Themes: Red-green shell for Christmas, pink-gold for Valentine’s, or metallic threads for festive décor.
-
Mini Accessories: Crochet a tiny scarf, hat, or bowtie for extra cuteness.
-
Fantasy Styles: Make a galaxy snail using navy yarn and specks of silver thread for stars.
-
Nature Tones: Earthy greens and browns for a realistic garden snail.
Advanced Tips & Troubleshooting
Even experienced crocheters can benefit from these pro-level insights:
-
Invisible Decreases: Insert hook through front loops only of next two stitches, yarn over, pull through both, then complete stitch reduces bumps.
-
Maintain Tension: Keep consistent yarn tension throughout rounds to avoid uneven edges.
-
Prevent Twisting: Use a stitch marker in the first stitch of every round.
-
Even Stuffing: Add small tufts gradually never large clumps to prevent lumps.
-
Shape Correction: Massage and roll the piece between your palms to even out fibers.
-
Joining Parts: Use the mattress stitch for nearly invisible seams.
-
Pattern Reading: Familiarize yourself with abbreviations (sc = single crochet, inc = increase, dec = decrease).
-
Color Changes: Change color during the final pull-through of the stitch before switching yarns.
-
Finishing Ends: Weave yarn tails back and forth 3–4 times to secure.
-
Mini Keychain Balance: Attach the ring near the shell top to ensure your snail hangs upright.
Care Instructions
To keep your crochet snail looking fresh and adorable:
-
Wash gently by hand using mild detergent in lukewarm water.
-
Do not wring or twist. Instead, gently squeeze excess water.
-
Air dry flat on a towel in the shade.
-
Avoid sunlight exposure for long periods to prevent fading.
-
Storage tip: Keep it in a clean, dry spot or in a zip pouch when used as a keychain.
-
Gift wrapping: Place inside a small kraft box or linen pouch for a beautiful handmade presentation.
Display & Gift Ideas
This little snail is as versatile as it is adorable. Here are some creative ways to use or gift it:
-
Home Décor: Display it on a bookshelf, windowsill, or plant pot as a touch of handmade whimsy.
-
Keychain or Bag Charm: Attach it to backpacks, tote bags, or zipper pulls.
-
Kid’s Room Accent: Perfect for nursery décor or gentle play (embroidered eyes recommended for safety).
-
Personalized Gift: Create in a loved one’s favorite colors perfect for birthdays, anniversaries, or just because gifts.
-
Event Souvenirs: Make a batch for handmade fair stalls or crochet swaps.
-
Holiday Ornament: Hang on the Christmas tree or garlands as unique crochet décor.
Benefits of Making the Crochet Easy Snail Keychain
Crafting something small yet full of heart brings countless benefits:
-
Mindful Relaxation: The repetitive motion of crochet induces calm, like meditation through creativity.
-
Stress Relief: Each stitch releases tension, helping you unwind after a busy day.
-
Joy of Creation: Watching your snail take shape gives genuine happiness and pride.
-
Sustainability: Handmade gifts are eco-friendly and reduce reliance on mass-produced items.
-
Emotional Connection: Gifting something made by hand carries love, thought, and effort.
-
Skill Development: Boosts dexterity, focus, and confidence with every completed piece.
-
Creative Therapy: Engaging your hands quiets the mind ideal for mental clarity and relaxation.
Photography & Social Media Tips
Want your handmade snail to shine online? Here’s how to capture its charm:
-
Use natural daylight morning light is soft and flattering.
-
Choose a neutral background (like beige linen or wooden texture) to highlight your snail’s colors.
-
Add storytelling props: yarn balls, crochet hooks, plants, or your workspace.
-
Experiment with angles: top-down for shape, close-up for stitches, or a side view for the shell spiral.
-
Keep it authentic: Show your hands or workspace for a warm, relatable vibe.
Bonus Tip: Short videos showing your snail’s 360° view or assembly process perform great on Instagram Reels and Pinterest.
Conclusion
Crochet isn’t just a hobby it’s a language of love and patience woven into yarn. The DIY Crochet Easy Snail Keychain Amigurumi proves that even the smallest projects can spark big joy. Every twist of the hook, every soft curve of the shell, and every smiling face you stitch becomes a tiny symbol of care and creativity.
Whether you’re gifting it to someone special, selling it at a craft fair, or simply adding it to your growing amigurumi family, this cheerful little snail reminds us to slow down to enjoy the process, not just the result. So grab your yarn and hook, and let your imagination crawl happily forward one cute stitch at a time.