

There’s a special kind of joy in watching yarn transform beneath your hands. Crochet, with its rhythmic motion and creative flow, turns simple strands into something magical a plush, a pouch, a little friend filled with warmth and heart. The satisfaction of seeing your creation come to life, stitch by stitch, is one of the purest pleasures a crafter can experience. It’s more than a hobby it’s a gentle art form that connects your imagination with something tangible and deeply personal.
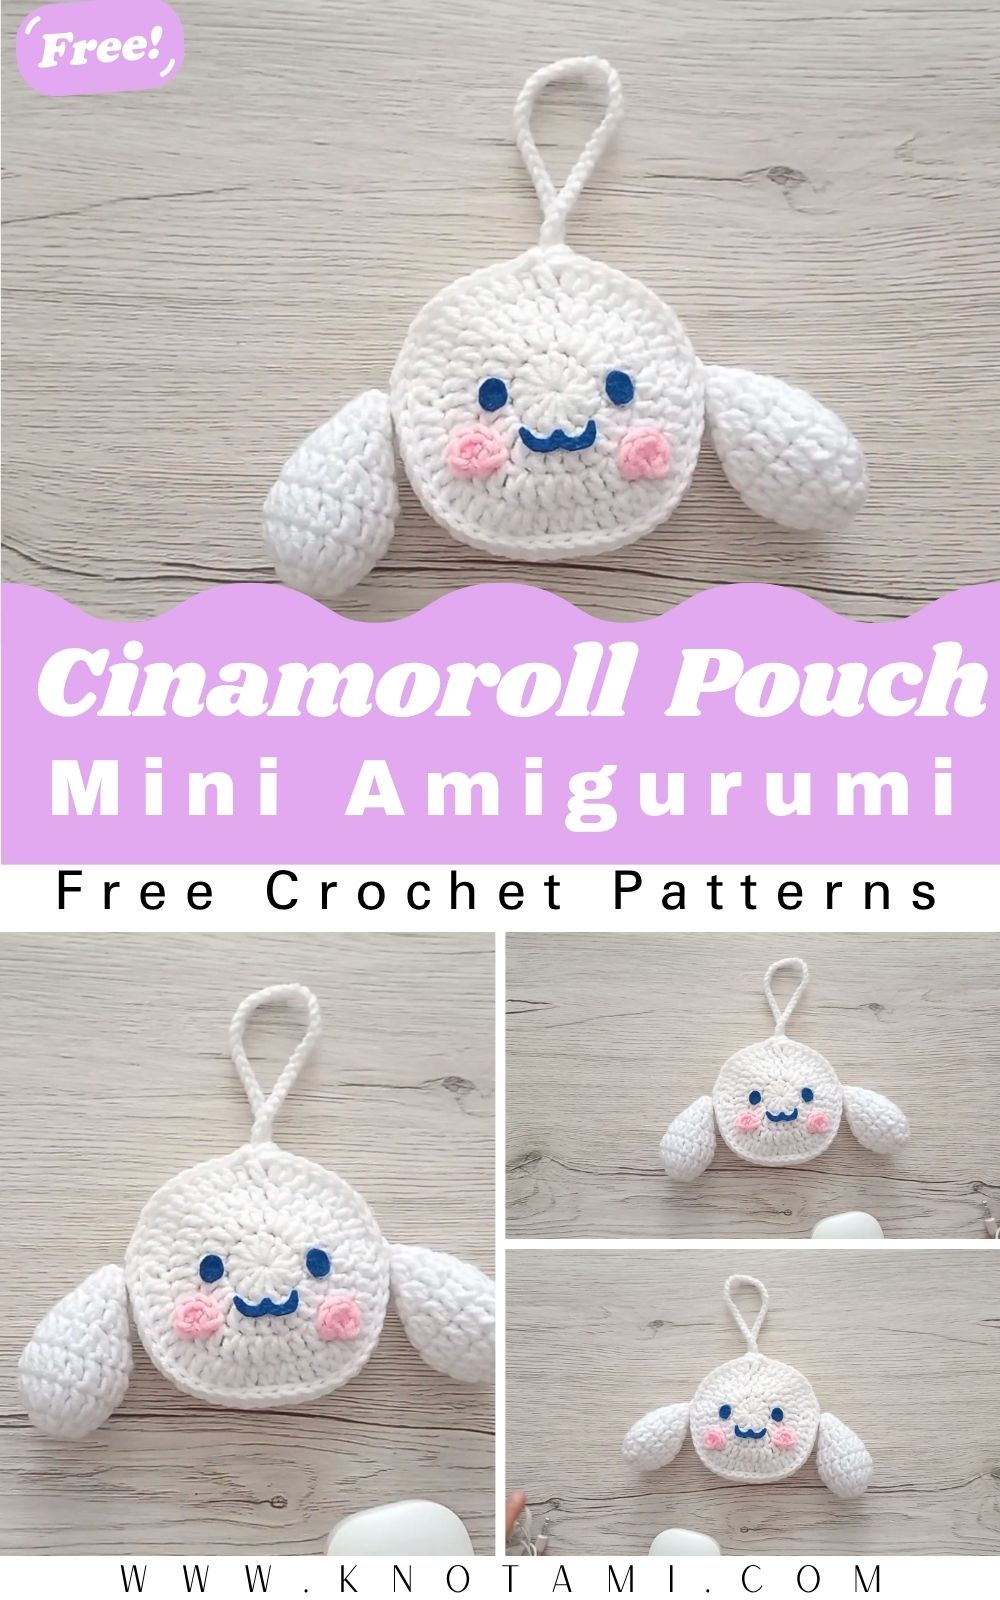
The Mini Crochet Cinnamoroll Pouch Amigurumi captures that magic perfectly. Inspired by Sanrio’s beloved floppy-eared puppy, this adorable pouch combines functionality and cuteness in one irresistible creation. With its signature blue eyes, soft pastel tones, and cheerful expression, it’s not just a toy it’s a sweet, collectible pouch perfect for holding coins, lip balm, jewelry, or even lucky charms. It’s a must-make for anyone who loves kawaii (cute) crafts and miniature accessories.
What makes this project so delightful is that it’s suitable for all skill levels. Beginners will find the pattern approachable, learning simple shaping and colorwork techniques, while experienced crocheters will enjoy fine-tuning facial details, ear positioning, and the finishing touches that give Cinnamoroll his signature personality. The pouch structure introduces a bit of practical crafting fun, allowing you to merge toy-making with functionality a rewarding challenge in itself.
The process of crocheting this Cinnamoroll pouch is slow, peaceful, and wonderfully creative. You’ll lose yourself in the gentle rhythm of stitches, watching the face emerge and the little pouch take shape. And when you’re done, you’ll hold in your hands not just a handmade item, but a tiny token of joy one that reflects patience, love, and creativity stitched together in the most adorable way possible.
Materials & Tools
Before you start your Cinnamoroll Amigurumi Pouch gather your materials to make the crafting process smooth and enjoyable.
Materials List
-
Yarn: Soft cotton or acrylic yarn (DK or light worsted weight)
-
White: For the main body and ears.
-
Baby blue: For the eyes.
-
Light pink: For blush cheeks.
-
Beige or brown: For the mouth embroidery.
-
-
Crochet hook: 2.5 mm or 3.0 mm (depending on your tension).
-
Stuffing: Polyester fiberfill (for ears or face if lightly stuffed).
-
Zipper or drawstring: Small white zipper (~8–10 cm) or cotton cord for pouch closure.
-
Safety eyes: 6–8 mm (or embroidered eyes).
-
Tapestry needle: For sewing parts and embroidery.
-
Scissors: Sharp pair for trimming yarn.
-
Stitch markers: To keep track of your rounds.
Choosing Yarn & Color
-
Cotton yarn: Creates a smooth, defined look perfect for structured pouches.
-
Acrylic yarn: Offers a soft, slightly fuzzy finish that adds charm.
-
Color combinations: Classic Cinnamoroll is white with sky-blue eyes, but you can experiment with pastel pink, cream, or lavender for a dreamy twist.
Pro Tip: Stick to high-quality yarns for this project since white can easily attract fuzz or dirt a smooth fiber keeps your pouch looking neat and bright.
Step-by-Step Crochet Instructions
This guide walks you through making the entire Mini Crochet Cinnamoroll Pouch, from shaping the head and ears to attaching the pouch compartment and final details.
Making the Head
The head forms both the pouch base and Cinnamoroll’s iconic rounded face.
Pattern (Head Base):
-
Round 1: Start with a magic ring, 6 sc (6).
-
Round 2: Inc in each stitch (12).
-
Round 3: (1 sc, inc) × 6 (18).
-
Round 4: (2 sc, inc) × 6 (24).
-
Round 5: (3 sc, inc) × 6 (30).
-
Rounds 6–11: sc around (30).
Now you’ll have a rounded oval shape this forms the front of the pouch.
-
Round 12: (3 sc, dec) × 6 (24).
-
Round 13: (2 sc, dec) × 6 (18).
-
Round 14: (1 sc, dec) × 6 (12).
-
Round 15: dec × 6 (6).
Fasten off and weave in ends. Flatten lightly.
Tip: If you’re planning to attach a zipper pouch insert, stop at Round 11 and leave the back open you’ll later sew a fabric or crochet lining.
Forming the Neck and Upper Body
For this pattern, the body is actually the pouch compartment behind the head.
Pattern (Back Piece):
-
Repeat Rounds 1–11 of the head pattern.
-
Do not close the piece. Leave the open edge to attach the zipper or join directly to the head using slip stitches.
Align both pieces (front and back) together, wrong sides facing inwards, and sew or crochet them together along the edge, leaving an opening for the zipper at the top.
Building the Pouch Opening
You can choose between zipper or drawstring styles.
Option 1 – Zipper:
-
Pin the zipper along the top edge of both pieces.
-
Use a sewing needle and thread to attach neatly, keeping stitches small and even.
Option 2 – Drawstring:
-
Crochet an extra round of chain loops at the top edge (ch 1, sk 1, sc in next stitch).
-
Thread a soft cord or yarn string through, add small beads at ends for decoration.
Pro Tip: A pastel pink or blue zipper adds a lovely touch that complements Cinnamoroll’s colors.
Creating the Ears
Cinnamoroll’s long, floppy ears are his most recognizable feature!
Pattern (Make 2):
-
Row 1: Ch 10.
-
Row 2: Starting from the 2nd ch, sc 8, inc in last st (9).
-
Row 3: sc across, inc in last (10).
-
Row 4–8: sc across (10 each row).
-
Row 9: dec at each end (8).
-
Row 10: dec at each end again (6).
Fasten off, leaving a tail for sewing. Optionally, lightly stuff each ear to give them volume and shape.
Attach the ears symmetrically on each side of the head between Rounds 4–6.
Expert Tip: To make them extra cute, sew them slightly angled downward for that signature floppy look.
Adding Facial Features
The face brings your Cinnamoroll to life!
Eyes:
-
Insert safety eyes between Rounds 5–6, about 7 stitches apart.
-
Use sky-blue yarn to crochet small circles if you prefer embroidered eyes:
-
Magic ring, 6 sc, sl st, FO.
-
Mouth:
-
With beige or brown thread, embroider a small 3 shape in the center below the eyes.
Blush:
-
Use light pink yarn or fabric blush.
-
Add small circular stitches (1–2 per side) below each eye.
Pro Tip: Always pin facial pieces before sewing slight adjustments can change the entire expression.
Optional Tail or Charm
If you’d like to add a cute charm to the back of the pouch:
-
Chain 8, sl st back, FO.
-
Sew it to the bottom as a small tail loop, and attach a tiny pom-pom or bell.
Charm Additions:
Add a small crocheted heart, star, or bow above the zipper for an extra kawaii touch.
Assembly & Final Touches
Now it’s time to bring everything together!
-
Attach the ears securely, stitching through both the ear and head layers for strength.
-
Sew facial details neatly.
-
Check balance both ears should fall evenly.
-
Lightly stuff the face if you want a more plush look; leave flat for pouch usability.
-
Attach zipper or drawstring closure at the top.
-
Weave in all ends and trim excess yarn.
Finishing Tip: Use an invisible join for the last stitch and lightly roll the piece in your hands to even the stuffing and shape.
Customization Ideas
Your Mini Cinnamoroll Pouch can be as classic or as creative as you wish!
Color Schemes
-
Classic: White with blue eyes and pink blush.
-
Pastel Rainbow: Gradient yarn for a dreamy look.
-
Mint Delight: Mint body, cream ears, pink zipper.
-
Holiday Special: Red scarf and mini snowflake charm for Christmas.
Yarn Alternatives
-
Velvet yarn: Soft and plush; creates a luxurious pouch feel.
-
Cotton yarn: Crisp, clean stitches ideal for a structured shape.
-
Sparkle thread: Add a strand of metallic thread for a magical shimmer.
Accessory Ideas
-
Crochet a tiny bow or flower for one ear.
-
Add a keychain clasp to carry it on your bag.
-
Sew in a lining fabric for extra durability.
Advanced Tips & Troubleshooting
-
Invisible Decreases: Insert the hook into the front loops of the next two stitches to create smooth, seamless shaping.
-
Even Tension: Keep your grip relaxed; tension too tight makes small amigurumi stiff, too loose makes them floppy.
-
Avoid Twisted Rounds: Always mark the start stitch with a marker to keep track of spirals.
-
Clean Color Changes: Switch yarn during the last pull-through of the previous stitch.
-
Fixing Uneven Shapes: Lightly steam-block the pouch (hold iron 2 inches away) to even the shape.
-
Proper Stuffing: Stuff gradually in layers to avoid lumps.
-
Joining Parts: Use whip stitch with invisible weaving for seamless attachment.
-
Reading Abbreviations:
-
sc = single crochet
-
inc = increase
-
dec = decrease
-
sl st = slip stitch
-
-
Stitch Count Accuracy: Count at the end of every round to avoid uneven sides.
-
Finish Securely: Hide yarn tails deep inside the stitches, never near the zipper seam.
Care Instructions
Keep your pouch soft, clean, and beautiful for years to come!
-
Hand wash gently in cool water using mild soap.
-
Do not wring press gently between towels to remove excess water.
-
Air dry flat to maintain shape.
-
Avoid direct sunlight to prevent fading (especially on white yarn).
-
Storage: Store in a dust-free container or display shelf.
Gift Tip: Wrap it in tissue paper inside a pastel box it makes an adorable, thoughtful handmade gift for birthdays or holidays.
Display & Gift Ideas
This Cinnamoroll pouch is so versatile, you’ll want to make several!
-
Desk buddy: Store small stationery like paperclips or erasers.
-
Travel companion: Keep jewelry or lip balm safe while traveling.
-
Kid’s accessory: Use as a cute coin or trinket pouch.
-
Room décor: Display it on your dresser or bookshelf with plushies.
-
Gift set: Pair it with a crocheted heart keychain or matching Cinnamoroll plush.
Creative Idea: Attach a chain or clasp so it doubles as a mini purse perfect for conventions, kawaii markets, or handmade fairs!
Benefits of Crocheting the Cinnamoroll Pouch
Creating this pouch offers more than a finished item it offers peace and joy.
-
Mindfulness: The steady rhythm of stitches calms the mind and enhances focus.
-
Stress Relief: Watching your Cinnamoroll appear brings comfort and satisfaction.
-
Creativity: Experimenting with colors, shapes, and accessories keeps the process fun and artistic.
-
Eco-Friendly: Handmade gifts reduce waste and celebrate slow living.
-
Emotional Value: Every stitch carries care a handmade treasure far more meaningful than store-bought trinkets.
Photography & Social Media Tips
Showcase your adorable pouch online with these photo tips!
-
Lighting: Use natural daylight near a window for soft, bright tones.
-
Backgrounds: Choose neutral or pastel settings to highlight your white pouch.
-
Props: Add yarn balls, flowers, or Sanrio plushies for aesthetic photos.
-
Angles: Take close-ups of the face and ears, and one full view showing the zipper.
-
Editing: Increase brightness slightly and keep tones natural avoid heavy filters.
Pro Tip: Create a time-lapse video of your process viewers love watching Cinnamoroll’s face come to life!
Conclusion
The Mini Crochet Cinnamoroll Pouch Amigurumi isn’t just a cute handmade project it’s a creative journey filled with warmth, patience, and pure joy. From shaping the soft head and floppy ears to sewing the zipper and adding finishing details, every step feels rewarding. You’ll not only end up with a charming pouch but also with a handmade keepsake that embodies your creativity and care.
Whether you gift it, sell it, or keep it for yourself, this tiny pouch will bring smiles wherever it goes. So grab your favorite yarn, prepare your hook, and let your imagination flow because one stitch at a time, you’re about to crochet your very own piece of Sanrio-inspired magic.