The Magic of Crochet

There’s something enchanting about transforming a soft strand of yarn into a delightful little creation that feels both comforting and personal. Crochet allows you to turn your imagination into something tangible stitch by stitch, round by round. The repetitive rhythm of crocheting is peaceful, almost meditative, while the result is a handcrafted piece filled with character and love. Every handmade item becomes more than an object it becomes a story woven through patience, creativity, and joy.

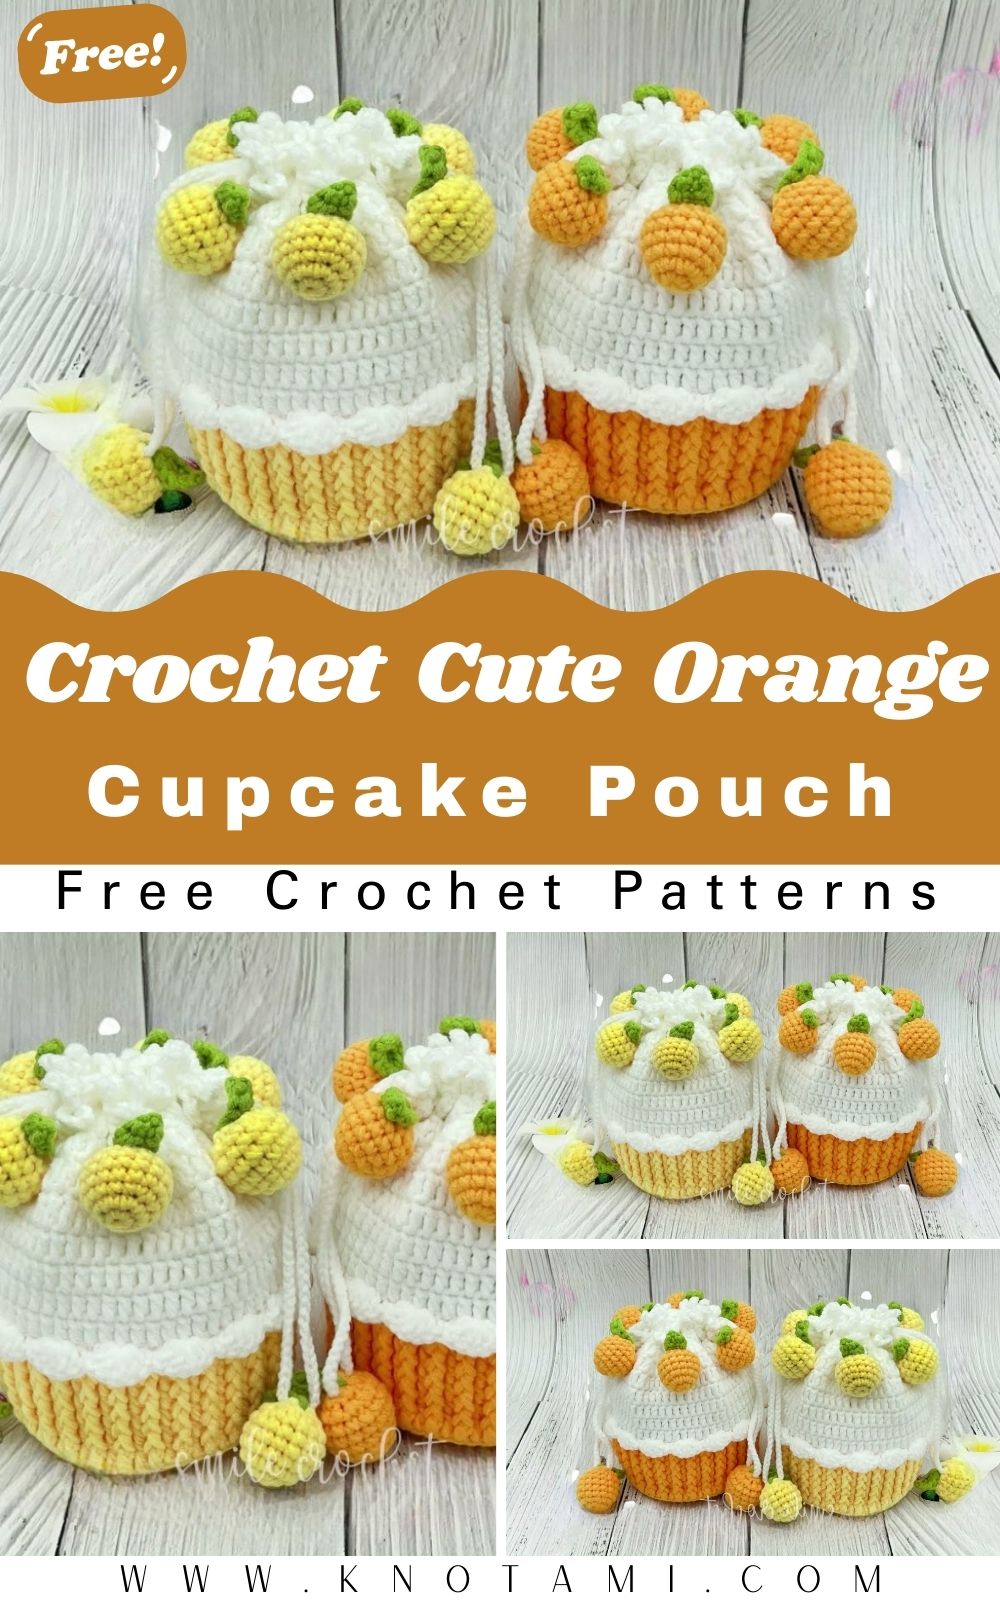
Meet the Crochet Cute Orange Cupcake Pouch

The DIY Crochet Cute Orange Cupcake Pouch Amigurumi combines the sweetness of dessert-inspired designs with the practicality of a tiny pouch. Its cupcake base, fluffy frosting top, and cheerful orange color make it irresistibly cute, while the zipper closure transforms it into a functional mini storage pouch. You can tuck in coins, jewelry, stitch markers, or small gifts. It’s a perfect blend of fun, cuteness, and everyday usefulness!

Great for All Skill Levels

This project is as enjoyable for beginners as it is for seasoned crocheters. The stitches are simple, the shape is forgiving, and the construction process offers endless creative freedom. You’ll get to practice foundational amigurumi techniques like the magic ring, increasing, decreasing, and working in rounds while experimenting with color changes and shaping. More experienced crafters will enjoy refining the details, from the frosting swirls to the decorative topping.

Mindful Making and Gifting

Few things feel as satisfying as completing a project made with your own hands. Crocheting this cupcake pouch isn’t just a craft it’s an act of mindfulness. The steady rhythm of each stitch brings calm focus, and watching the cupcake form under your hook brings a sense of accomplishment that’s hard to beat. Whether you keep it as a cute accessory or gift it to a loved one, this project is a sweet reminder of the joy that handmade art brings.

DIY Crochet Cute Orange Cupcake Pouch Amigurumi Pattern

Materials & Tools

Here’s everything you’ll need to bring your cupcake pouch to life:

Materials

  • Yarn Type & Weight:

    • Main color (MC): Bright orange (for cupcake base)

    • Secondary color (SC): White, cream, or light yellow (for frosting)

    • Accent color: Brown or pastel pink (optional for decorative swirls or cherries)

    • Weight: Category #3 (DK/light worsted) or #4 (worsted weight) acrylic or cotton blend

  • Hook Size: 2.5 mm – 3.0 mm (adjust based on yarn thickness)

  • Stuffing: Small amount of polyester fiberfill (optional, for rounded shape if making a plushier pouch)

  • Zipper: 8–10 cm (preferably in a color matching the yarn)

  • Tapestry Needle: For sewing parts together and weaving ends

  • Scissors: Sharp for clean cuts

  • Stitch Markers: To track the beginning of rounds

  • Optional: Decorative buttons, beads, or ribbon for topping accents

Choosing the Right Yarn & Colors

For the best texture and structure, pick a smooth, sturdy yarn that holds shape well. Cotton yarn gives a crisp finish, while acrylic yarn provides a softer, fluffier look.

Color Combinations to Try:

  • Classic Orange Cupcake: Orange base + white frosting + cherry red topper

  • Citrus Twist: Orange base + lemon-yellow frosting

  • Creamsicle Vibe: Light orange base + pale cream frosting

  • Rainbow Delight: Multicolored frosting for a playful aesthetic

Pro Tip: Always test your hook size your stitches should be tight enough to hold structure but not so tight that it’s hard to insert the hook.

4. Step-by-Step Crochet Instructions

Below is a full guide to crafting your Crochet Cute Orange Cupcake Pouch Amigurumi inspired by the reference project but written freshly and comprehensively for clarity.

Step 1: Crochet the Cupcake Base

With orange yarn (MC):

  1. R1: Start with a magic ring and work 6 single crochets (sc) into it. (6)

  2. R2: Increase (2 sc in each stitch) around. (12)

  3. R3: (1 sc, inc) repeat around. (18)

  4. R4: (2 sc, inc) repeat around. (24)

  5. R5: (3 sc, inc) repeat around. (30)

  6. R6: (4 sc, inc) repeat around. (36)

At this point, you have the circular bottom of the cupcake.

  1. R7: Work in back loops only (BLO) to start forming the sides. Sc in each stitch around. (36)

  2. R8–R12: Continue working even (one sc in each stitch) to build height. (36)

Tip: For a ribbed “cupcake liner” texture, alternate between one round of BLO and one round of regular stitches.

Step 2: Form the Cupcake’s Upper Rim

  1. Switch to cream or white yarn (frosting color).

  2. R13: Work in front loops only (FLO) from the last orange round. Sc around. (36)

  3. R14: (2 sc, inc) repeat around for a subtle frosting puff. (48)

  4. R15–R16: Continue sc in each stitch around to add fluffy height.

This forms the frosting base that transitions smoothly from the cupcake liner.

Step 3: Create the Frosting Top (Pouch Lid)

  1. Continue with the same frosting color.

  2. R1 (lid start): MR, 6 sc. (6)

  3. R2: inc around. (12)

  4. R3: (1 sc, inc) × 6. (18)

  5. R4: (2 sc, inc) × 6. (24)

  6. R5: (3 sc, inc) × 6. (30)

  7. R6–R8: sc around. (30)

Try fitting the top against the base it should sit slightly overlapping, like a cupcake lid. If it’s too tight or loose, adjust one round up or down.

Step 4: Add the Cherry or Decorative Topping

Cherry (optional):

  1. With red or pink yarn:

    • R1: MR, 6 sc. (6)

    • R2: inc around. (12)

    • R3–R4: sc around (12).

    • R5: dec around (6).

    • Stuff lightly and FO.

Sew the cherry to the center of the frosting top.
Add a small green chain stitch (ch 4) for a stem if you like!

Step 5: Add Zipper & Assembly

  1. Align the zipper between the top and bottom parts.

  2. With a tapestry needle, use matching thread (or thin yarn) to hand-stitch the zipper evenly along the inner edges.

  3. Ensure it opens and closes smoothly.

  4. Once attached, sew any decorative toppings (cherry, beads, bows) securely to the top.

Pro Tip: If you prefer not to sew, use fabric glue for securing the zipper temporarily, then stitch around for added durability.

Step 6: Optional Stuffing (for Plush Look)

If you’d like your cupcake pouch to stay round even when empty:

  • Add a small layer of polyfill inside the base before fully closing the zipper seam.

  • Do not overfill it should stay slightly squishy but functional.

Step 7: Finishing Touches & Polishing

  • Weave in all loose ends neatly using your tapestry needle.

  • Add surface embroidery for sprinkles or cream drizzles using yarn or thread.

  • If gifting, tie a satin ribbon around the zipper pull for an extra touch of charm.

  • Roll your pouch gently between your hands to even out shape.

Expert Tip: For a clean, professional finish, steam-block the cupcake base lightly (avoid direct heat on acrylic yarn).

5. Customization Ideas

Crochet projects shine when you add your own flavor! Try these ideas:

Color Variations

  • Classic Dessert: Orange liner, white frosting, red cherry

  • Tropical Sunset: Coral orange base, lemon-yellow frosting, pink bead topper

  • Chocolate Dream: Brown base, orange frosting drizzle, cream top

  • Pastel Fantasy: Soft peach base, mint frosting, lavender cherry

Yarn Experiments

  • Cotton yarn: Crisp, holds shape well, easy to clean.

  • Acrylic yarn: Soft, fluffy texture ideal for a plush look.

  • Velvet yarn: Creates a luxurious, smooth finish for a bakery display vibe.

Theme Ideas

  • Halloween Treat: Orange base, black frosting, tiny ghost charm

  • Christmas Cupcake: Red and green swirls with a white pom-pom top

  • Rainbow Sprinkle Pouch: Multicolored frosting using variegated yarn

Add Accessories

  • Mini bows or charms

  • Embroidered eyes for a kawaii-style face

  • Tiny heart appliqué stitched onto the liner

  • Clip-on keychain ring or bag tag

6. Advanced Tips & Troubleshooting

  1. Invisible Decrease: Insert hook through front loops of next two stitches, yarn over, pull through both loops, yarn over, pull through two creates smooth decreases.

  2. Even Tension: Keep your wrist relaxed; if stitches look uneven, check your hook grip and tension consistency.

  3. Prevent Twisting in Rounds: Always mark the first stitch of each round with a marker.

  4. Shape Maintenance: Add stuffing gradually while shaping; overfilling can distort the base.

  5. Clean Joins: Use whip stitch through back loops only to join parts seamlessly.

  6. Color Changes: Always switch colors on the final yarn-over of the previous stitch for crisp transitions.

  7. Zipper Attachment: Baste with pins before sewing to ensure alignment.

  8. Avoid Uneven Rims: When switching from base to frosting, count stitches carefully to avoid gaps.

  9. Neat Finish: Weave ends inside using a darning needle instead of knotting visibly outside.

  10. Pattern Reading: Familiarize yourself with abbreviations (sc, inc, dec, BLO, FLO) before starting it’ll save time mid-project.

7. Care Instructions

Your cute orange cupcake deserves gentle care to stay fresh and adorable!

  • Hand Wash Only: Submerge in lukewarm water with mild detergent.

  • No Machine Spin: Squeeze gently; never twist or wring.

  • Air Dry Flat: On a clean towel to keep shape intact.

  • Avoid Sunlight: Extended exposure fades bright yarns.

  • Storage: Keep in a dry, cool space; avoid crushing under heavy objects.

  • For Gifted Pieces: Include a small “handmade care tag” for an extra professional touch.

8. Display & Gift Ideas

Your Crochet Cute Orange Cupcake Pouch is both decorative and practical here are ways to show it off or share the love!

  • Desk Décor: Use it as a cheerful storage pouch for paperclips, USBs, or small stationery.

  • Makeup Holder: Perfect for lip balms, hair ties, or jewelry.

  • Coin Purse: Compact enough to slip into a bag, yet spacious for coins and trinkets.

  • Holiday Ornament: Add a ribbon loop and hang it on your Christmas tree.

  • Handmade Gift: Fill it with candies, notes, or crochet stitch markers.

  • Craft Fair Favorite: These make charming, quick-to-sell handmade items!

Gift Tip: Present it inside a small bakery-style box tied with twine for that sweet treat presentation.

9. Benefits of Making the Crochet Cute Orange Cupcake Pouch

Relaxation & Mindfulness

The repetitive rhythm of stitches calms your mind, helping you unwind and focus. It’s creative self-care at its finest.

Stress Relief

Crocheting small, colorful projects like this releases tension and brings instant joy especially when you finish a perfectly shaped cupcake!

A Sense of Accomplishment

Completing a project that’s both functional and adorable provides a quick win and boosts crafting confidence.

Eco-Friendly Gifting

Handmade gifts are sustainable, thoughtful, and waste-free—no plastic packaging, no mass production.

Emotional Connection

When you gift a handmade piece, you’re giving time, love, and intention—something far more meaningful than a store-bought item.

10. Photography & Social Media Tips

Want to share your cupcake masterpiece online? Here’s how to capture its charm perfectly:

  1. Natural Light: Photograph near a window for soft, even lighting.

  2. Backgrounds: Use light wood, marble, or pastel cloth for contrast.

  3. Props: Include yarn balls, crochet hooks, or real cupcakes for a fun theme.

  4. Angles: Try overhead flat-lays and close-ups of the frosting texture.

  5. Consistency: Use similar filters or tones for your crochet feed.

  6. Reels/TikToks: Record your progress the before stuffing to finished pouch reveal is always satisfying!

  7. Pinterest Text Overlay: DIY Crochet Cupcake Pouch Free Pattern” works beautifully for engagement.

  8. Community Sharing: Tag crochet groups or small business pages that promote handmade art.

  9. Show Scale: Place the pouch beside everyday objects (spool of thread, hook, etc.) to show its mini size.

11. Conclusion

Creating your own DIY Crochet Cute Orange Cupcake Pouch Amigurumi is like blending art, relaxation, and sweetness into one satisfying project. Every round brings your little cupcake to life, from the ribbed liner to the swirled frosting and cheerful cherry on top. It’s simple enough for beginners yet charming enough for seasoned crocheters to love.

When you zip it up for the first time ready to hold your treasures you’ll feel the quiet joy of handmade success. Whether it sits on your desk, hangs from your bag, or is gifted to someone special, this cupcake pouch carries a little reminder: beautiful things happen one stitch at a time.

Happy Crocheting and may your days be as bright and sweet as your handmade cupcakes!

knotami

By Mira Knotts

By Mira Knotts — the creative mind behind Knotami (knotami.com), lovingly crafting unique crochet designs and sharing inspiring patterns for makers everywhere.

Leave a Reply

Your email address will not be published. Required fields are marked *