
The quiet magic of yarn and a hook
There’s a special kind of peace that happens when yarn slips through your fingers and loops transform into something comforting and alive. Crochet gives us the experience of building warmth and personality one stitch at a time. Every round carries intention; every seam becomes part of a story your hands tell. The satisfaction isn’t just the finished piece it’s the journey, the rhythm, the gentle click of the hook as imagination turns into something you can hold.
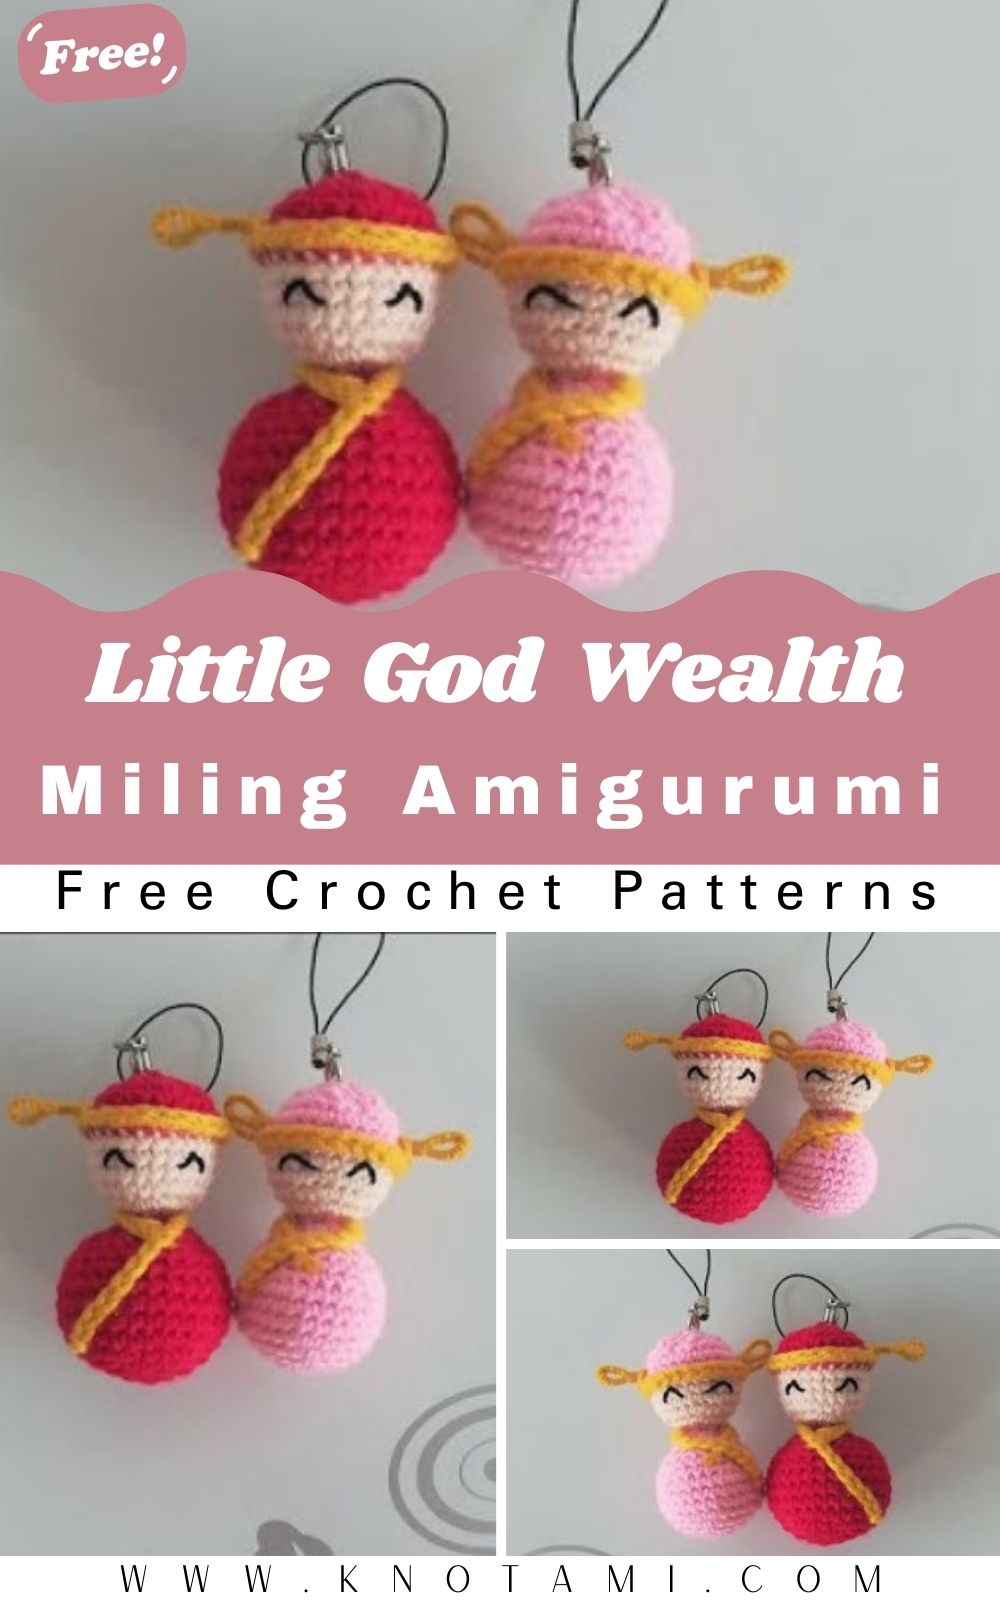
Meet the Crochet Little God Wealth “Miling”
The Crochet Little God Wealth Miling is a palm-sized amigurumi inspired by symbols of prosperity and good fortune. Think cheerful smile, festive red robe trimmed with gold, a traditional hat, and a tiny gold ingot (yuanbao) snuggled in the hands. Whether you place him on a shelf, gift him to a friend starting a new venture, or clip him to a bag during festival season, he’s a pocket charm that radiates positivity and celebration.
For beginners and beyond
This pattern is beginner-friendly yet satisfying for seasoned crocheters. New makers practice the basics magic ring, increasing, decreasing, and simple color changes while experienced crafters can refine shaping, invisible decreases, and clean assembly. The project is compact, portable, and perfect for an afternoon of slow crafting, with details (like the hat brim and the gold ingot) that make the final doll look wonderfully “finished.”
Slow crafting, joyful gifting
As the head rounds stack up and the robe flares out, you’ll feel that familiar glow of progress. By the time you stitch on the smile and nestle the tiny ingot into the hands, you’ve created more than a doll you’ve made a moment of care and well-wishing, locked inside a soft keepsake. It’s the kind of handmade gift that feels thoughtful, festive, and deeply personal.
Materials & Tools
Yarn
Use smooth amigurumi-friendly yarn with good stitch definition. Cotton or cotton-blend is crisp; acrylic is slightly softer.
-
Skin tone (Head & hands): light beige/peach (#3 DK or #4 worsted)
-
Robe main color: lucky red
-
Trim & accents: gold/yellow (for borders, belt, ingot)
-
Hat: red + black (or deep brown) + gold edging
-
Hair: black or very dark brown (for sideburns or tiny mustache, optional)
-
Blush (optional): pale pink yarn or fabric pastel
Yarn weight: #3 (DK/light worsted) gives a smaller, neater finish. #4 (worsted) makes a slightly larger, cuddlier doll. Either works—adjust hook accordingly.
Hook
-
2.5–3.0 mm for DK
-
3.0–3.5 mm for worsted
Choose a hook that produces dense fabric (no stuffing peeking).
Notions
-
Stuffing: polyester fiberfill
-
Safety eyes: 6–8 mm (or embroider eyes for child-safe version)
-
Tapestry needle: blunt tip for sewing
-
Scissors
-
Stitch markers: crucial for tracking rounds
-
Pins/clips: for positioning parts
-
Optional: thin craft wire for shaping hat wings (use safely; omit for toys for young children)
Picking textures & colors
-
Texture: Smooth yarn highlights facial features and clean seams.
-
Color balance: Keep robe vivid (red) and trims bright (gold) for strong contrast in photos. Skin tone should contrast with hat and robe so the face reads clearly.
-
Finish: Cotton is crisp and professional; acrylic is plush and forgiving. If you’re new, acrylic can be easier on the hands.
4. Step-by-Step Crochet Instructions
Pattern notes (US terms): Work in continuous rounds unless stated. Place a marker in the first stitch of each round.
Abbreviations:
-
MR = magic ring
-
sc = single crochet
-
inc = increase (2 sc in one stitch)
-
dec = invisible decrease (front loops; see tips)
-
sl st = slip stitch
-
ch = chain
-
BLO/FLO = back/front loop only
-
FO = fasten off
Number in parentheses at end of round = total stitches.
Sizing note: With DK yarn and a 2.75–3.0 mm hook, the doll typically stands ~10–13 cm (4–5 in) tall. Worsted + 3.5 mm gives ~13–16 cm (5–6.5 in).
1) Head (skin tone)
-
R1: MR, 6 sc (6)
-
R2: inc around (12)
-
R3: (1 sc, inc) × 6 (18)
-
R4: (2 sc, inc) × 6 (24)
-
R5: (3 sc, inc) × 6 (30)
-
R6: (4 sc, inc) × 6 (36)
-
R7–R10: sc around (36)
Insert safety eyes between R7–R8, about 6–7 sts apart. If embroidering eyes, do it after stuffing.
-
R11: (4 sc, dec) × 6 (30)
-
R12: (3 sc, dec) × 6 (24)
Stuff head firm but not overpacked roll between palms to smooth. -
R13: (2 sc, dec) × 6 (18)
-
R14: (1 sc, dec) × 6 (12)
-
R15: dec around (6). FO. Weave tail through front loops to close.
Optional facial embroidery:
-
A tiny smile (black/brown), one curved backstitch.
-
Blush with pastel or two tiny circles of pale pink yarn.
Shaping tip: A touch more stuffing at the sides (not the top) keeps the head nicely round and prevents a cone shape.
2) Neck & Upper Body (robe start)
We’ll build the body separately, then sew to the head for a crisp neck seam.
Robe (red):
-
R1: MR, 6 sc (6)
-
R2: inc around (12)
-
R3: (1 sc, inc) × 6 (18)
-
R4: (2 sc, inc) × 6 (24)
-
R5: (3 sc, inc) × 6 (30)
-
R6: (4 sc, inc) × 6 (36)
Robe torso height
7. R7–R10: sc around (36)
8. R11: (4 sc, dec) × 6 (30)
9. R12: sc around (30)
10. R13: (3 sc, dec) × 6 (24)
11. R14: sc around (24)
Switch to gold for a belt line:
12. R15 (gold): sc around (24)
Switch back to red:
13. R16: sc around (24)
14. R17: (2 sc, dec) × 6 (18) start stuffing body evenly
15. R18: sc around (18)
16. R19: (1 sc, dec) × 6 (12)
17. R20: dec around (6)
FO and close. The body should be a plump bell shape.
Balance tip: Concentrate stuffing where the robe is widest (R7–R12) for stability. Keep the belt round crisp by not overstuffing right at that line.
3) Base shaping / feet (gold slippers)
Feet (make 2, gold):
-
R1: MR, 6 sc (6)
-
R2: (1 sc, inc) × 3 (9)
-
R3: sc around (9)
-
R4: dec, sc 2, dec, sc 3 (7) optional taper
FO with tail. Lightly stuff. Stitch side-by-side under the robe front to peek out like little gold slippers.
For a sitting display, slightly flatten feet before sewing so the doll’s base rests on them.
4) Arms & hands (holding the ingot)
Hands (skin tone, make 2):
-
R1: MR, 6 sc (6)
-
R2: sc around (6)
FO, leave tail. Lightly stuff.
Sleeves/arms (red, make 2):
-
R1: MR, 5 sc (5)
-
R2: (1 sc, inc) × 2, 1 sc (7)
-
R3–R6: sc around (7)
Switch to gold for cuff: -
R7 (gold): sc around (7)
Insert the hand (skin-tone nub) into sleeve; sew the hand opening to the sleeve opening.
Angle both arms slightly inward when attaching later so they can cradle the gold ingot.
5) Collar & robe trim (gold)
-
Collar band (gold): ch 16–18, sc in each chain (15–17 sts). FO. Wrap around the neck at the top of the robe (where head joins later).
-
Hem trim (gold, optional): Surface-sl st around the robe base or crochet a separate thin band: ch long enough to circle base, sc 1–2 rows, FO, and sew neatly.
6) Hat with side wings (festive cap)
Hat crown (red):
-
R1: MR, 6 sc (6)
-
R2: inc around (12)
-
R3: (1 sc, inc) × 6 (18)
-
R4: (2 sc, inc) × 6 (24)
-
R5: sc around (24)
Brim (black or deep brown):
6. R6: switch color; BLO sc around (24)
7. R7: sc around (24); FO leaving long tail.
Gold top button:
-
R1: MR, 6 sc (6), sl st to first, FO. Sew to hat center top.
Wing tabs (make 2, gold-edged):
-
Base strip (black): ch 8, sc in 2nd ch from hook and across (7); ch 1, turn; sc row (7). FO.
-
Gold edge: sl st around the strip’s perimeter for a narrow glint. FO.
Sew one tab to each side of the hat brim as stylized “wings.” For a firmer look, insert a sliver of felt inside or a short, safely secured wire. Omit wire for child gifts.
7) Gold ingot (yuanbao) accessory
Top cup (gold):
-
R1: MR, 6 sc (6)
-
R2: inc around (12)
-
R3: (1 sc, inc) × 6 (18)
-
R4: sc around (18); FO.
Bottom cup (gold):
Repeat R1–R4 for a second piece.
Join & shape:
-
Place cups wrong sides together sc through both layers around for a shallow “boat.” Before closing, add a pinch of stuffing.
-
To accent the center bump, weave a small yarn ball: MR with 5–6 sc; FO, place in center and secure with hidden stitches.
-
Optional: embroider a tiny coin motif or lucky character in the middle with a single strand of darker gold.
The ingot should be small enough to rest comfortably between the hands.
8) Assembly & positioning
-
Head to body: Pin head centered on the robe top. Whip stitch around in small, even bites catching inner loops for an invisible seam.
-
Collar: Wrap gold collar band neatly around the join line; sew ends together at the back.
-
Arms: Pin arms slightly forward and inward on the upper torso. Stitch securely.
-
Ingot: Position between the hands so both palms touch it; take a few securing stitches from palm to ingot bottom hidden and durable.
-
Feet: Sew at robe base, projecting slightly.
-
Hat: Seat the hat low enough to frame the face without covering the eyes; anchor with 2–3 tiny stitches. Adjust the wing tabs symmetrically.
-
Face details (optional):
-
Tiny mustache: with black, stitch two short curves under the nose line.
-
Eyebrows: two short diagonal stitches for a friendly expression.
-
Blush: pastel dots or tiny woven circles at cheek corners.
-
Professional finish: After sewing, roll the doll gently between your palms to smooth stuffing and blend seams. Trim fuzzies.
9) Final touches & balance checks
-
Set the doll upright; adjust stuffing in the robe base with a blunt tool if lean appears.
-
If you want a hanging charm, attach a gold loop (ch 12, sl st back) to hat crown and add a split ring or tassel.
5. Customization Ideas
Colorways
-
Classic Prosperity: Red robe, gold trims, black brim, gold ingot.
-
Spring Festival Pastels: Peach robe, champagne gold trim, cream hat brim.
-
Monochrome Modern: Deep crimson robe, matte mustard trims, charcoal hat.
-
Lucky Jade Accent: Add a tiny green bead or leaf at the hat button for a jade-inspired touch.
Yarn choices
-
Cotton DK: Crisp lines, great for photos and sharp edges on the ingot.
-
Acrylic worsted: Rounder silhouette, cozy feel, slightly larger doll.
-
Mercerized cotton: Subtle sheen for trims and ingot deluxe look.
Theme twists
-
New Venture Gift: Embroider initials or a tiny coin on the robe hem.
-
Holiday Ornament: Add a tassel and long hanging cord.
-
Keychain Mini: Use sport weight yarn + 2.25 mm hook; embroider eyes for safety.
Add-ons
-
Tiny scroll (felt roll tied with gold thread).
-
Lucky coin (small gold disc of felt or crocheted circle).
-
Sash: slender gold belt tied in a bow at back.
6. Advanced Tips & Troubleshooting
-
Invisible decrease (no bumps): Insert hook through front loops only of the next two stitches, yarn over, pull through both front loops, yarn over, pull through two. Cleaner than a standard dec.
-
Even tension = even shapes: If holes appear, drop your hook size by 0.5 mm. If fabric feels like cardboard, go up 0.5 mm.
-
Prevent twisting in spirals: Always mark the first stitch of each round. A gently diagonal seam is normal; what you want is consistency.
-
Crisp color-change edges: Change color on the last yarn-over of the previous stitch; then tug both tails gently to lock the transition.
-
Stuffing balance: Add small pinches of fiberfill as you go more in belly center, less near seams. Overstuffing the head can distort eyes.
-
Seamless joins when sewing: Use ladder/mattress stitch, catching inner loops only on both pieces for an almost invisible seam.
-
Symmetry check hack: Pin first, then snap a quick phone photo. Misalignment shows up instantly on screen.
-
Clean embroidery: Use short, even backstitches; anchor knots deep inside. If lines look thin, double the thread or yarn strand.
-
Firm hat wings: If you add craft wire, wrap ends with tape and bury safely inside. For child gifts, use double-layer felt instead.
-
Reading abbreviations correctly: Keep a small legend nearby (MR, sc, inc, dec, sl st, BLO/FLO). Slowing down on shaping rounds reduces errors.
7. Care Instructions
-
Gentle hand wash only: Lukewarm water + a drop of mild detergent.
-
Spot clean first: Dab marks with soapy cloth; rinse with a damp cloth.
-
Air dry flat: Lay on a towel; reshape hat, wings, collar while damp.
-
Avoid direct sunlight: Bright reds and golds can fade with prolonged exposure.
-
Storage: Keep in a dust-free shelf or box. For long-term display, a small acrylic case looks adorable and keeps fibers pristine.
8. Display & Gift Ideas
-
Home altar or shelf décor: A tiny symbol of goodwill beside a plant or candle.
-
Desk companion: Perch near your laptop as a cheerful reminder of goals and gratitude.
-
Festival ornament: Add a hanging loop and tassel; cluster with lanterns for seasonal charm.
-
Personalized gift: Tuck into a red envelope (hongbao)–style pouch with a handwritten wish card.
-
Craft fair favorite: Present in mini kraft boxes with a gold sticker that says Handmade Fortune.
9. Benefits of Making the Crochet Little God Wealth Miling
-
Relaxation & mindfulness: Repetitive stitching is grounding; counting rounds invites presence.
-
Stress relief through crafting: Small projects deliver quick wins and happy dopamine hits.
-
Accomplishment & pride: A detailed, gift-worthy mascot emerges in just a few cozy sessions.
-
Eco-friendly gifting: Use stash yarns, recyclable packaging, and skip mass-produced trinkets.
-
Emotional connection: A handmade blessing doll feels thoughtful and personal like gifting a warm wish you made yourself.
10. Photography & Social Media Tips
-
Natural daylight: Shoot near a window; avoid harsh noon light.
-
Soft backgrounds: Linen, light wood, or red paper with gold flecks suits the theme.
-
Story props: Coins, red envelopes, a tiny tassel, or a sprig of lucky bamboo.
-
Angles: Front portrait, 45°, side, and overhead flat-lay of parts (hat, ingot, collar).
-
Close-ups: Capture the gold trim texture and ingot details.
-
Consistent color: Slightly warm your white balance to flatter reds and golds.
-
Reels/Shorts: Time-lapse of sewing the ingot into the hands = instant crowd-pleaser.
-
Pin-ready text overlay: “Little God Wealth Miling – Free Crochet Pattern.
-
Engage your audience: Ask which trim they prefer matte mustard vs. metallic gold thread.
11. Conclusion
From the first loop of your magic ring to the final stitch that anchors the tiny gold ingot, the Crochet Little God Wealth Miling is a celebration of intention and joy. You’ve shaped warmth out of yarn, dressed it in festive colors, and tucked a wish for good fortune between its hands. Whether it brightens your own space or travels to a friend on a milestone day, this small doll carries a big message: prosperity, kindness, and the magic of things made slowly and with care.
So gather your reds and golds, settle into your favorite chair, and let your hook glide. In a few mindful rounds, you’ll have a pocket-size blessing that smiles back and reminds you that beautiful things happen, one stitch at a time.