
There’s something magical about crochet the way a simple strand of yarn can transform into a character bursting with charm and personality. Every loop, pull, and stitch brings you closer to a finished piece that carries your creativity, warmth, and time. Crochet connects your hands to your imagination, turning soft fibers into tangible expressions of joy and love.
Meet the Crochet Cute Cockerel Hen Amigurumi
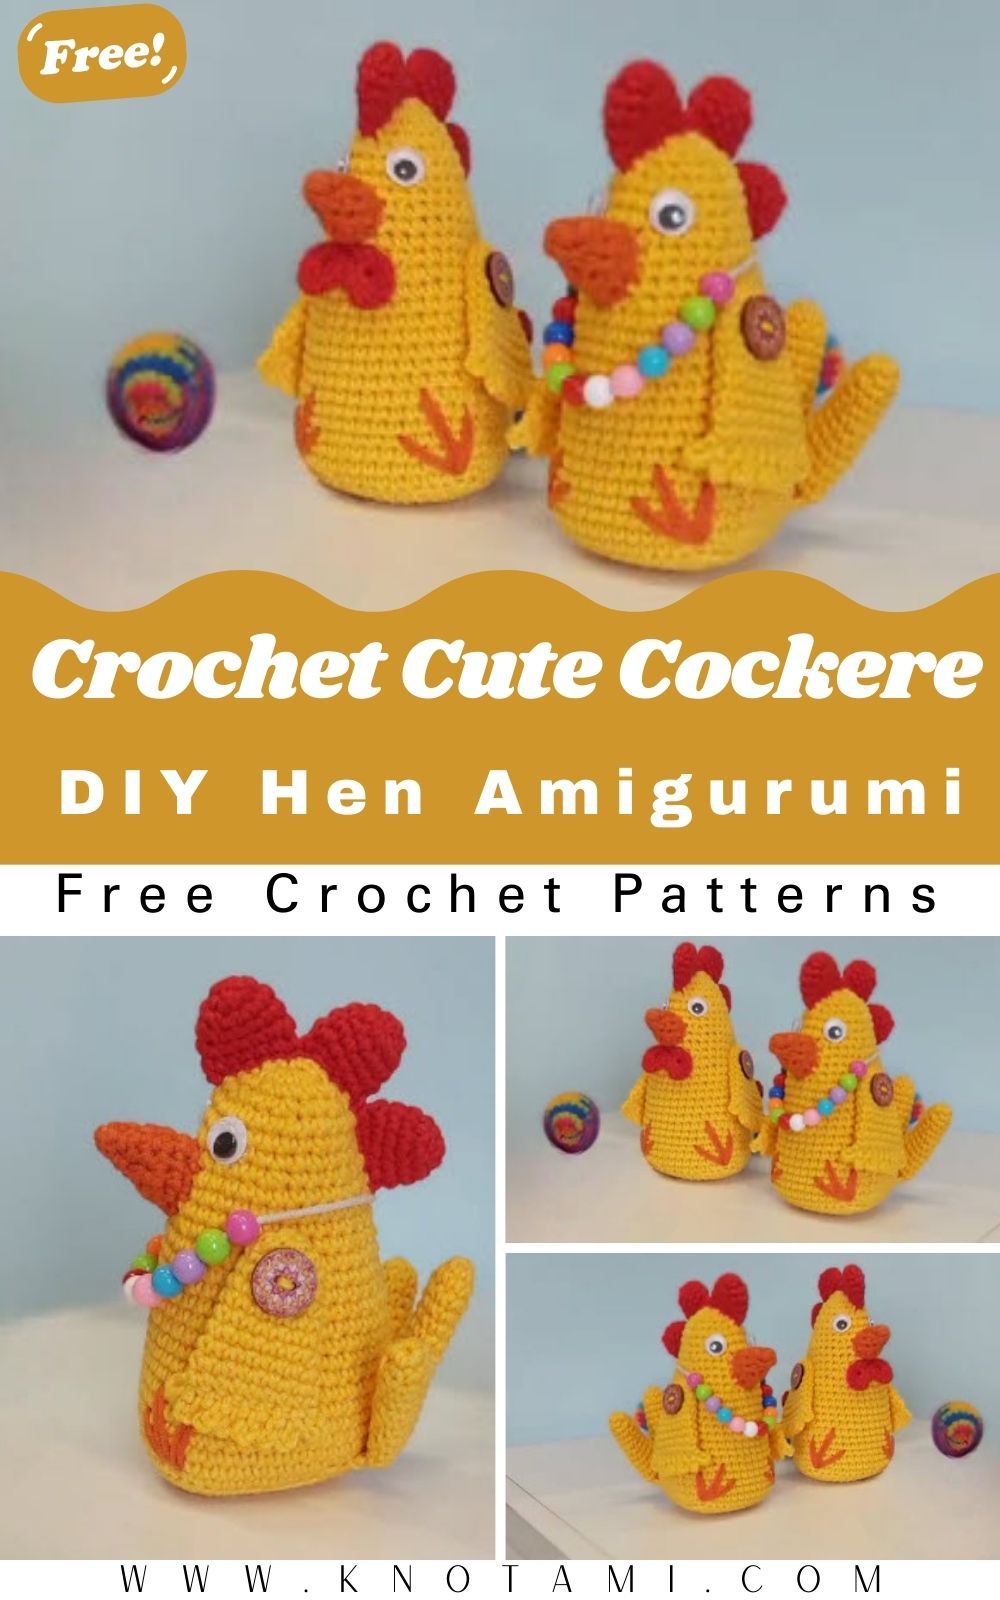
If you’ve ever wanted to bring the cozy charm of the countryside into your home, the DIY Crochet Cute Cockerel Hen Amigurumi Pattern is the perfect project. This delightful design captures the proud stance of a cockerel and the soft, rounded sweetness of a hen. Together, they make a lovable duo cheerful, eye-catching, and full of personality. Whether you display them on a windowsill, gift them to a friend, or create an entire crochet barnyard, these feathered friends are guaranteed to make everyone smile.
Perfect for all skill levels
This project is designed for both beginners and experienced crocheters alike. If you’re new to amigurumi, you’ll learn how to work in the round, shape using increases and decreases, and attach small details like beaks and combs. Experienced crocheters will enjoy the chance to experiment with color changes, layered wings, and textural techniques to bring the feathers and tails to life. It’s the kind of pattern that offers just the right balance between challenge and relaxation.
A project for slow crafting and heartfelt gifting
There’s a beautiful rhythm to crocheting animals the repetition of stitches becomes meditative, the colors brighten your mood, and the growing shape brings a sense of accomplishment with each round. Creating your own crochet cockerel and hen isn’t just a craft project; it’s a celebration of patience, imagination, and care. And when you gift it to someone, you’re sharing not just yarn and fiber, but a handmade piece of happiness.
Materials & Tools
Here’s everything you’ll need to crochet your adorable cockerel and hen pair:
Basic Materials
-
Yarn type: 100% cotton or acrylic DK-weight yarn (Category 3).
-
Colors:
-
For the hen: cream, beige, or soft white for the body; orange for beak and feet; red for comb and wattle.
-
For the cockerel: brown, red, gold, and teal for the body; red for comb; yellow for beak; dark blue or green for tail feathers.
-
-
Hook size: 2.5 mm – 3.0 mm (choose a smaller hook to avoid gaps in stitches).
-
Stuffing: Polyester fiberfill for soft, even filling.
-
Safety eyes: 6–8 mm (or embroidered eyes for baby-safe toys).
-
Tapestry needle: For sewing pieces and weaving ends.
-
Scissors: Sharp ones for precise snipping.
-
Stitch markers: To keep track of rounds.
Yarn Tips
-
Texture: Cotton gives a neat, defined stitch perfect for amigurumi. Acrylic makes a softer, cuddlier bird.
-
Weight: Stick to one yarn weight for both birds so they match proportionally.
-
Color combos:
-
Classic: Cream hen + golden cockerel.
-
Farmhouse pastel: Light gray + peach.
-
Playful: Rainbow tail feathers or polka-dot wings for a whimsical look.
-
Step-by-Step Crochet Instructions
Abbreviations: MR (Magic Ring), sc (single crochet), inc (increase = 2 sc in same stitch), dec (decrease), sl st (slip stitch), ch (chain), BLO/FLO (back/front loop only).
Work in continuous rounds unless otherwise specified.
1) Making the Head
Hen’s head:
-
Round 1: MR, 6 sc (6).
-
Round 2: inc in each st (12).
-
Round 3: (sc, inc) ×6 (18).
-
Round 4: (2 sc, inc) ×6 (24).
-
Rounds 5–7: sc around (24).
-
Round 8: (2 sc, dec) ×6 (18).
-
Insert safety eyes between Rnds 5–6, about 6 stitches apart.
-
Round 9: (sc, dec) ×6 (12).
-
Round 10: dec around (6). FO and close.
Cockerel’s head:
-
Follow the same steps, but switch to a vibrant red or golden color for the upper part of the head to form the comb base.
-
Add a slightly larger comb on top for the rooster’s signature crown.
Comb (make 1):
-
Ch 5, sc in 2nd ch from hook, hdc, dc, tr. FO.
-
Repeat 3–4 small humps, join together, and sew on top of the head.
Beak (for both):
-
With yellow or orange yarn, ch 3, sc in 2nd ch from hook, sl st in next. FO, leaving a long tail to sew between eyes.
2) Forming the Neck and Upper Body
-
Reattach yarn (main body color) to the base of the head.
-
Round 1: sc around (12–14 sts).
-
Round 2: (sc, inc) ×6 (18).
-
Round 3: sc around (18).
-
Round 4: (2 sc, inc) ×6 (24).
-
Round 5: (3 sc, inc) ×6 (30).
-
Stuff neck firmly as you go; it supports the head’s position.
Pro tip: A tight tension on the neck helps your bird hold its head upright without wobbling.
3) Building the Main Body
For both hen and cockerel:
-
Round 6: (4 sc, inc) ×6 (36).
-
Rounds 7–11: sc around (36).
-
Round 12: (4 sc, dec) ×6 (30).
-
Round 13: (3 sc, dec) ×6 (24).
-
Round 14: (2 sc, dec) ×6 (18).
-
Round 15: (sc, dec) ×6 (12).
-
Stuff firmly before closing.
-
Round 16: dec around (6). FO and close neatly.
Hen shaping tip: Keep the base round and plump this gives the hen her adorable, full-bodied charm.
Cockerel shaping: Make the lower body slightly longer by adding 2–3 extra rounds of sc before decreasing to form a proud, upright stance.
4) Shaping the Base and Adding Legs
Legs (make 2 each):
-
With orange or yellow yarn:
-
Ch 6, sl st in 2nd ch from hook and next 3 ch. Ch 3, sl st in 2nd ch from hook, continue across chain, and FO.
-
You’ll have a Y shape foot with three toes.
-
Sew to the body base slightly forward for balance.
Base support:
-
For sitting hens, flatten the base slightly before final stuffing.
-
You can sew a small felt circle to the bottom for stability.
5) Creating the Tail, Wings, and Comb Details
Hen tail:
-
With the same body color, ch 10.
-
Sc across, turn, then dec every 2 stitches.
-
FO and gather slightly at base to form a fan.
-
Sew to the back of the hen.
Cockerel tail:
-
Use multiple colors (blue, green, red, yellow).
-
For each feather:
-
Ch 12, sl st back to base for curve.
-
Repeat 4–5 times with different lengths.
-
Sew all feathers together and attach to the back.
-
Lightly curl with your fingers for that proud rooster flair.
-
Wings (for both):
-
MR, 6 sc.
-
(sc, inc) ×3 (9).
-
(2 sc, inc) ×3 (12).
-
2 rounds sc.
-
FO and flatten slightly before sewing to sides of the body.
Wattle:
-
Ch 3, sl st in 2nd ch from hook, hdc in next, FO.
-
Make 2, and attach below the beak.
6) Assembly & Positioning
-
Attach head to body: Pin securely and stitch around with small, tight backstitches.
-
Sew wings: Slightly tilted down at the sides.
-
Attach legs: Ensure both feet touch the ground evenly.
-
Add tail: For the hen, angle slightly upward. For the cockerel, position high and fan out feathers.
-
Adjust stuffing: Balance both birds so they sit upright.
Finishing tip: Roll the completed birds gently between your palms to smooth lumps.
7) Adding Final Touches & Accessories
Now that your crochet chickens have come to life, it’s time for the fun finishing details!
-
Add tiny embroidered eyelashes or blush for personality.
-
Stitch a ribbon bow on the hen’s neck or around the cockerel’s tail.
-
Make a mini crochet egg (MR, 6 sc → (inc, sc) rounds → decrease to close).
-
Use felt hearts or flowers for a cute decorative touch.
-
Add a loop on top to turn them into hanging ornaments.
Customization Ideas
Crochet lets you reimagine this design however you want. Try these creative twists:
-
Farmhouse Style: Neutral beige hen and golden cockerel with rustic brown accents.
-
Holiday Edition: Red-and-green feathers, gold yarn trim, and tiny Santa hats.
-
Rainbow Fantasy: Multicolor feathers and metallic thread for shimmer.
-
Spring Theme: Soft pastel palette mint, lavender, peach for Easter décor.
-
Mini Keychains: Use sport-weight yarn and 2 mm hook for pocket-size chickens.
Yarn textures:
-
Brushed acrylic for fluffy effect.
-
Mercerized cotton for glossy, defined stitches.
-
Velvet yarn for ultra-soft plush versions.
Advanced Tips & Troubleshooting
-
Invisible decrease: Insert hook through front loops of next two stitches, yarn over, pull through both, yarn over again, and pull through two loops.
-
Even tension: Keep yarn flowing smoothly through your fingers; relax wrists for consistent gauge.
-
Avoid twisted rounds: Always move your stitch marker each round to stay on track.
-
Fix uneven shapes: Add or remove a little stuffing, then massage gently to reshape.
-
Proper stuffing: Firm but not hard especially in neck and base for balance.
-
Seamless joins: Ladder stitch pieces together using yarn tails for invisible seams.
-
Color changes: Switch colors on the last yarn-over of the previous stitch for a clean transition.
-
Finishing ends: Weave tails back and forth several times inside the body.
-
Eye alignment: Mark both positions with pins before inserting symmetry adds realism.
-
Fuzzy yarn tip: Use a steel needle to tease fibers lightly for a “feathery” effect.
Care Instructions
To keep your crochet cockerel and hen looking farm-fresh:
-
Hand wash gently in cold water with mild soap.
-
Rinse and press with a towel never wring.
-
Air dry flat, shaping while damp.
-
Avoid direct sunlight to prevent fading.
-
Storage: Keep in a cool, dry place; support tails and combs to keep their shape.
-
Display safely: Keep away from pets and small children who may tug delicate parts.
Display & Gift Ideas
These handmade birds make adorable companions for any space:
-
Home décor: Add them to a farmhouse shelf or kitchen counter for rustic charm.
-
Kid’s room accessory: Safe, soft, and cheerful perfect for storytime décor.
-
Desk buddy: Let a tiny hen keep you company while you work!
-
Seasonal display: Easter, spring festivals, or Thanksgiving centerpieces.
-
Personalized gifts: Make a matching pair for weddings (“Mr. & Mrs. Cockerel”), housewarmings, or birthdays.
Creative gift idea: Present your crochet hen with a real egg-shaped bath bomb or candle in a nest basket a blend of craft and surprise!
Benefits of Making a Crochet Cute Cockerel Hen Amigurumi
-
Relaxation and mindfulness: The repetitive stitches and gentle colorwork invite calm and focus.
-
Stress relief: Every finished round brings a sense of progress and peace.
-
Creative expression: Play with color, texture, and tiny accessories for endless personalization.
-
Eco-friendly gifting: Handmade gifts mean less waste and more meaning.
-
Emotional connection: Each amigurumi carries a part of your time, care, and creativity that’s what makes handmade art so special.
Photography & Social Media Tips
Capture your crochet flock beautifully for Instagram or Pinterest!
-
Natural daylight: Morning or late-afternoon light is perfect.
-
Soft background: Wooden tables, baskets, or neutral fabrics enhance colors.
-
Props: Add yarn balls, crochet hooks, or tiny eggs for cozy context.
-
Angles: 45° front angle highlights the shape; top view works great for flat-lay shots.
-
Close-ups: Focus on texture comb stitches, feather details, and eyes.
-
Pair shots: Photograph cockerel and hen together for a charming story.
-
Editing tip: Slightly increase brightness and warmth for that handmade glow.
Conclusion
The DIY Crochet Cute Cockerel Hen Amigurumi Pattern brings together everything we love about crochet creativity, color, calm, and joy. From the soft curves of the hen’s body to the bold plumage of the rooster’s tail, each stitch transforms simple yarn into something full of warmth and life. Whether you make one for yourself or gift a pair to someone special, these crochet birds carry a story of time, care, and handmade beauty.
So grab your yarn, choose your colors, and let your imagination take flight. With just a hook and your hands, you’ll soon have a proud cockerel and a sweet hen ready to brighten every room they perch in.