
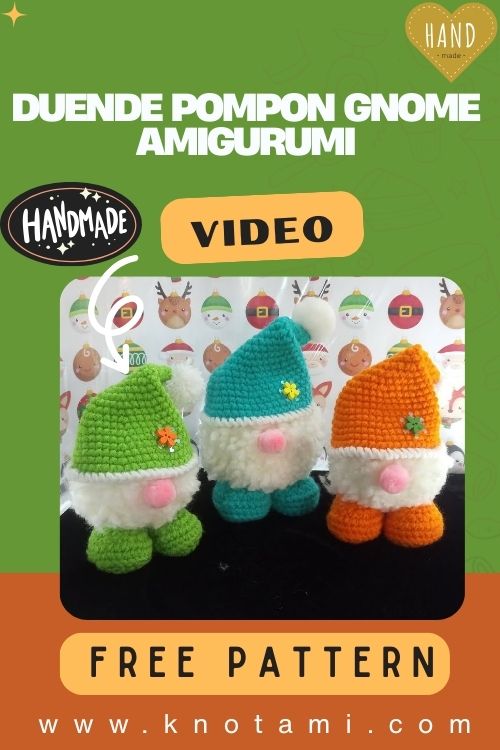
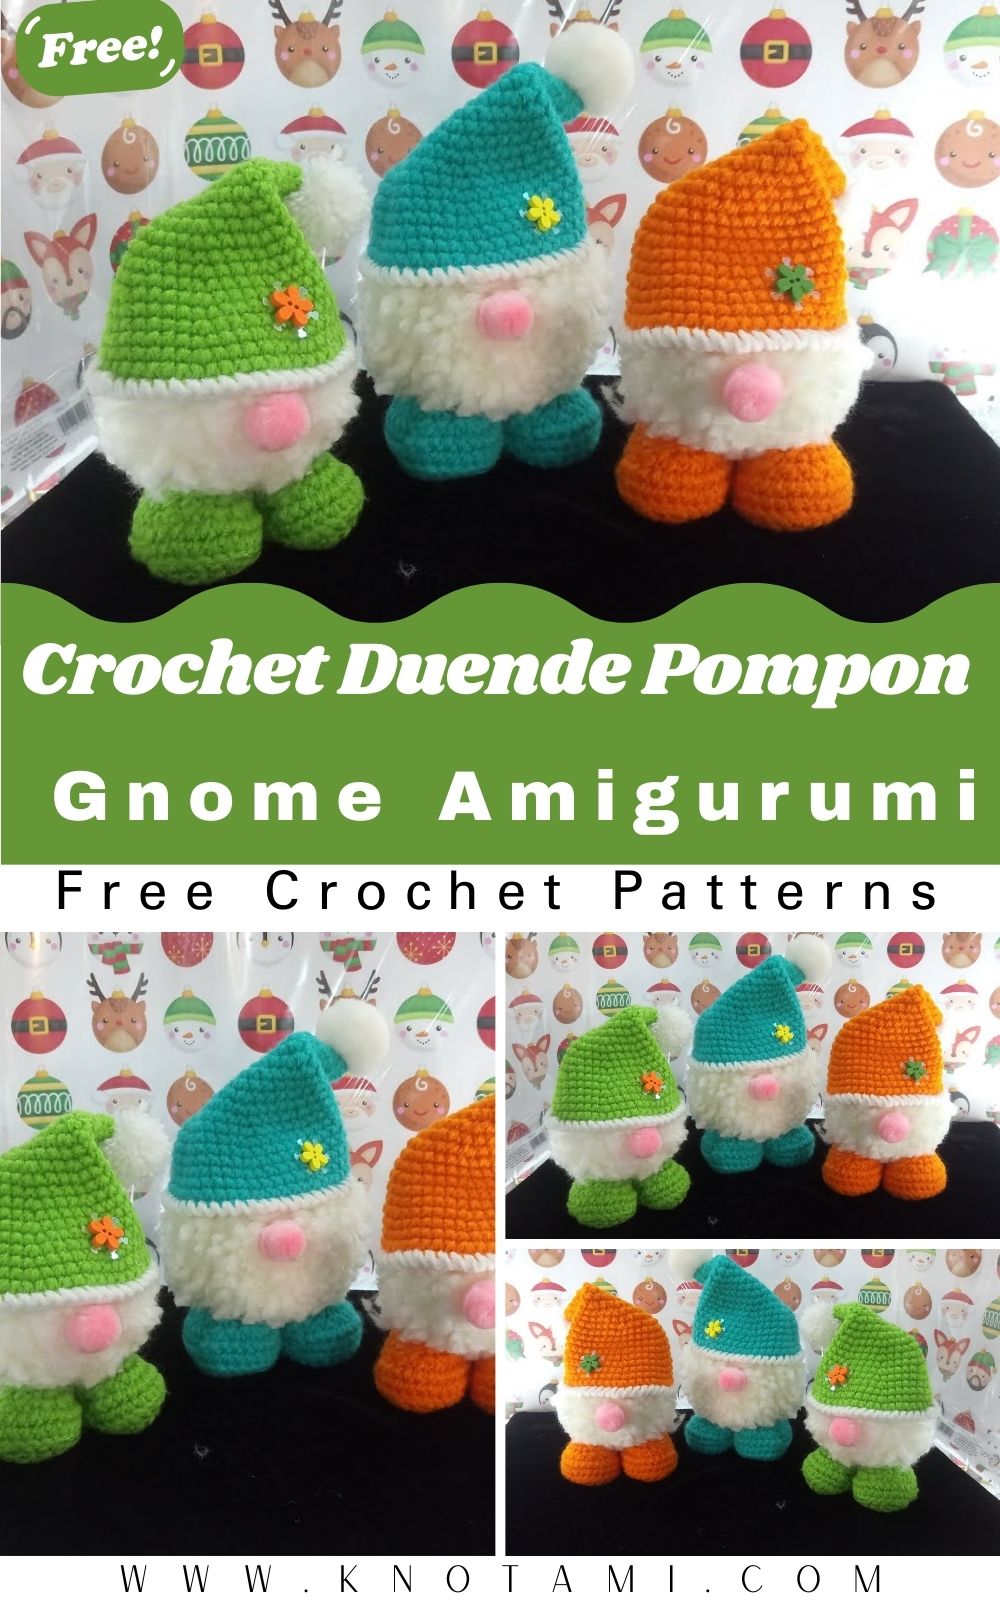
Are you ready to bring a touch of magic into your home with a Crochet Duende Pompon Gnome Amigurumi? These little mythical creatures are not only adorable but also incredibly fun to make. Whether you are looking for a unique holiday decoration or a handmade gift for a loved one, this project is perfect for you. In this guide, you will learn how to combine traditional crochet techniques with fluffy pompons to create a “pachoncito” or cuddly duende that everyone will adore.
If you have leftover yarn scraps lying around, this is the best way to use them up. You can customize your gnome with different colors for the hat and boots, while using a thick, white textured yarn for the body to give it that extra soft look. Because we focus on simple stitches, even if you are relatively new to the world of crochet, you will find this process smooth and rewarding. Let’s dive into the whimsical world of gnomes and start crafting your very own friend today!
To help you visualize every stitch and fold, I have included an embedded video above that walks you through the entire process. Sometimes seeing the tension of the yarn and the placement of the hook makes all the difference in your final result. Watch the video closely as you follow the written steps below to ensure your Crochet Duende Pompon Gnome Amigurumi turns out perfectly symmetrical and cute.
Materials Needed
Before you start your Crochet Duende Pompon Gnome Amigurumi, gather these essential supplies to make the process easier. Using the right tools ensures that your gnome stays sturdy and looks professional.
-
Yarn: You need white yarn for the body (thick or “peludito” yarn works best) and your choice of colors for the hat and boots.
-
Crochet Hook: A 4.5 mm hook is recommended for thick yarn, but always match your hook to your specific yarn weight.
-
Stuffing: High quality polyester fiberfill to keep the shoes and hat plump.
-
Cardboard: Small scraps from a toothpaste box or hair dye box to create sturdy soles for the shoes.
-
Pompon Maker: You can use plastic tools or the traditional cardboard method.
-
Safety Tools: A tapestry needle, scissors, and stitch markers.
-
Glue: A hot glue gun for adults or cold silicone glue if you are working with children.
-
Decorations: A snowflake charm or small fabric flowers to add a festive touch.
Step by Step Guide to Creating Your Gnome
Phase 1: Crafting the Gnome Shoes
The foundation of your Crochet Duende Pompon Gnome Amigurumi starts with the feet. We begin by making six chains. You will work around the chain to create an oval shape. In the second chain from the hook, place one single crochet. Continue across, and in the last chain, place three single crochets to turn the corner. As you work back down the other side, hide the starting tail within your stitches.
For the second round, you will perform three increases at the curves to expand the sole. It is very important to use your stitch markers here so you do not lose track of your starting point. By the end of this round, you should have 18 points. The third round involves a sequence of one increase and one point, repeated three times, bringing your total to 24 points. In the fourth round, you will follow a specific pattern of increases to reach 30 points. This creates the flat base where you will later insert your cardboard support.
Phase 2: Adding Height to the Boots
Now that the base is ready, it is time to build the shoe’s sides. For round five, work 30 points but only through the back loops. This creates a sharp edge that helps the shoe sit flat on the ground. For round six, work regular stitches through both loops.
In round seven, we begin shaping the top of the foot by performing five decreases at the front. This pulls the fabric inward to create that classic boot shape. Continue with normal points and a few more decreases as specified in the transcript. By the end of round eight, you will have a perfect little boot. Don’t forget to slide your cardboard insert into the bottom before adding the stuffing. This keeps the bottom flat so your Crochet Duende Pompon Gnome Amigurumi can stand up straight on your shelf.
Phase 3: The Magical Gnome Hat
The hat is the most iconic part of any Crochet Duende Pompon Gnome Amigurumi. We start with a magic ring of four points. Because the tip is so small, it might feel a bit fiddly at first, but keep going! As you move into round two, you will increase to six points. You might notice the piece curling; make sure to flip it right side out so you aren’t crocheting inside out.
The hat grows gradually to give it a long, pointed look. You will alternate between rounds of increases and rounds of “straight” crochet where you just maintain the stitch count. For example, in round four you increase to nine points, and in round five you simply work those nine points. This rhythmic growth continues until you reach round 21, where you will have 42 points. This creates a wide base that will sit perfectly on top of the pompon body.
Phase 4: Constructing the Pompon Body
The body of your gnome is not actually crocheted; it is a large, fluffy pompon! This is what makes this Crochet Duende Pompon Gnome Amigurumi so unique and soft. Use your thick white yarn and wrap it around your pompon maker or a piece of cardboard many times. The more you wrap, the “pachoncito” your gnome will be.
Once you have wrapped enough yarn, tie it tightly in the middle with a strong string and cut the loops. Trim the edges until you have a perfect sphere. You will also need a much smaller pompon for the tip of the hat and a medium sized one if you choose to give your gnome a big fluffy nose.
Phase 5: Final Assembly
Now comes the part where your character comes to life. Heat up your silicone gun or prepare your cold glue. First, glue the boots to the bottom of the large white pompon. Make sure they are level so the gnome doesn’t tip over. Next, place the hat over the top of the pompon. You can add a little stuffing to the hat to help it keep its shape.
Glue the small pompon to the tip of the hat for a classic look. Finally, add your decorations like the snowflake or the little flower. If you want your gnome to have a face, you can tuck a small wooden bead or a peach colored pompon just under the rim of the hat to serve as a nose. Your Crochet Duende Pompon Gnome Amigurumi is now complete and ready to guard your home!
Common Mistakes to Avoid
When making a Crochet Duende Pompon Gnome Amigurumi, one common error is not using a stitch marker. Because crochet is worked in a continuous spiral, it is very easy to lose your place, which results in a lopsided hat or mismatched shoes. Always mark the first stitch of every round.
Another mistake is stuffing the shoes too lightly. If the boots aren’t firm, the cardboard sole might shift, and your gnome will wobble. Ensure you pack the fiberfill tightly around the cardboard. Also, when making the pompon body, ensure you tie the center knot extremely tight. If it is loose, the yarn strands will fall out over time, and your gnome will lose its fluffiness.
Frequently Asked Questions
1. What is the best yarn for the body of the gnome?
For a truly soft Crochet Duende Pompon Gnome Amigurumi, use a bulky or “fuzzy” white yarn. This creates a more “tierno” or cute appearance compared to standard thin acrylic yarn.
2. Can I make this gnome without a glue gun?
Yes, you can use cold silicone glue or even sew the pieces together using a tapestry needle and matching yarn. Sewing is safer if you are making this as a toy for a small child.
3. How do I make the hat stand up straight?
If your yarn is soft, the hat might flop over. To keep it upright, you can insert a pipe cleaner or a bit of wire inside the hat before you glue it to the body.
4. Why do I need cardboard in the shoes?
The cardboard provides a flat, rigid base. Without it, the bottom of the crochet boot would be rounded, making it impossible for your Crochet Duende Pompon Gnome Amigurumi to stand on its own.
5. Can I wash my crochet gnome?
If you used cardboard in the shoes, you should only spot clean the surface. Submerging it in water will ruin the cardboard support and might cause the pompons to lose their shape.
Making Your Gnome Unique
One of the best things about the Crochet Duende Pompon Gnome Amigurumi is how easy it is to customize. You can change the colors to match different seasons. For example, use green and red for Christmas, or pastel pinks and yellows for a Spring gnome. You can even add tiny bells to the tip of the hat so it tinkles when you move it.
Remember to take your time with the increases in the hat. If you find that the hat is too small for your pompon, you can simply add a few more rounds of increases following the established pattern. Crochet is very forgiving, so do not be afraid to experiment with the size. Whether you make a giant gnome for your mantel or a tiny one for your desk, you will love the process of bringing these little spirits to life. Happy crafting!