
Flawless Crochet Perry Platypus Amigurumi Pattern: turn a simple strand of yarn into a cheerful little character that brightens your day. Crochet is creativity in motion. Each loop slows things down, each stitch brings a sense of calm and before you know it, you’re holding a tiny handmade treasure. Ready to unwind and make something adorable? Let’s get stitching.
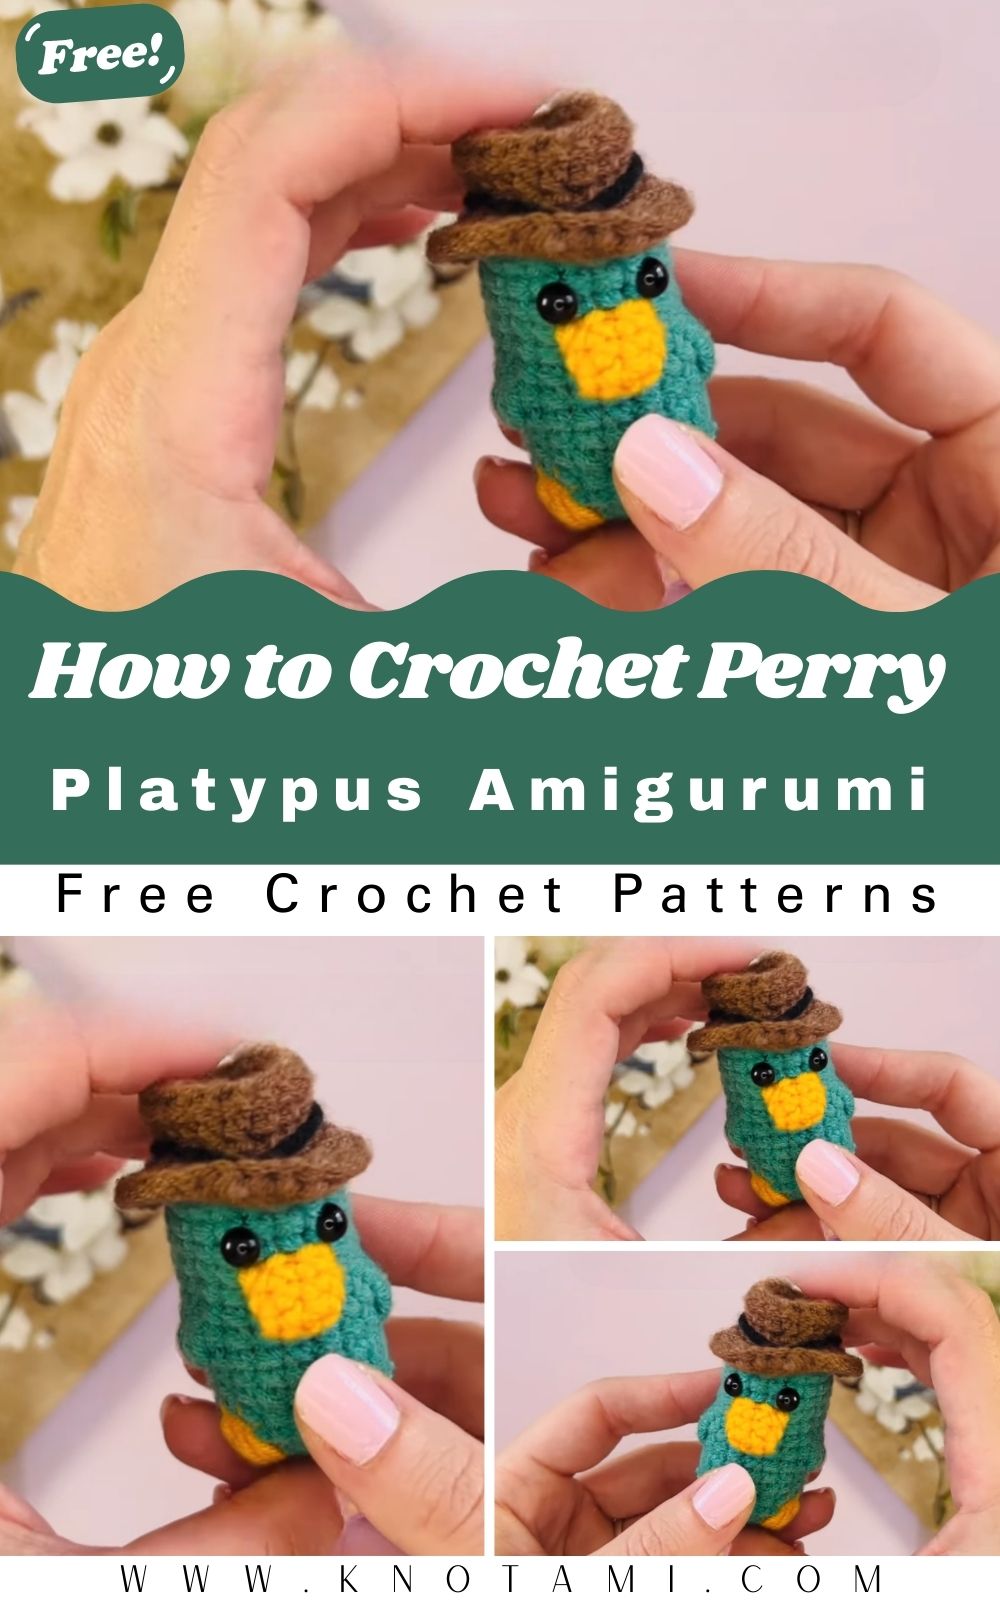
If you’re in the mood for something quirky and nostalgia-sprinkled, this Flawless Crochet Perry Platypus Amigurumi Pattern is a total charmer. From the teal body and beak-like bill to the playful paddle tail, the design captures his unmistakable look. It’s perfectly sized for gifting, displaying on a shelf, or keeping on your desk as a cheerful reminder to make time for fun.
Flawless Crochet Perry Platypus Amigurumi Pattern, you’ll get a materials list, step-by-step photos, exact stitch counts, and color-change notes. It also includes size guidance about 6–8 in/15–20 cm, quick time estimates, customization ideas, and a printable, mobile-friendly PDF.
Materials & Tools
Before you start your Crochet Perry Platypus Amigurumi, gather the following materials:
Yarn
-
Main Color: Teal or turquoise (for the body)
-
Secondary Color: Brown (for the tail and bill)
-
Optional: White and black for eyes if crocheting them instead of using safety eyes
Yarn Type: Soft acrylic or 100% cotton yarn
Yarn Weight: DK (Category 3) or light worsted (Category 4)
Tools
-
Crochet Hook: 2.5 mm or 3.0 mm
-
Stuffing: Polyester fiberfill (firm but fluffy)
-
Safety Eyes: 6 mm–8 mm (or small black beads/embroidered eyes)
-
Tapestry Needle: For sewing parts and weaving in ends
-
Stitch Markers: To mark the beginning of rounds
-
Scissors: Small and sharp for clean yarn trimming
Optional Additions
-
Felt sheets (for eye whites or hat details)
-
Fabric glue for securing small parts
-
Keychain ring (to make it a portable charm)
Choosing the Best Yarn & Colors
Cotton yarn creates crisp, defined stitches perfect for character-based amigurumi, while acrylic gives a softer, cuddlier finish. For a true “Perry” look, use a vibrant teal body, warm brown bill and tail, and white eyes with black pupils. Avoid fuzzy yarns, as they may blur stitch definition and obscure small details.
Pro Tip: Always crochet a small test swatch first to ensure your hook size gives a tight, even stitch. This keeps stuffing from peeking through.
Step-by-Step Crochet Instructions
Notes:
• Use US crochet terms throughout.
• Work in continuous rounds unless otherwise stated.
• Keep a stitch marker at the start of each round.
• Add stuffing gradually as you crochet each body section.
Abbreviations
-
MR = Magic Ring
-
sc = Single Crochet
-
inc = Increase (2 sc in same stitch)
-
dec = Decrease (single crochet two together)
-
sl st = Slip Stitch
-
ch = Chain
-
FO = Fasten Off
Making the Head
The head and body are worked as one continuous oval base.
-
With teal yarn, make a magic ring (MR).
-
Round 1: 6 sc in MR (6)
-
Round 2: inc around (12)
-
Round 3: (sc 1, inc) × 6 (18)
-
Round 4: (sc 2, inc) × 6 (24)
-
Rounds 5–10: sc around (24. This builds height for the head shape.
Insert safety eyes between Rounds 6 and 7, about 5 stitches apart. If you’re embroidering eyes, do it after assembly.
-
Round 11: (sc 2, dec) × 6 (18)
-
Round 12: (sc 1, dec) × 6 (12)
Stuff the head lightly but evenly as you go. Keep the top firm and smooth for a rounded shape.
Forming the Neck & Upper Body
Continue directly from the head.
-
Round 13: inc around (24)
-
Round 14: (sc 3, inc) × 6 (30)
-
Rounds 15–20: sc around (30)
-
Round 21: (sc 3, dec) × 6 (24)
-
Round 22: (sc 2, dec) × 6 (18)
Stuff the body firmly to maintain shape and support the tail. You can use the back of your hook handle to distribute the stuffing evenly.
Building the Main Body & Tail
Tail (Brown Yarn)
-
Ch 10, turn.
-
Row 1: sc in 2nd ch from hook and across (9), ch 1, turn.
-
Rows 2–8: sc across each row (9), ch 1, turn.
-
Round Edge: sc evenly around all sides for a clean finish.
-
FO, leaving a long tail for sewing.
Optional: Add diagonal lines of surface slip stitches or cross-stitches to mimic Perry’s iconic tail pattern.
Attaching the Tail
Position the tail at the lower back of the body. Sew it securely with small whip stitches. Add a bit of stuffing at the base before closing for a firm attachment.
Shaping or Attaching the Base (Feet and Limbs)
Front Legs (Make 2)
-
With teal yarn, ch 5.
-
Round 1: sc in 2nd ch from hook and across (4), 3 sc in last ch, continue along the other side of the chain (8).
-
Round 2: (sc 1, inc) × 4 (12).
-
Rounds 3–5: sc around (12).
FO, leaving a long tail for sewing.
Back Legs (Make 2)
-
MR, 6 sc (6).
-
Round 2: (sc 1, inc) × 3 (9).
-
Round 3: sc around (9).
FO, lightly stuff, and attach near the base of the body.
Creating the Tail or Limbs (Beak and Hat)
Bill (Brown Yarn)
-
Ch 7.
-
Row 1: sc in 2nd ch and across (6), ch 1, turn.
-
Rows 2–4: sc across (6).
-
Work sc around all edges to give the bill shape.
FO, leaving a long tail for sewing.
Position the bill on the face, slightly below the eyes, and sew it flat.
Hat (Optional Accessory)
To crochet Perry’s detective-style hat:
-
With dark brown yarn, MR, 6 sc.
-
Round 2: inc around (12).
-
Round 3: BLO, sc around (12).
-
Round 4: (sc 1, inc) × 6 (18).
-
FO and lightly stuff before attaching g to the top of the head.
Assembly & Positioning
-
Start with the Bill: Place it symmetrically under the eyes and stitch from corner to corner.
-
Attach Legs: Sew front legs slightly below the middle of the body, then attach back legs near the tail for balance.
-
Add Tail: Secure the flat side against the body with tight, small stitches.
-
Place the Hat: Stitch the hat or glue it securely on the head.
Tip: To ensure symmetry, pin all parts in place before sewing permanently. Step back and check proportions, small adjustments make a big difference!
Adding Final Touches & Accessories
-
Use a bit of blush or soft pink pastel for the cheeks to give a friendly look.
-
Add small embroidery details like nostrils or tiny eyebrows.
-
Create a mini tie, spy gadget, or briefcase for an “Agent P” version.
-
Use felt cutouts for eye highlights to make the expression pop.
Once everything is attached, weave in all yarn ends securely inside the body.
Customization Ideas
Play with Colors
-
Classic Perry: Teal body, brown bill, and tail.
-
Fantasy Perry: Purple or pastel blue body, golden tail.
-
Winter Perry: White body, icy-blue bill.
-
Rainbow Perry: Use self-striping yarn for a gradient effect.
Yarn Textures
-
Cotton: Crisp and defined for display pieces.
-
Acrylic: Soft and plush for children’s toys.
-
Velvet: Luxurious, larger plush version.
Themed Versions
-
Holiday Edition: Red hat and scarf.
-
Beach Edition: Sunglasses and a crochet surfboard.
-
Kawaii Style: Oversized eyes and pink cheeks.
Add-ons
-
Keychain ring for portability.
-
Mini base or platform to make a standing display.
-
Personalized tag with initials or a tiny crochet heart.
Advanced Tips & Troubleshooting
-
Invisible Decrease: Insert hook into front loops of next two stitches, yarn over, pull through both, yarn over again, pull through tw, seamless shaping!
-
Even Tension: Practice consistent hand movement to avoid uneven stitches.
-
Prevent Rounds from Twisting: Align the stitch marker vertically; this ensures straight spiraling rounds.
-
Avoid Overstuffing: Overfilling can distort shape. Aim for firm yet flexible stuffing.
-
Joining Parts: Always sew with matching yarn color to hide seams.
-
Check Proportions: Compare each part side by side before attaching.
-
Use Quality Safety Eyes: They secure tightly and won’t loosen over time.
-
Pattern Reading: Always preview abbreviations and stitch counts to avoid confusion.
-
Blocking: Lightly steam flat pieces like the tail before attaching.
-
Durability: Add a dab of glue over knots hidden inside to secure them permanently.
Care Instructions
Keep your Perry Platypus Amigurumi looking fresh and adorable with these simple care tips:
-
Hand Wash Only: Use cool water and gentle detergent.
-
Avoid Wringing: Press between towels to remove excess water.
-
Air Dry Flat: Shape bill, tail, and legs while drying.
-
No Direct Sunlight: Prolonged exposure can fade yarn colors.
-
Storage: Keep in a clean, dry place or display under a dust cover.
If gifting, wrap it in kraft paper or a small disboxy box; presentation adds a handmade charm!
Display & Gift Ideas
Your handmade Perry deserves to shine!
-
Desk Buddy: Keep him beside your workspace for daily smiles.
-
Kid’s Room Décor: Soft and safe for kids’ shelves.
-
Keychain Version: Make a mini version with lighter yarn and attach it to backpacks.
-
Holiday Ornament: Hang on the Christmas tree for a fun, handmade twist.
-
Gift Idea: Perfect for birthdays, anniversaries, or thank you presents.
Pro Tip: Add a little handmade tag with Made with Love. Small details make gifts unforgettable.
Benefits of Making Crochet Perry Platypus Amigurumi
-
Relaxation & Mindfulness: The repetitive rhythm of stitches calms your mind and relieves stress.
-
Stress Relief: Focusing on your hook and yarn helps redirect mental energy.
-
Creative Expression: You can personalize colors, shapes, and accessories however you like.
-
Sustainable Gifting: Handmade crafts are eco-friendly alternatives to factory-made toys.
-
Confidence Boost: Completing a character brings instant joy and pride.
-
Emotional Value: Handmade gifts carry the warmth of time and ca,r e a piece of you, stitched into every loop.
Photography & Social Media Tips
Show off your adorable Perry with Instagram-worthy photos!
Photography Tips
-
Natural Light: Morning or late-afternoon sunlight gives the best glow.
-
Background: Use simple tones like white, beige, or wood for focus.
-
Props: Yarn balls, hooks, or leafy plants add cozy texture.
-
Angles:
-
Front shot for expression.
-
Side view for shape and proportions.
-
Close-up to show stitch texture.
-
Conclusion
Crocheting your own Perry Platypus Amigurumi is more than a creative project; it’s a joyful experience filled with color, patience, and imagination. From the first loop to the final stitch, every moment feels rewarding as your yarn transforms into something truly adorable.
Whether you’re gifting it, selling it, or keeping it for yourself, this handmade Perry will always carry a piece of your heart. It’s proof that creativity can turn simple materials into something magical.
So grab your teal yarn, put on your favorite playlist, and let your crochet hook work its quiet magic because the best kind of crafting is the kind that makes you smile.