
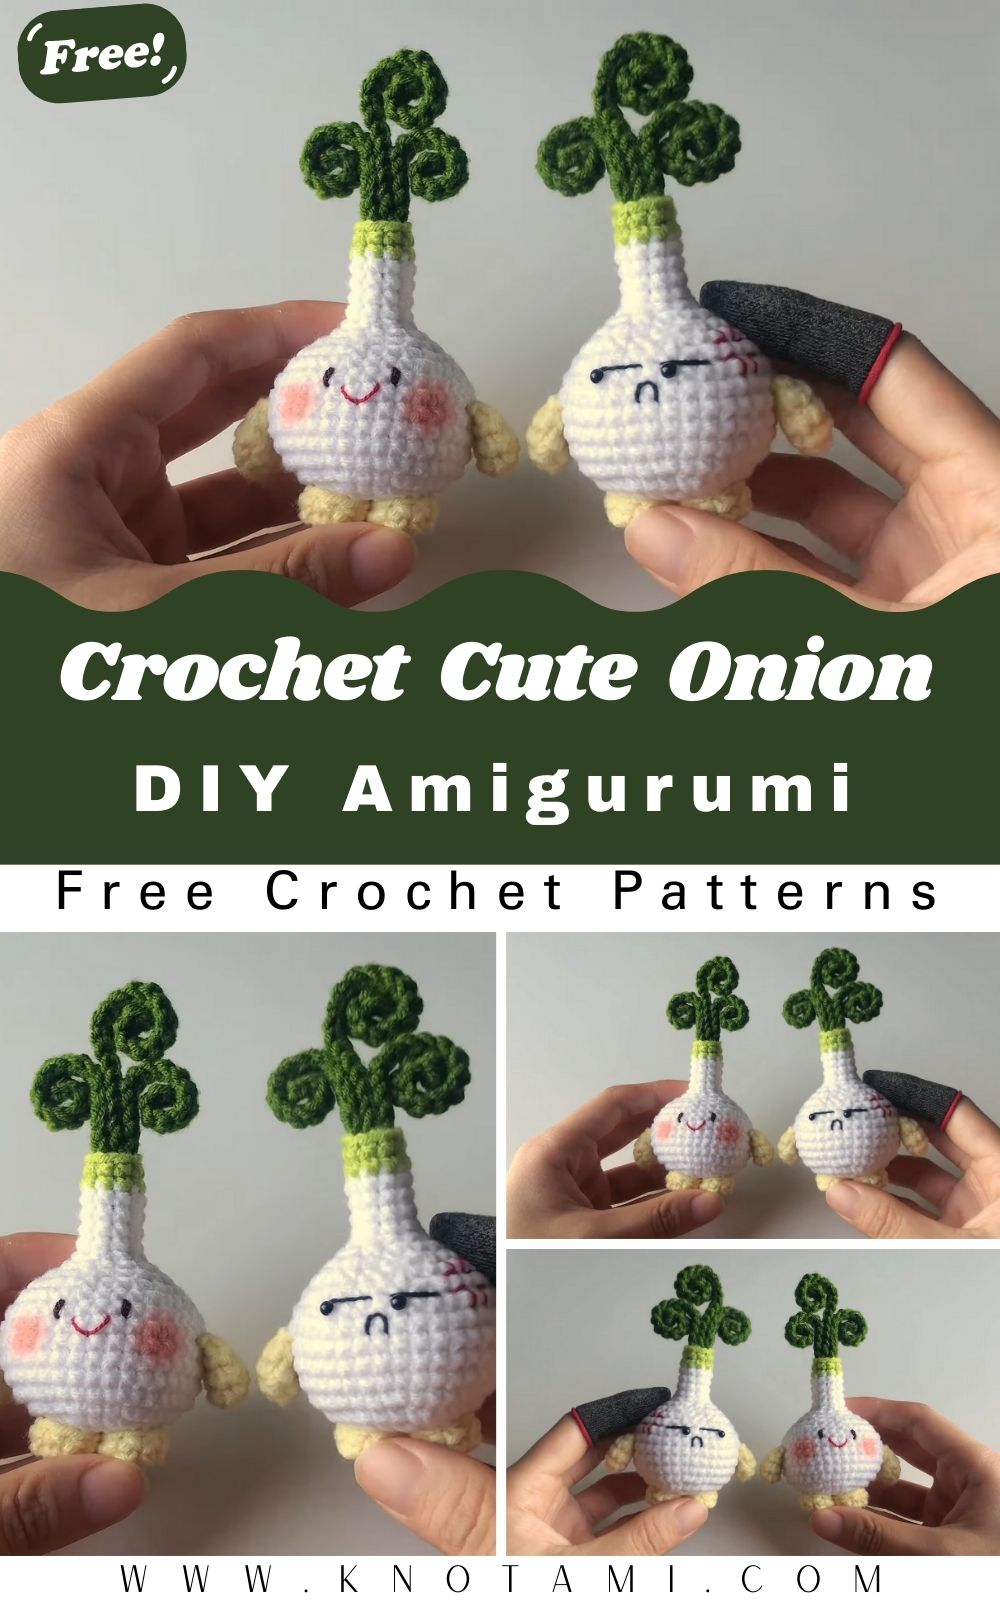
Welcome to our latest crafting adventure where we bring a little bit of the garden into your hobby room! If you have ever wanted to create something unique and adorable, then making an Onion Crochet Doll is the perfect project for you. Crocheting toys, also known as amigurumi, is a wonderful way to relax while producing a handmade treasure that can brighten up any space. In this detailed guide, we will walk you through every single step to ensure your finished onion looks professional and charming.
Starting a new project can sometimes feel overwhelming, but this Onion Crochet Doll is designed with simplicity in mind. Whether you are a seasoned pro or just picking up a hook for the first time, the clear instructions and repetitive patterns will help you master the craft quickly. We focus on using basic stitches like the single crochet and the magic ring to form a sturdy, cute vegetable friend. Grab your yarn and let us dive into the wonderful world of crochet vegetables together!
The video embedded above provides a visual walkthrough of every technique mentioned in this guide. If you find yourself stuck on a specific stitch or want to see the exact hand movements for the magic ring, simply refer back to the video. Watching the tutorial alongside reading these instructions is the best way to ensure your Onion Crochet Doll turns out exactly as pictured. It serves as a great companion to help you visualize the shaping of the bulb and the attachment of the green leaves.
Skill Level / Level of Difficulty
The Onion Crochet Doll is categorized as an Easy to Intermediate project. While the majority of the doll uses basic single crochet stitches, the shaping of the bulb and the assembly of the small arms and legs require a bit of patience and attention to detail. If you know how to increase and decrease, you will find this project very manageable. It is an excellent choice for a student or a hobbyist looking to practice their amigurumi assembly skills.
Tutor’s Suggestions
Before you start your Onion Crochet Doll, I highly suggest choosing a high quality cotton or acrylic yarn that does not split easily. This makes the stitches look much cleaner and more defined. Additionally, always use a stitch marker at the beginning of every round. Because we work in continuous spirals, it is very easy to lose track of where a round ends. My biggest tip is to stuff the doll very firmly; this ensures the onion keeps its round, plump shape even after being handled or washed.
Materials Needed
To create your very own Onion Crochet Doll, gather the following supplies:
-
Yarn: Cream or light yellow for the bulb, and a vibrant green for the leaves.
-
Crochet Hook: A 2.5mm or 3.0mm hook works best for tight amigurumi stitches.
-
Stuffing: Polyester fiberfill or cotton stuffing.
-
Safety Eyes: 6mm or 8mm black eyes (optional, or you can embroider them).
-
Stitch Markers: To keep track of your rounds.
-
Yarn Needle: For sewing the arms, legs, and leaves together.
-
Scissors: For cutting yarn ends.
Step-by-Step Guide to Your Onion Crochet Doll
Phase 1: The Onion Bulb
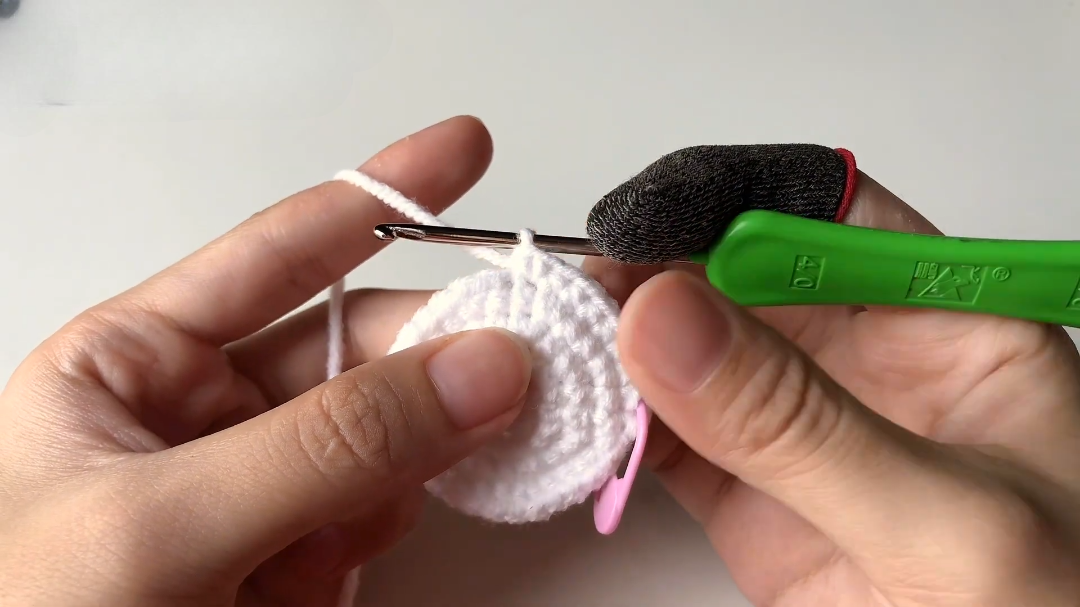
The journey of your Onion Crochet Doll begins with the main body. We start by creating a magic ring, which is the foundation for most circular crochet projects. Inside this ring, you will crochet eight single stitches. Once you have your eight stitches, pull the yarn tail tightly to close the hole. This creates a neat center for the bottom of your onion.
For the second round, you will increase every stitch. This means you put two single crochet stitches into every one stitch from the previous round. By the end of this round, you should have 16 stitches. In the third round, the pattern changes to one single crochet followed by an increase. This gradual expansion helps the bulb grow outward in a flat circle before we start building the height.
In the fourth round, you will follow a cluster pattern: one single crochet, one increase, and then one single crochet. Repeat this around the entire circle. This specific spacing ensures that the additional points are staggered, resulting in a perfectly round shape rather than a hexagon. By round five, you will single crochet in seven stitches and then add an increase. Repeat this four times. From rounds six through ten, you will simply work even rounds with one single crochet in each stitch. This creates the middle “body” of your Onion Crochet Doll.
Phase 2: Shaping and Decreasing
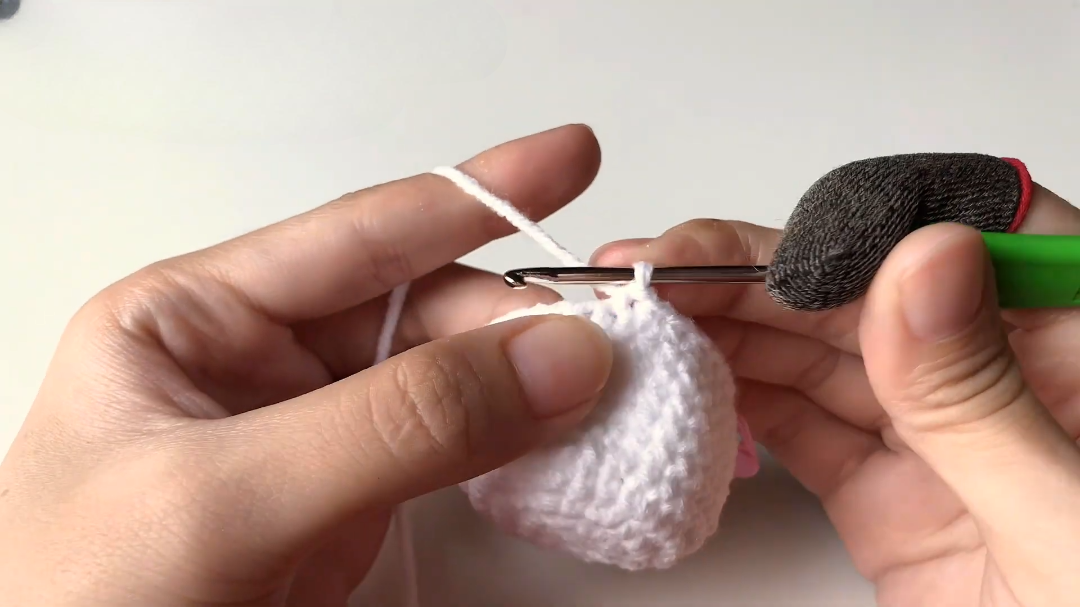
Now that the middle of the bulb is finished, we must taper the top to give it that classic onion shape. In round 11, you will work two single crochets, followed by a decrease, and then two more single crochets. Repeat this cluster until the end of the round. Decreasing can be tricky, so make sure you are pulling your yarn tight to avoid any gaps where stuffing might peek through.
Round 12 involves three single crochets followed by a decrease. As the opening gets smaller, you will start to see the “neck” of the onion forming. Round 13 uses a pattern of one single crochet, one decrease, and one single crochet. By round 14, you should alternate one single crochet and one decrease. At this point, it is crucial to stop and stuff your Onion Crochet Doll. Use your fingers or a stuffing tool to push the cotton into the sides to make it firm and round.
Phase 3: The Top and Leaves
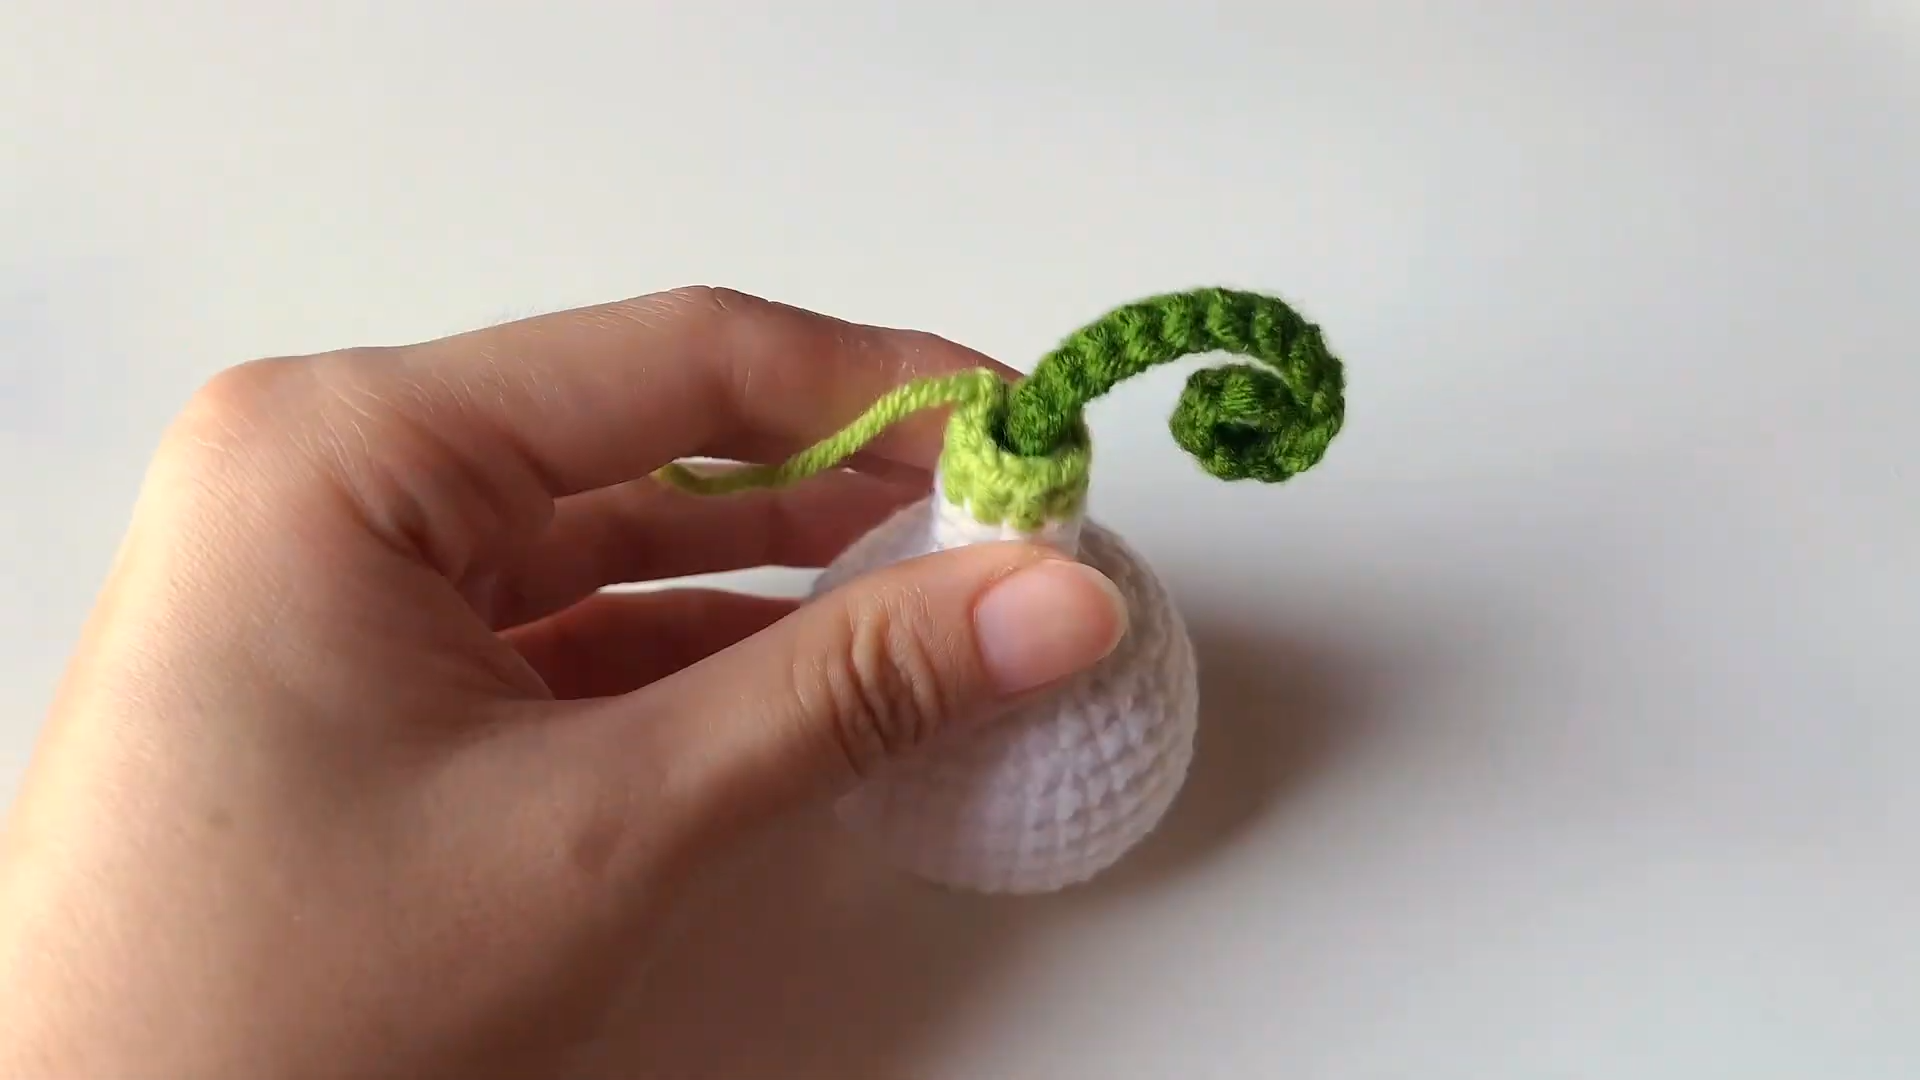
After stuffing, we finish the neck. Round 15 consists of two single crochets followed by a decrease, repeated three times. Rounds 16 through 19 are worked evenly, which creates the thin “sprout” area of the onion. At the end of round 19, you will switch from your cream yarn to the green yarn. This color change signifies the transition from the vegetable body to the fresh green leaves.
To make the leaves, you will chain 20 and then work single crochets back down the chain, starting from the second loop from the hook. You should make three leaves in total: two medium ones and one longer one. These leaves are what give the Onion Crochet Doll its personality. Once finished, sew them securely to the top of the green neck using your yarn needle.
Phase 4: Arms, Legs, and Assembly

The limbs are what turn a simple vegetable into a cute doll. For the legs, create a magic ring with six stitches and increase gradually until you have a small nub. For the arms, follow a similar process but make them slightly longer and flatter at the end so they can be sewn onto the sides of the bulb. Position the legs at the very bottom so the onion can sit upright. The arms should be placed halfway up the body. If you are using safety eyes, insert them between rounds 8 and 9 before you finish stuffing the doll completely.
6
Where Can We Use It?
The Onion Crochet Doll is incredibly versatile! It makes for a fantastic kitchen decoration, sitting on a shelf or near a window to add a touch of handmade warmth to your cooking space. Because it is so soft, it also serves as a wonderful toy for children who enjoy playing “grocery store” or “chef.” Furthermore, these dolls are popular at craft fairs because they are unique and eye catching. You can even add a keychain ring to the top and turn it into a backpack charm for a friend who loves cooking.
Tips and Tricks
-
Use Invisible Decreases: When working on the tapering section of the bulb, try using the invisible decrease method. This involves picking up only the front loops of the next two stitches, which makes the decrease almost impossible to see.
-
Tension is Key: Keep your tension consistent. If your stitches are too loose, the stuffing will show through. If they are too tight, your hands might get tired quickly.
-
Yarn Choice: If you want a “rustic” look, use a slightly variegated yarn with shades of white and tan. For a “kawaii” look, use bright, solid colors and add a little pink blush to the cheeks using a real blush or a pink marker.
-
Wire Support: If you want the leaves to be poseable, you can crochet around a thin piece of florist wire. This allows you to bend the green sprouts in different directions.
Common Mistakes
One common mistake is forgetting to move the stitch marker. In a spiral pattern, if you miss the start of the round, your increases will be misaligned, and the onion will look lopsided. Another frequent error is not stuffing the neck area enough. Since the neck is thin, it can become floppy if it is not packed with enough cotton. Lastly, ensure you are not accidentally adding extra stitches at the end of rounds when you join with a slip stitch; always count your stitches to stay on track.
Frequently Asked Questions (FAQs)
1. What kind of yarn is best for the Onion Crochet Doll?
I recommend using a cotton blend or a “milk cotton” yarn. Cotton is less fuzzy than wool and holds the shape of amigurumi toys much better over time.
2. Can I make this doll bigger or smaller?
Yes! To make a larger Onion Crochet Doll, you can use a thicker yarn and a larger hook. To make it smaller, use embroidery floss or lace weight yarn with a tiny hook.
3. Do I have to use a magic ring to start?
While a magic ring is preferred because it leaves no hole, you can also chain 2 and work your first round of stitches into the second chain from the hook.
4. How do I clean my crochet doll if it gets dirty?
If you used acrylic or cotton yarn, you can gently hand wash the doll in cool water with mild soap. Let it air dry completely to ensure the stuffing inside does not stay damp.
5. How long does it take to finish this project?
For most intermediate crocheters, an Onion Crochet Doll takes about 2 to 4 hours to complete, including the assembly of the leaves and limbs.
Conclusion
Creating this Onion Crochet Doll is a rewarding experience that results in a unique piece of art. By following the steps in this guide and referring to the video for visual help, you have all the tools necessary to succeed. Remember that every handmade item is special because of the care and effort you put into it. Furthermore, practicing these techniques will help you grow as a crafter. Whether you are keeping this onion for yourself or giving it as a gift, it is sure to bring a smile to anyone’s face. Happy crocheting, and I look forward to seeing your beautiful finished dolls!
Additionally, don’t be afraid to experiment with different expressions for your doll. You can embroider a tiny mouth or even give it a little mustache. The possibilities are endless when you use your imagination. Therefore, take your time, enjoy the rhythmic flow of the stitches, and celebrate your progress. Every stitch is a step closer to completing your masterpiece. Furthermore, sharing your work with the crochet community online is a great way to stay motivated and inspired. I hope this tutorial has been helpful and clear for your crafting journey!