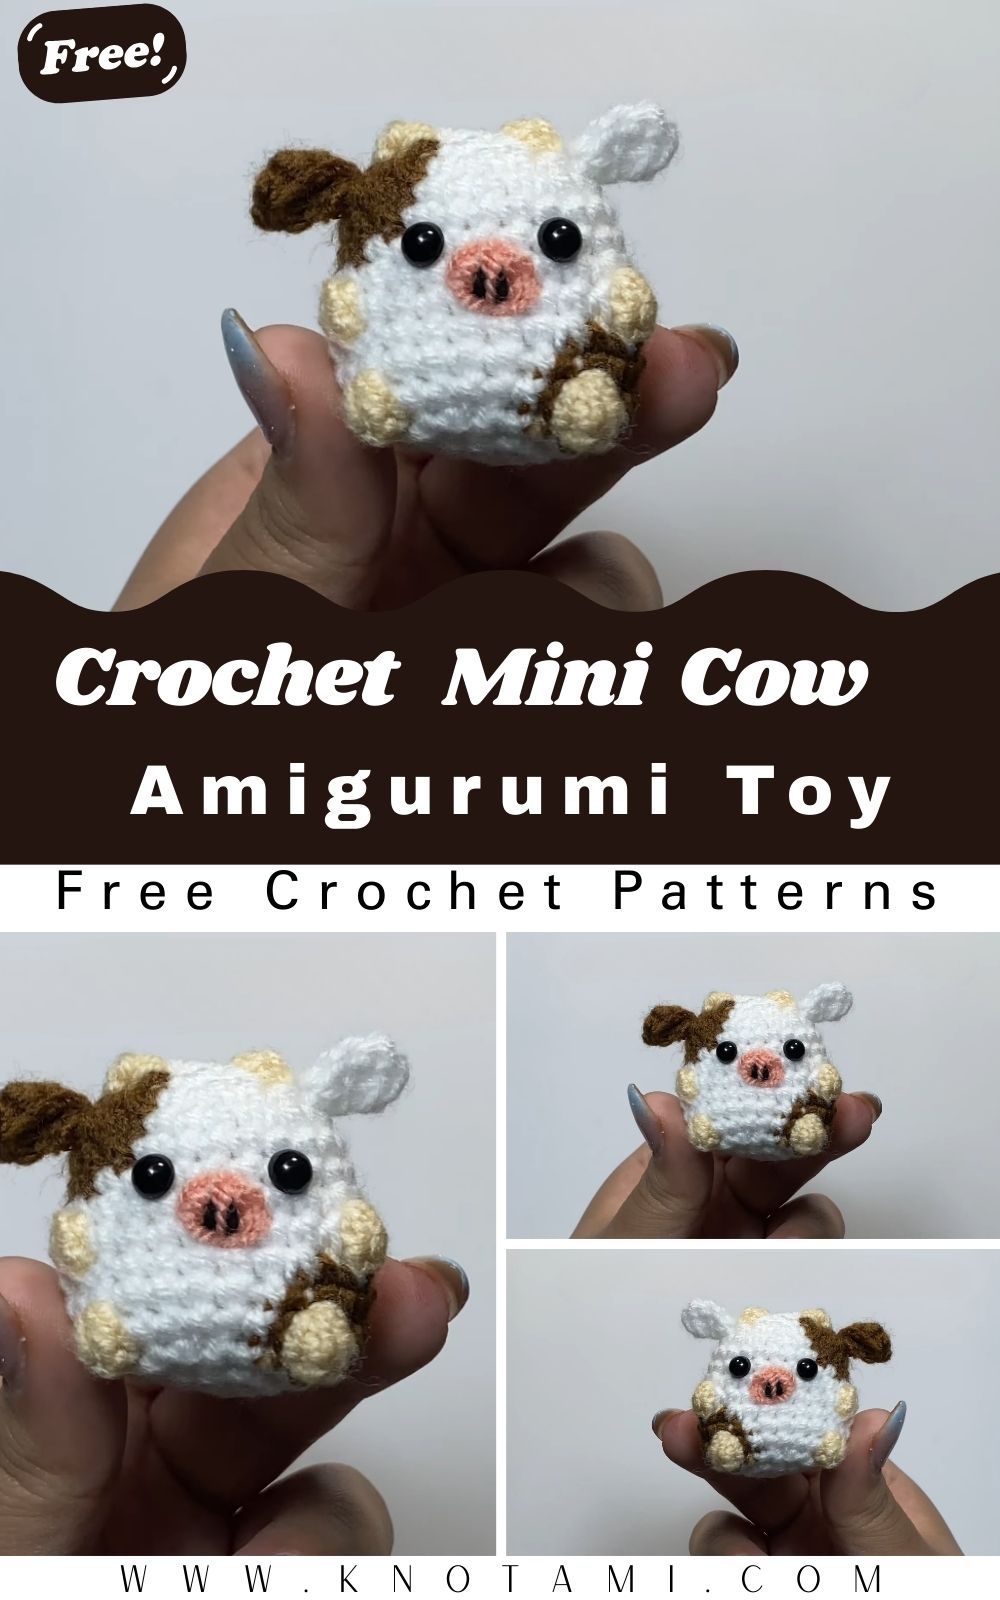
Are you ready to create something absolutely adorable? If you love handmade toys, then this Mini Cow Amigurumi Pattern is exactly what you need to start your next creative project. Crocheting small animals is a wonderful way to relax and produce a charming gift that everyone will cherish. In this guide, we will walk through every single stitch together so that you can finish with a professional-looking little cow. Whether you are a seasoned crafter or just starting your crochet journey, this project is designed to be simple, fun, and highly rewarding.
Setting up your workspace for a Mini Cow Amigurumi Pattern is the first step toward success. You will find that using the right yarn and hook size makes a massive difference in the final texture of your cow. This tiny bovine friend features cute spots, little horns, and a sweet pink snout that brings it to life. Because we are focusing on a miniature size, this cow is perfect for keychains or desk accessories. Let’s dive into the details and turn some simple yarn into a lifetime companion that you can be proud of making.
Skill Level: Beginner to Intermediate
This Mini Cow Amigurumi Pattern is rated as a “Beginner-Plus” project. While the basic shapes are simple rounds of single crochet, you will need to feel comfortable with color changes and the popcorn stitch. If you know how to make a magic ring and can increase or decrease, you are already halfway there. The assembly phase requires a bit of patience for sewing the small ears and horns, but it is a great way to practice your finishing techniques.
Tutor’s Suggestions for Success
Before you pick up your hook, I have a few professional tips to make your Mini Cow Amigurumi Pattern turn out perfectly. First, always use a stitch marker because working in continuous rounds can get confusing very quickly. Second, ensure your tension is tight enough so that the fiberfill stuffing does not peek through the stitches. If you notice gaps, try switching to a slightly smaller hook. Lastly, when you are doing the color changes for the spots, carry the yarn loosely inside to avoid pulling the fabric too tight.
Materials Needed
To complete your Mini Cow Amigurumi Pattern, gather the following supplies:
Tools: Scissors, tapestry needle, and tweezers for stuffing
Filling: High-quality fiberfill or polyester stuffing
Step-by-Step Guide to the Mini Cow Amigurumi Pattern
Creating the Body and Base
To start your Mini Cow Amigurumi Pattern, you must begin with the body using the white yarn. Create a magic ring and work 6 single crochets into it. For the second round, you will increase in every stitch to reach a total of 12. In the third round, follow a pattern of one single crochet then one increase for 18 stitches. Continue expanding in the fourth round with two single crochets and one increase to reach 24 stitches. This creates a solid base for your cow to sit upright.
Adding the Cute Cow Spots
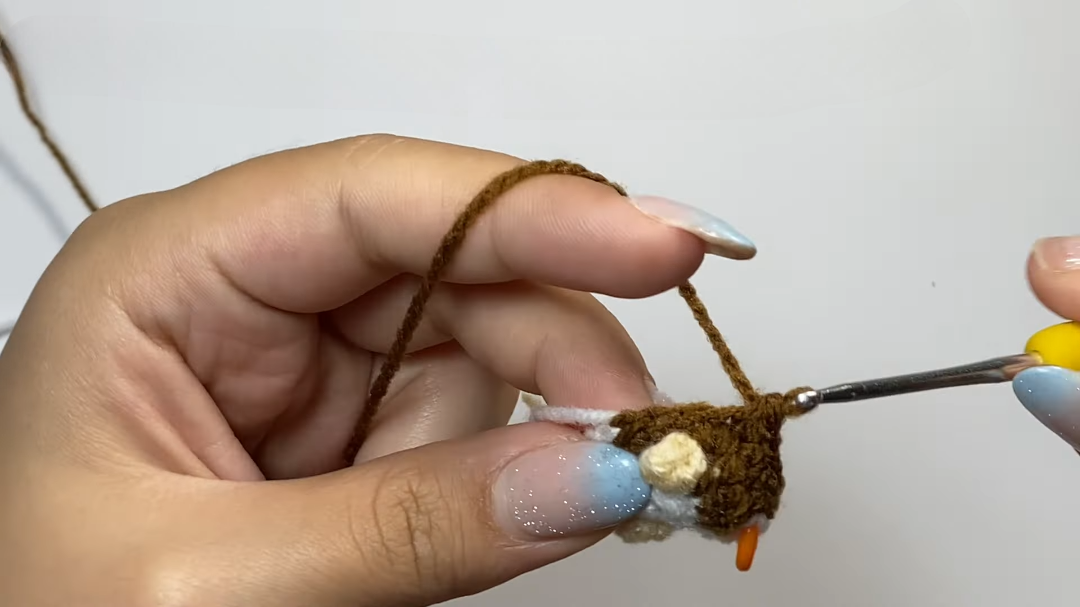
The fifth round is where the Mini Cow Amigurumi Pattern gets its character. You will work 7 single crochets in white, then switch to brown yarn for a popcorn stitch. To make the popcorn, work 5 double crochets in the same stitch, then pull the loop through the first double crochet to “pop” it out. Follow the pattern of 6 white stitches and another popcorn stitch to create the front legs or spots. Remember to switch back to white for the final 8 stitches of the round. This technique adds a 3D texture that makes your cow stand out.
Building the Head
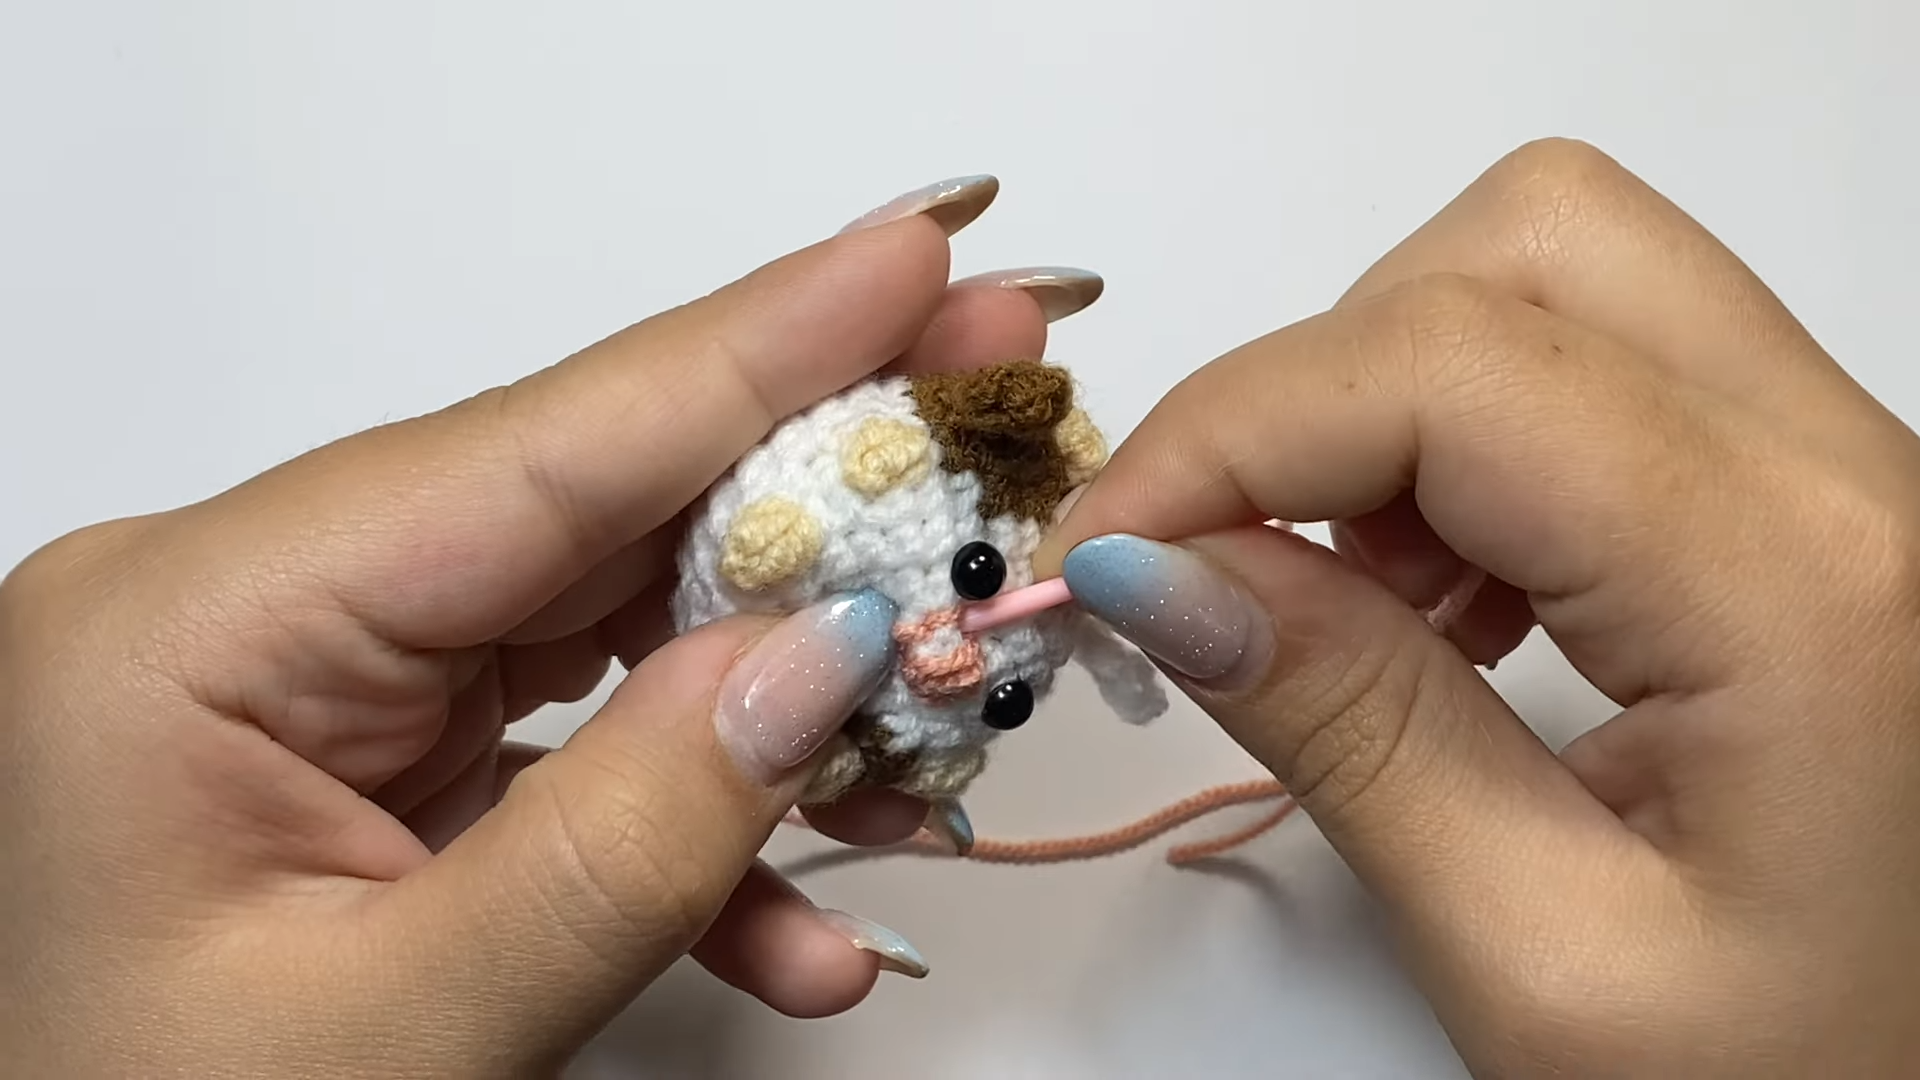
After finishing the body rounds, you will transition into the head section. The Mini Cow Amigurumi Pattern uses the Front Loop Only (FLO) technique in round 11 to create a distinct neck line. Increase your stitches back up to 36 over the next two rounds to give the head its rounded shape. Between rounds 15 and 16, you should safely place the 6mm eyes. Make sure they are spaced about 7 to 8 stitches apart so your cow has a friendly and wide-eyed expression.
Finishing the Main Shape
Once the eyes are secure, you will begin decreasing the head of your Mini Cow Amigurumi Pattern. Work rounds of four single crochets followed by a decrease, then three and a decrease, and so on. As the hole gets smaller, use your tweezers to firmly pack the fiberfill into the head and body. It is vital to stuff the neck area well so the head doesn’t wobble. Close the final 6 stitches using your needle by catching the front loops and pulling tight to create a seamless finish.
Where Can We Use This Mini Cow?
The beauty of the Mini Cow Amigurumi Pattern is its versatile size. You can easily attach a lobster claw or key ring to the top of the head to turn it into a cute keychain for your bag. Furthermore, these little cows make excellent nursery decor when placed on a shelf or used as part of a baby mobile. Many crafters also use them as “worry pets” or desk buddies to keep them company during work. They are also the perfect size for stocking stuffers during the holiday season or as small “just because” gifts for friends.
Tips and Tricks for Amigurumi
To excel at the Mini Cow Amigurumi Pattern, you should focus on your “invisible decrease.” Instead of a standard decrease, insert your hook into the front loops of the next two stitches only. This makes the reduction of stitches nearly invisible to the eye. Additionally, when you are sewing the parts together, use the same yarn you used for crocheting to ensure the seams disappear. If you want your cow to have a bit of a “blush” look, you can use a tiny bit of real makeup blush on the cheeks after you finish sewing.
Common Mistakes to Avoid
One frequent error when following a Mini Cow Amigurumi Pattern is stuffing the piece too lightly. If you do not add enough fiberfill, the cow will lose its shape over time and look wrinkled. Another mistake is forgetting to secure the yarn tails inside the body. Always tie a double knot when changing colors so that the spots do not come undone when someone plays with the toy. Lastly, be careful with the placement of the horns; if they are too far apart or too close, the cow might end up looking like a different animal entirely.
Frequently Asked Questions (FAQs)
1. What is the best yarn for this Mini Cow Amigurumi Pattern?
For the best results, a cotton blend like Alize Cotton Gold is ideal. It provides great stitch definition and does not pill as much as acrylic yarn. This ensures your cow stays looking new for a longer period.
2. Can I use larger safety eyes for this pattern?
While 6mm eyes are recommended for the Mini Cow Amigurumi Pattern, you can use 8mm eyes if you want a more “kawaii” or oversized eye look. Just ensure they are fastened tightly so they do not fall out.
3. How do I make the popcorn stitch look better?
The secret to a great popcorn stitch is tension. When you pull the loop through the first double crochet, give the yarn a firm tug. This gathers the stitches together and makes the “spot” on the cow look more prominent.
4. Is this pattern suitable for children?
Yes, but if you are giving this to a child under three years old, you should embroider the eyes with black yarn instead of using plastic safety eyes. This prevents any potential choking hazards.
5. How long does it take to finish this project?
Because this is a Mini Cow Amigurumi Pattern, most intermediate crocheters can finish the entire cow in about two to three hours. It is the perfect project for a relaxing afternoon or a quick weekend craft.
By Mira Knotts — the creative mind behind Knotami (knotami.com), lovingly crafting unique crochet designs and sharing inspiring patterns for makers everywhere.