
Welcome back to the world of cozy crafting where we turn simple yarn into holiday magic. If you are looking for a quick and adorable project, this Christmas crochet tree keychain is the perfect choice for you. During the holiday season, there is nothing quite like giving a handmade gift that carries a bit of your own heart. These tiny trees are not just cute; they are incredibly versatile and fast to make. Whether you want to decorate your own keys or create a fleet of festive ornaments for a craft fair, this guide will walk you through every single step with ease and clarity.
You might be wondering if you have enough skill to tackle amigurumi, but I promise you that this project is designed with beginners in mind. Consequently, even if you have only just picked up a hook, you will find the instructions straightforward and manageable. We use basic stitches like the single crochet and the magic circle to build the shape of the tree. Furthermore, this Christmas crochet tree keychain serves as a wonderful stash-buster because it requires very little yarn. You can experiment with different shades of green or even go wild with non-traditional colors to match your personal style or home decor.

After you watch the embedded video above, you will have a much clearer vision of how the stitches should look in real-time. Although the written instructions provide the structural map, seeing the hand movements for the magic circle and the reverse single crochet garland is incredibly helpful. Therefore, I highly recommend keeping the video open as a visual reference while you work through the pattern. This combination of visual and written guidance ensures that you won’t get lost, especially when we transition between the green tree body and the brown trunk.
Skill Level: Beginner Friendly
The level of difficulty for this Christmas crochet tree keychain is definitely “Beginner.” If you know how to hold a hook and perform a basic single crochet, you are already halfway there. However, we do introduce a couple of special techniques like working in the back loops and the reverse single crochet. These methods are excellent for leveling up your skills without feeling overwhelmed. Since the project is small, any mistakes are very easy to fix quickly.
Tutor’s Personal Suggestions for Success
Before you start your Christmas crochet tree keychain, I want to share a few professional tips to make your experience smoother. First, always choose a hook size that is slightly smaller than what your yarn label recommends. For instance, if your yarn suggests a 4 mm hook, try using a 3 mm hook instead. This choice ensures that your stitches are tight enough so that the white stuffing does not peek through the gaps.
Secondly, I suggest using a stitch marker religiously. Because we are working in continuous rounds, it is very easy to lose track of where one row ends and the next begins. If you do not have a professional marker, a simple paperclip or a scrap piece of contrasting yarn works perfectly well. Additionally, don’t be afraid to customize your tree. You can add more ornaments, use a sparkly yarn for the garland, or even add a tiny bell inside the stuffing for a jingle effect.
Materials Needed for Your Festive Tree
To create your very own Christmas crochet tree keychain, you will need to gather the following supplies. Most of these items are likely already in your craft bin.
-
Green Yarn: A small amount of 4 ply yarn (Two shades of green look great for variety).
-
Brown Yarn: For the sturdy little tree trunk.
-
White Yarn: To create the snowy garland effect.
-
Yellow Yarn: A tiny bit for the star on top.
-
Black Yarn/Beads: For the cute face details.
-
Scrap Yarn: Various colors for the tiny ornaments.
-
Polyester Stuffing: To give your tree its squishy shape.
-
Crochet Hooks: 2.5 mm and 3 mm sizes.
-
Keychain Hardware: Blank rings to turn it into a portable accessory.
-
Essential Tools: A yarn needle, stitch markers, and sharp scissors.
Step-by-Step Guide to the Christmas Crochet Tree Keychain
Phase 1: The Body of the Tree
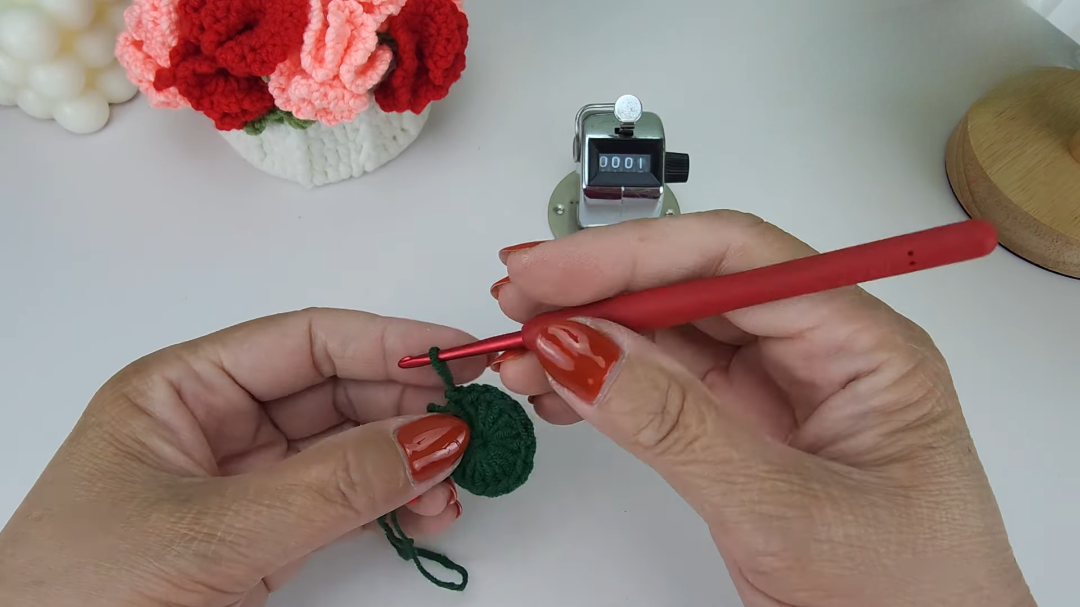
You will begin by using your green yarn and the 3 mm hook. As mentioned before, the smaller hook creates a dense fabric. Start by creating a magic circle. This is the foundation for almost all amigurumi projects because it allows you to pull the center tight, leaving no hole at the top.
-
Round 1: Make 6 single crochets (sc) into the magic circle. Pull the tail to cinch it closed. (6 stitches)
-
Round 2: Work 1 sc in each stitch around. If the stitches feel tight, use your needle to loosen them. (6 stitches)
-
Round 3: We will now increase the size. Work [1 sc, 1 increase] three times. An increase is simply two sc in one stitch. (9 stitches)
-
Round 4: Work [2 sc, 1 increase] three times. (12 stitches)
-
Round 5 (Back Loops Only): Work 1 sc in each stitch around. By working only in the back loops, you leave the front loops exposed. These exposed loops are where you will attach the garland later. (12 stitches)
-
Round 6: Work [3 sc, 1 increase] three times. (15 stitches)
-
Round 7: Work [4 sc, 1 increase] three times. (18 stitches)
-
Round 8 (Back Loops Only): Work 1 sc in each stitch around. Again, this creates the ridge for your decorations. (18 stitches)
-
Round 9: Work [5 sc, 1 increase] three times. (21 stitches)
-
Round 10: Work [6 sc, 1 increase] three times. (24 stitches)
Phase 2: The Base and the Trunk
Now that the cone shape is finished, we need to close the bottom of your Christmas crochet tree keychain.
-
Round 11 (Back Loops Only): Work [2 sc, 1 decrease] six times. A decrease joins two stitches into one. (18 stitches)
-
Round 12: Work [1 sc, 1 decrease] six times. On the very last stitch of this round, switch your yarn color to brown. (12 stitches)
-
Round 13 (Front Loops Only): Using brown yarn, work 1 sc in each stitch. (12 stitches)
-
Round 14: Work 1 sc in each stitch around. Now is the time to stuff your tree firmly with fluff. (12 stitches)
-
Round 15 (Back Loops Only): Decrease in every stitch around. (6 stitches)
Fasten off and leave a long tail. Use your yarn needle to weave the tail through the remaining 6 stitches and pull tight to close the trunk.
Adding the Festive Decorations
The Snowy Garland
To make the garland, join your white yarn to the exposed front loops from earlier rounds. Use the reverse single crochet (also known as the crab stitch). Instead of working to the left, you will work to the right. This creates a textured, cord-like look that resembles thick snow sitting on branches. Follow the ridges all the way up the tree.
The Face and Ornaments
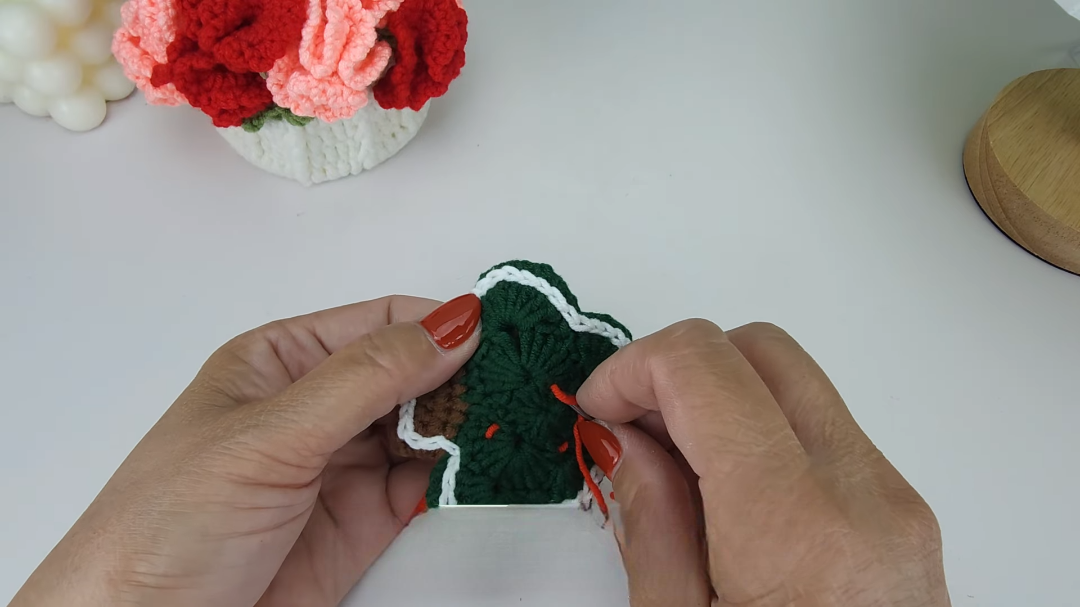
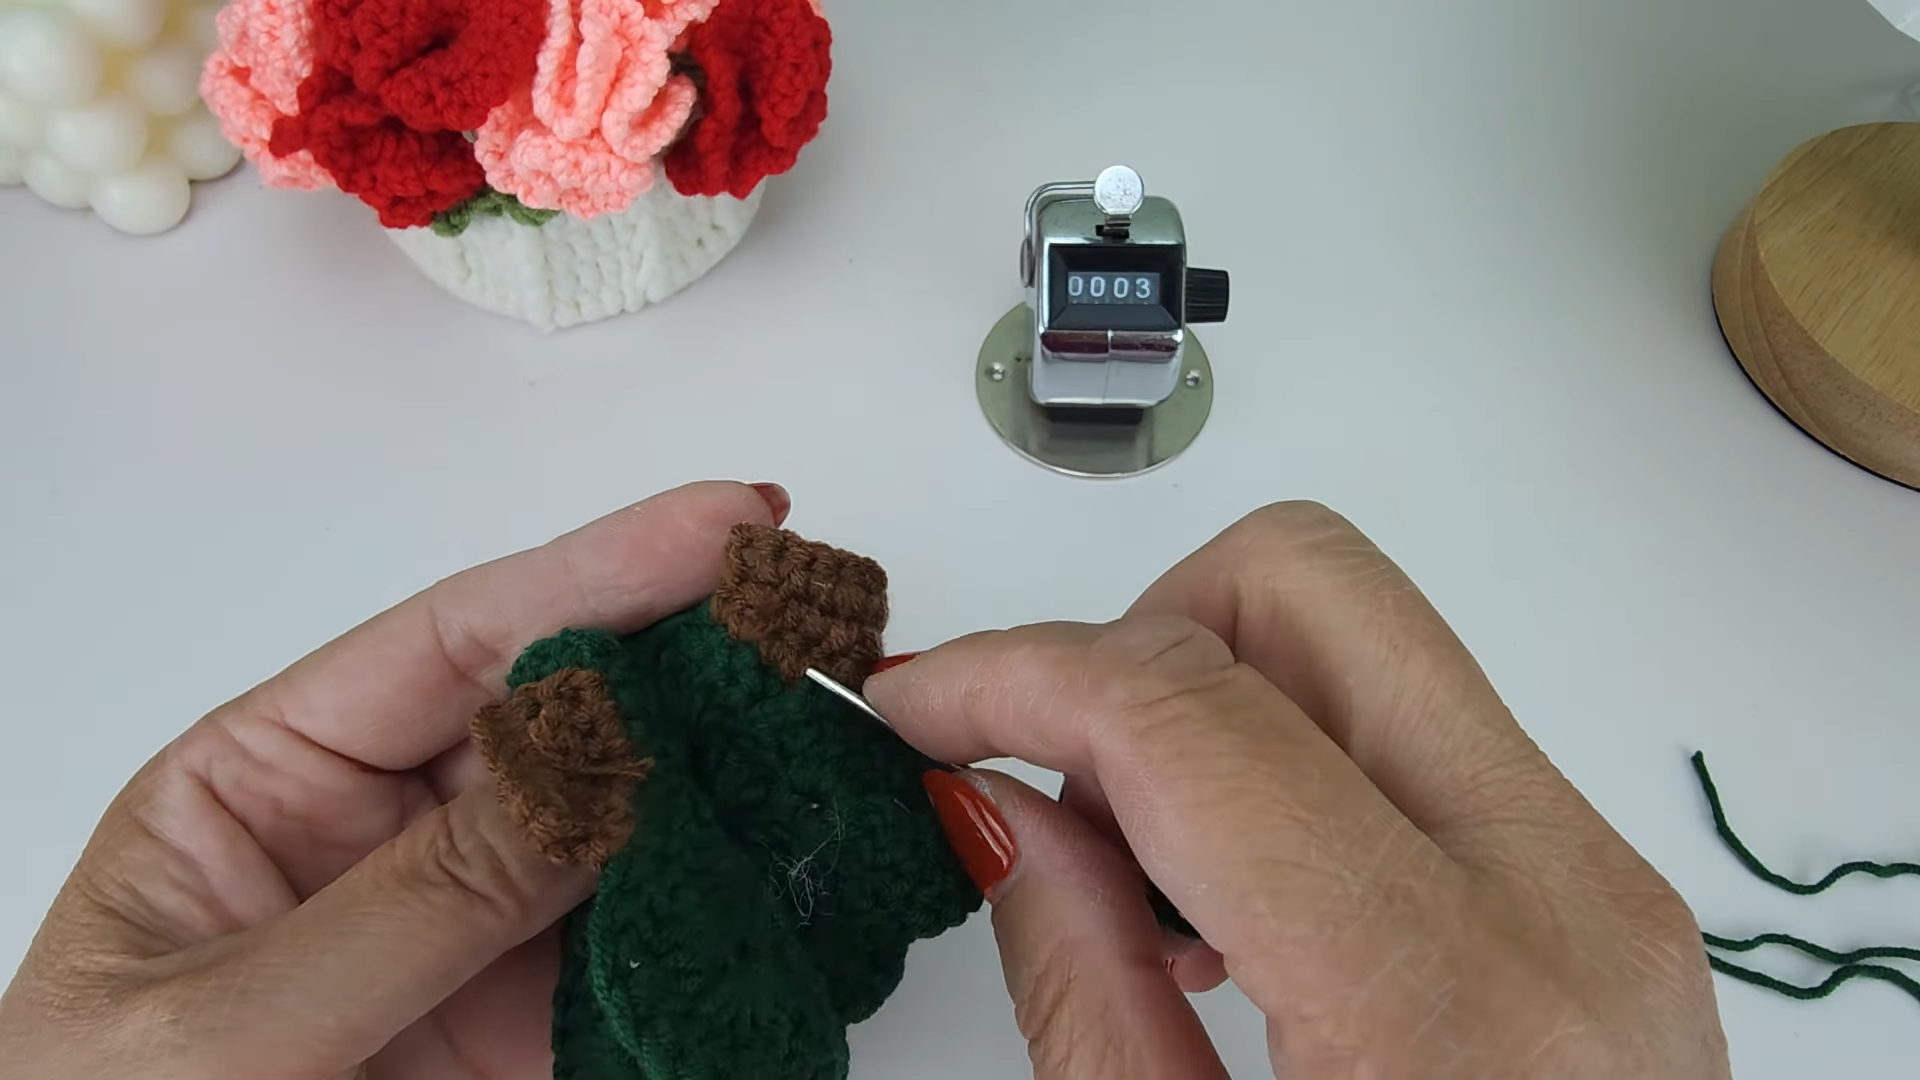
If you want your Christmas crochet tree keychain to have a personality, sew on two small black beads for eyes and a tiny black smile. For the ornaments, use different colors of scrap yarn to make French knots all over the green sections. These little pops of color make the tree look vibrant and joyful.
The Tiny Star
Using yellow yarn and the 2.5 mm hook, start a magic circle. Repeat the sequence [chain 2, slip stitch in the second chain from hook, slip stitch into the magic circle] five times. This creates a perfect five-pointed star. Sew this firmly to the top of your tree.
Where Can You Use Your Crochet Tree?
The beauty of this Christmas crochet tree keychain is that its uses are only limited by your imagination. First and foremost, it serves as a wonderful keychain that makes finding your keys in a large bag much easier. Because it is soft, it won’t scratch your phone or other items.
Furthermore, you can skip the keychain ring and add a simple yarn loop to turn it into a crochet Christmas ornament. These look stunning on a traditional tree, especially when made in various shades of green. Additionally, you can use them as festive bag charms, backpack decorations for kids, or even as “toppers” for gift wrapping. Imagine a beautifully wrapped box with a handmade crochet tree tied into the bow. It adds a personal touch that store-bought decorations simply cannot match.
Tips and Tricks for a Professional Finish
To ensure your Christmas crochet tree keychain looks like it came from a high-end boutique, follow these simple tricks.
-
Invisible Decreases: When the pattern calls for a decrease, try using the “invisible decrease” method. Instead of pulling up loops in both stitches, you only go through the front loops of the next two stitches. This makes the transition much smoother.
-
Flat Base: When you finish the trunk, pull the yarn tail up through the center of the tree and out the top, then back down. This slightly compresses the stuffing and helps the tree stand upright on its own.
-
Tension Control: Try to keep your tension consistent. If you crochet too tightly in one section and loosely in another, the tree might look slightly lopsided.
-
Yarn Choice: Cotton yarn provides great stitch definition, while acrylic yarn makes the tree look a bit fuzzier and “cozier.” Choose the texture that fits your vision.
Common Mistakes to Avoid
Even experienced crafters make mistakes, but you can avoid them by being aware of these common pitfalls.
-
Overstuffing: It is tempting to put as much fluff as possible inside, but overstuffing can stretch the stitches and reveal the white filling.
-
Losing the Ridge: If you forget to work in the back loops during rounds 5 and 8, you won’t have a place to attach your white garland. Always double-check your row instructions.
-
Wrong Hook Size: Using a hook that is too large will result in a floppy tree with visible holes. Stick to the 2.5 mm or 3 mm sizes for the best results.
-
Forgetting the Stitch Marker: In continuous rounds, missing just one stitch can throw off the entire shape of the cone.
Frequently Asked Questions (FAQs)
1. How long does it take to make one Christmas crochet tree keychain?
Typically, an intermediate crocheter can finish one tree in about 45 to 60 minutes. Beginners might take a bit longer as they learn the reverse single crochet technique, but it is still a very fast project.
2. Can I wash my amigurumi tree?
Yes, if you use acrylic or cotton yarn. I recommend hand washing in cold water and letting it air dry. Be careful if you used glue for the eyes; in that case, surface cleaning with a damp cloth is better.
3. What if I don’t know how to do a magic circle?
If the magic circle is too difficult for you, you can chain 2 and then work 6 single crochets into the second chain from the hook. However, the magic circle provides a much cleaner finish for the top of the tree.
4. Can I make a larger version of this tree?
Absolutely. You can use a thicker yarn, like bulky velvet yarn, and a larger hook (like 5 mm or 6 mm). The pattern remains exactly the same, but the resulting tree will be much bigger and perfect for a desk decoration.
5. Is this project safe for small children?
If you are giving this to a child, please embroider the eyes with black yarn instead of using plastic beads or safety eyes. Beads can be a choking hazard. Always prioritize safety when creating toys for little ones.
Final Thoughts on Your Crochet Journey
Creating a Christmas crochet tree keychain is a rewarding way to spend an afternoon. Not only do you end up with a cute accessory, but you also practice essential amigurumi skills that you can apply to future projects. Remember that handmade items are special because of their imperfections and the time you invested in them. Consequently, don’t worry if your first tree isn’t “perfect.” With every stitch, you are improving and creating holiday memories.
I hope you enjoyed this tutorial and feel inspired to make many more trees for your friends and family. This Christmas crochet tree keychain is a small project that brings a huge amount of holiday cheer. Happy crocheting, and may your holidays be filled with yarn, warmth, and joy!