
There’s a quiet kind of joy that comes from creating something with your own two hands. The soft pull of yarn between your fingers, the rhythmic loop of stitches, and the transformation of simple threads into something bright, cute, and full of life that’s the true magic of crochet. It’s not just crafting; it’s storytelling through texture, color, and heart. Each project becomes a reflection of your mood and creativity something tangible and deeply personal.
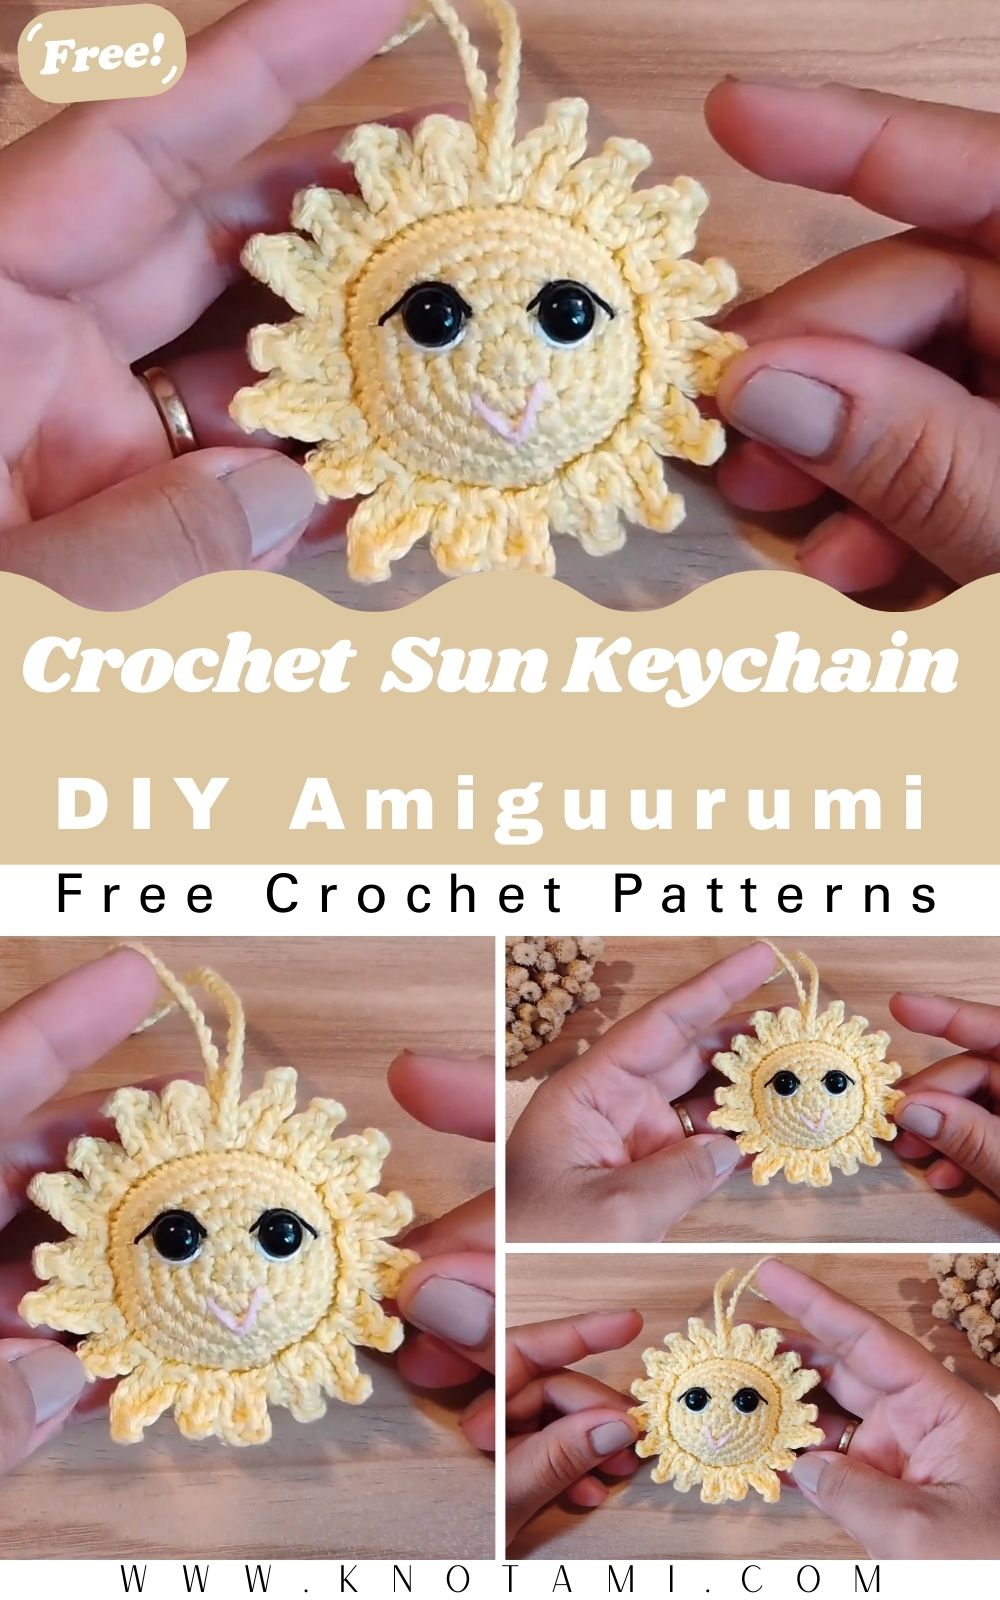
Today’s project, the DIY Crochet Cute Sun Keychain Amigurumi, captures that same spirit of warmth and positivity. Imagine holding a tiny, smiling sun in your hand cheerful rays, soft texture, and bright colors radiating happiness. It’s the kind of crochet project that instantly lifts your mood and brings a sense of sunshine wherever you go, whether it’s hanging from your bag, keys, or gifted to someone special.
What makes this little sun so special is its simplicity and charm. It’s perfectly suited for both beginners and experienced crocheters. Beginners can learn essential amigurumi skills like crocheting in the round, increasing, and shaping, while advanced makers can refine their techniques and add personal flair. It’s small, quick, and fun the perfect bite-sized project to squeeze in between larger creations.
Beyond the stitches, this crochet sun is about mindful making. Crocheting this tiny symbol of light encourages you to slow down, enjoy each round, and feel the gentle rhythm of creation. It’s the perfect project for relaxing evenings, thoughtful gifting, or simply celebrating the joy of handmade sunshine one stitch at a time.
Materials & Tools You’ll Need
Before you start your sunny creation, make sure you have all the materials ready. This project requires only basic amigurumi tools simple but essential for achieving clean, polished results.
Materials List
-
Yarn: 100% cotton or acrylic (Lightweight 3 or Medium 4)
-
Yellow yarn (for the sun body)
-
Orange yarn (for the rays)
-
Black yarn or embroidery thread (for facial details)
-
Pink yarn or felt (for cheeks, optional)
-
-
Crochet Hook: 2.0 mm–3.0 mm depending on your yarn weight
-
Stuffing: Polyester fiberfill or soft cotton stuffing
-
Safety Eyes: 6mm–8mm black eyes or small black beads
-
Tapestry Needle: For sewing and weaving ends
-
Scissors: Sharp and precise for trimming yarn
-
Stitch Marker: To mark the beginning of each round
-
Keychain Ring: For attachment
-
Optional: Glue gun or fabric glue for added stability
Choosing the Right Yarn & Color
For this project, cotton yarn is ideal because it holds its shape beautifully and gives a crisp finish. If you prefer a softer, fluffier look, acrylic yarn works well too. The color choice defines the mood:
-
Use bright yellow and orange for a classic sunny look.
-
Pale yellow and peach for a softer, pastel vibe.
-
Golden yellow with coral for a warm sunset-style sun.
Avoid fuzzy or bulky yarns the neat stitch definition makes the facial features pop and the rays stand out clearly.
Step-by-Step Crochet Instructions
This adorable crochet sun is made up of two main circles (front and back) joined together with sun rays crocheted around the edge. Follow each step carefully, and soon your bright little sun will come to life.
1. Making the Sun Body (Front Circle)
-
Start with a Magic Ring using yellow yarn.
-
Round 1: 6 single crochets (sc) into the ring. Pull tight. (6 sts)
-
Round 2: Increase in each stitch around. (12 sts)
-
Round 3: 1 sc, inc repeat around. (18 sts)
-
Round 4: 2 sc, inc repeat around. (24 sts)
-
Round 5: 3 sc, inc repeat around. (30 sts)
-
Round 6: 4 sc, inc repeat around. (36 sts)
This creates the first half of the sun’s face. Keep your stitches firm but not too tight smooth edges make assembly easier.
Expert Tip: Use a stitch marker at the start of each round to keep your circle even. If your circle curls, loosen your tension slightly.
2. Making the Back Circle
Repeat the same pattern for the second yellow circle (Rounds 1–6).
You’ll join both circles later to form a 3D stuffed sun.
3. Adding the Face (on Front Circle)
Before assembly, it’s easier to add the face now rather than later.
-
Insert safety eyes between Rounds 3 and 4, spaced about 5–6 stitches apart.
-
Use black embroidery thread to stitch a small smile between the eyes.
-
Add pink felt circles or embroidered cheeks below the eyes for extra cuteness.
Pro Tip: Use pins to plan your face placement before sewing or inserting eyes a symmetrical smile makes all the difference!
4. Joining the Circles
-
Place the two circles together (wrong sides facing inward).
-
Begin single crocheting around the edge using orange yarn.
-
When about 75% joined, stuff lightly with fiberfill.
-
Continue closing the edge completely with single crochets.
-
Do not fasten off yet this will transition directly into the sun rays.
5. Crocheting the Sun Rays
Now for the fun part adding those cheerful, pointy rays!
Round of Rays:
(Sl st, ch 5, sc in 2nd ch from hook, hdc in next st, dc in next st, tr in next st, skip 2 sts, sl st in next st) repeat all around.
This creates small triangular rays that form a bright halo effect around your sun. Adjust the number of chains if you want shorter or longer rays.
Expert Tip: If your rays start to curl or overlap, try using a slightly larger hook for this section to relax tension and keep the edges smooth.
6. Assembly & Keychain Attachment
-
Once the rays are done, fasten off and weave in all loose ends.
-
Attach a keychain ring through one of the top stitches of a ray.
-
Reinforce it with a few stitches using yellow yarn for strength.
You now have your own Crochet Sun Keychain Amigurumi ready to spread warmth wherever it goes!
7. Final Touches & Accessories
Add finishing details to give your sun more personality:
-
Embroider tiny eyebrows for expression.
-
Stitch sparkles or freckles with white yarn.
-
Add a small felt heart or embroidered initials.
-
Lightly blush the cheeks with pink fabric paint for a sweet effect.
Your little sun now looks lively, happy, and utterly adorable!
Customization Ideas
Crochet is all about expressing yourself. This sun keychain is the perfect blank canvas for creative twists.
1. Play with Color Themes
-
Rainbow Sun: Use multicolor yarn for rays red, orange, yellow, green, blue, purple.
-
Sunset Vibes: Blend coral, pink, and golden yellow.
-
Galaxy Glow: Try white and blue yarn with silver thread accents for a “cosmic” sun.
2. Try Different Yarns
-
Velvet or chenille yarn: For a plush, squishy finish.
-
Metallic thread: For a shimmering, radiant effect.
-
Gradient yarn: Creates natural shading without color changes.
3. Add Accessories
-
A tiny bow tie, scarf, or mini sunglasses for personality.
-
Attach a small charm or tag that says Handmade Sunshine.
-
Stitch a hanging loop instead of a keychain to turn it into a car mirror ornament.
4. Make Seasonal Versions
-
Spring Sun: Yellow body with pastel green rays.
-
Summer Sun: Bright orange and lemon yellow.
-
Holiday Sun: Add red and white stripes to rays.
Customization turns every sun into something unique no two ever look alike!
Advanced Tips & Troubleshooting
Even with simple amigurumi, details matter. Here are expert tips to make your Crochet Sun Keychain look clean, neat, and professional:
-
Invisible Decrease: Insert hook through front loops of next two stitches, yarn over, pull through, then yarn over and pull through again. This eliminates holes during decreases.
-
Even Tension: Keep your yarn consistent too tight leads to curling, too loose causes gaps.
-
Mark Every Round: Always mark your first stitch; amigurumi works in continuous spirals.
-
Fix Uneven Rays: If a ray looks bent, block it gently with steam or pin it flat overnight.
-
Avoid Overstuffing: Use small tufts of stuffing gradually; too much can distort the shape.
-
Joining Circles: Align stitches carefully to prevent twisting or uneven rays.
-
Color Changes: When switching from yellow to orange, pull the new color through the last loop of the previous stitch for a seamless transition.
-
Hide Yarn Ends: Weave ends in between stitches and pull them gently to keep the surface smooth.
-
Pattern Abbreviations Recap:
-
MR = Magic Ring
-
sc = Single Crochet
-
inc = Increase
-
dec = Decrease
-
sl st = Slip Stitch
-
ch = Chain
Understanding these helps follow any future amigurumi pattern confidently.
-
-
Shape Balancing: Roll the stuffed piece between your palms to evenly distribute fiberfill and smooth the curves.
Care Instructions
To keep your Crochet Sun Keychain bright and fresh:
-
Hand Wash Gently: Use cool water and mild detergent.
-
Do Not Wring: Press gently with a towel to remove excess water.
-
Air Dry Flat: Lay on a towel in a shaded area to dry.
-
Avoid Sunlight Exposure: Ironically, too much real sun fades yarn colors.
-
Storage Tip: Keep in a zip pouch or on display away from moisture.
If gifting, place it inside a small kraft box or organza bag it makes the presentation as charming as the gift itself!
Display & Gift Ideas
Your Crochet Sun Keychain deserves to shine! Here are delightful ways to use or share it:
1. Everyday Keychain
Attach it to your car keys, backpack, or purse it’s lightweight, cheerful, and instantly noticeable.
2. Home Décor Accent
Hang it on a doorknob, near your desk, or from a curtain tie. It brings a bright pop of happiness to any corner.
3. Thoughtful Handmade Gift
Perfect for birthdays, friendship day, or just because. Add a tag that says:
A little sunshine, handmade just for you.”
4. Holiday Ornament
Use metallic thread to hang it on a Christmas tree it’ll stand out beautifully among the ornaments.
5. Kids’ Backpack Charm
Children love playful accessories. Securely attach it to school bags for a cute, sunny buddy on the go!
Handmade items carry a charm no store-bought trinket can match because they come from the heart.
Benefits of Making the Crochet Cute Sun Keychain
Beyond its cute appearance, this tiny sun carries big benefits for the maker.
Relaxation & Mindfulness
Crocheting helps calm the mind. Each stitch is like a mini meditation that draws you into the present moment.
Stress Relief
Crafting something cheerful literally brightens your mood. The repetitive motions and soft yarn texture are therapeutic.
Sense of Accomplishment
Completing a small project feels incredibly satisfying. You turn yarn into art something that didn’t exist before your hands made it real.
Eco-Friendly Gifting
Using natural fibers or leftover yarn scraps means sustainable crafting. It’s an Earth-friendly way to create gifts full of meaning.
Emotional Connection
A handmade gift symbolizes time, care, and affection. Every stitch holds a little piece of your heart something no machine can replicate.
Photography & Social Media Tips
If you love sharing your crochet creations online, great photos make all the difference!
1. Lighting
Use soft natural daylight, preferably near a window. Avoid harsh shadows or flash.
2. Backgrounds
Use neutral or pastel backgrounds white, beige, or wood textures work beautifully to highlight the bright yellow yarn.
3. Props
Surround your sun with cute elements like mini clouds, yarn balls, crochet hooks, or flowers.
4. Angles
Try flat lays, side profiles, and close-ups of the rays or embroidered smile. Each angle tells a new story.
5. Editing & Composition
Keep edits minimal. Adjust brightness and contrast slightly to make colors pop naturally.
Engage your followers by asking fun questions like, What should I make next a cloud or a rainbow?
Conclusion
In a world that often feels rushed, crafting gives us the rare gift of slowing down and creating joy from simple things. The DIY Crochet Cute Sun Keychain Amigurumi isn’t just a pattern it’s a reminder that warmth, color, and happiness can come from your own hands.
With every loop and stitch, you’re weaving positivity into something real a pocket-sized piece of sunshine that will make anyone smile. Whether you keep it on your keys, hang it on your bag, or gift it to someone dear, this tiny crochet sun will always remind you: creativity is its own kind of light.
So grab your hook, pick up your yarn, and let your imagination shine bright.