
Some days, getting kids out the door feels like a whole adventure. A tiny Crochet Penguin Hair Tie Ponytail Amigurumi wrapped around their ponytail can bring a moment of calm like a secret friend they carry with them. It’s small, but it can mean a lot.
Bring a touch of quiet charm to everyday styling with this Kids Crochet Penguin Hair Tie Ponytail Amigurumi Pattern. Designed for neat ponytails and happy little routines, it blends amigurumi crochet, hair accessory crochet pattern details, and kid-friendly finishing for a polished result.
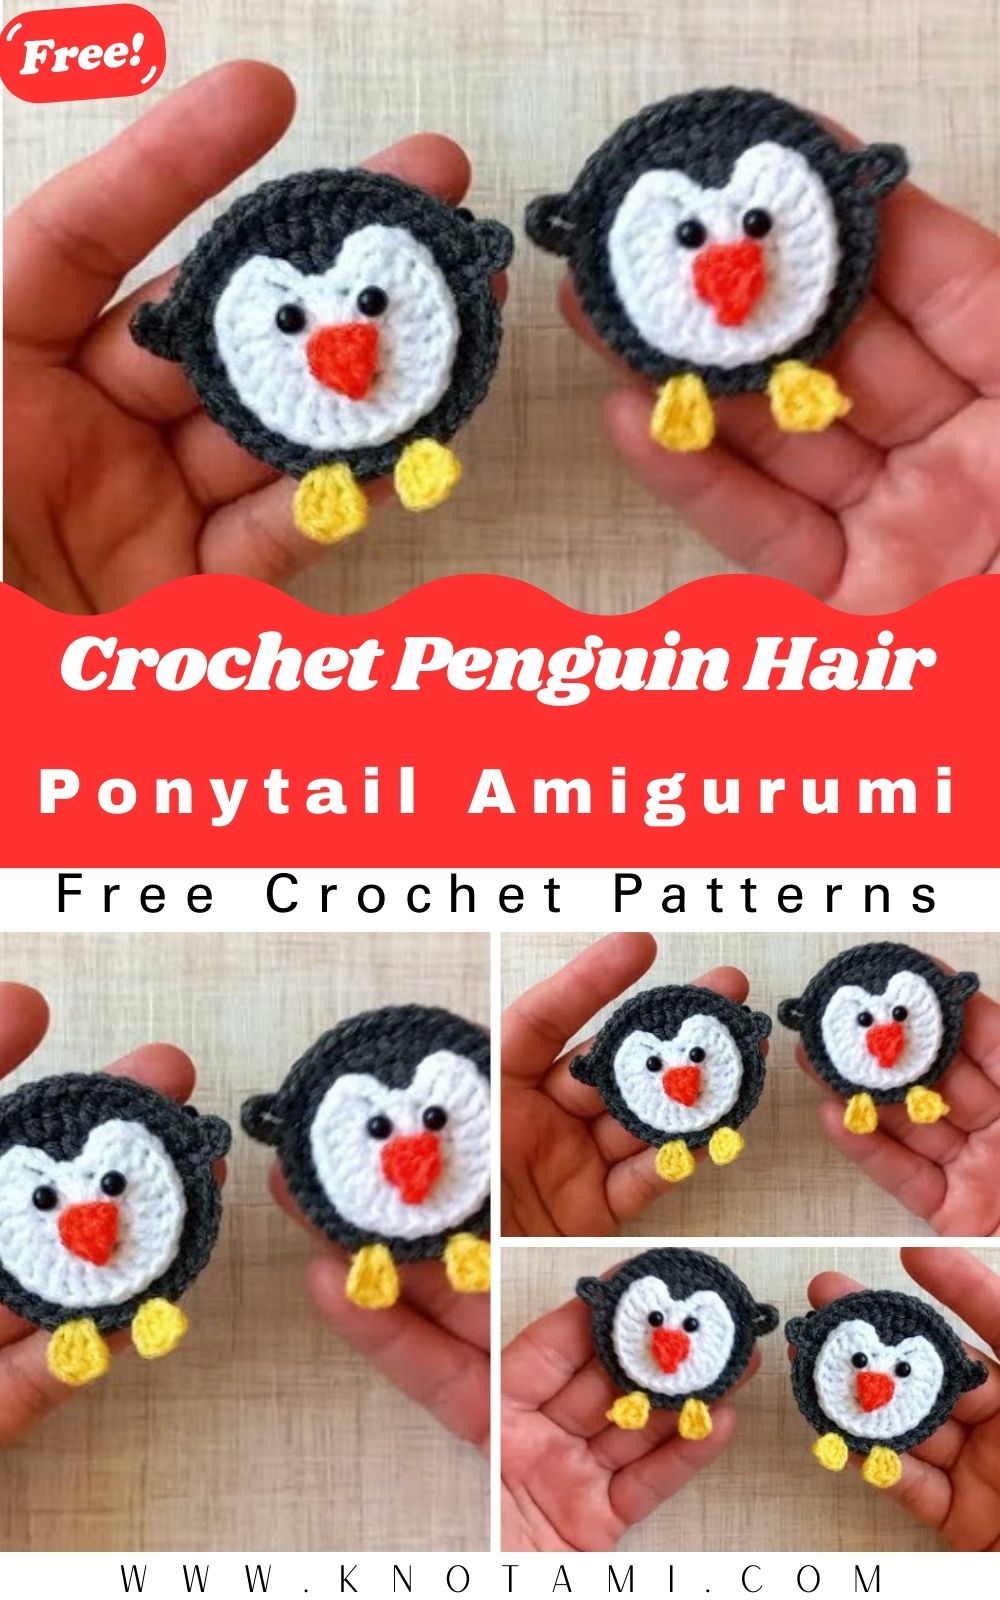
The penguin makes a sweet choice for custom gifts, a boutique-style add-on for personalized gifts, or a thoughtful accent in nursery decor baskets. Stitch it in soft cotton or velvet yarn, keep the embroidery delicate, and you’ll have a handmade piece that feels special yet practical enough for daily wear.
Kids Crochet Penguin Hair Tie Ponytail Amigurumi Pattern (Beginner-Friendly Tutorial)
A tiny penguin can turn an everyday ponytail into something special. In everyday use, this amigurumi hair tie stays small and comfortable, yet it still feels like a handmade keepsake. To begin with, the pattern relies on simple shapes that build confidence fast. Right after that, the pieces come together quickly, so finishing in one cozy sitting feels realistic. At the same time, the ponytail elastic sits behind the penguin, so the front stays tidy. In the end, a few careful stitches add personality, and as a result, the penguin looks sweet, neat, and ready for school mornings, playdates, and gift-giving.
Materials Needed (Exact Measurements)
Yarn (recommended):
- White yarn (worsted/Aran, #4 weight): 10–15 g (about 20–30 m)
- Black yarn (worsted/Aran, #4 weight): 15–20 g (about 30–40 m)
- Orange yarn (worsted/Aran, #4 weight): small scrap (about 2–3 m)
- Optional blush pink (embroidery floss or very thin yarn): 30 cm
Hook & tools:
- Crochet hook: 2.75 mm to 3.5 mm (and for tighter stitches, 3.0 mm is a great middle)
- Tapestry needle: 1
- Scissors: 1
- Stitch marker: 1 (or, in a pinch, a small safety pin)
Eyes & stuffing:
- Safety eyes: 6 mm (or, for a bigger face, 7–8 mm)
- Stuffing: small handful (polyfill)
Hair tie / accessory:
- Ponytail elastic: 1 piece (medium thickness, seamless preferred)
- Alternatively, a keychain ring (25–30 mm) can be used to make a bag charm version.
Skill Level
Easy / Beginner.
In general, this pattern uses basic amigurumi techniques: magic ring, single crochet, increases, decreases, and simple sewing. Plus, the small size makes it quick and forgiving.
Making Time (Overview)
Total time: about 1.5 to 2.5 hours.
Naturally, time depends on sewing speed and comfort with small parts. In addition, adding a heart or extra details may add 10–20 minutes.
Instructions
Notes before starting:
- First, work in continuous rounds unless stated otherwise.
- Next, use a stitch marker to track the first stitch of each round.
- Meanwhile, keep tension tight so stuffing does not show.
Abbreviations:
- MR = magic ring
- sc = single crochet
- inc = increase (2 sc in the same stitch)
- dec = invisible decrease (sc2tog)
- sl st = slip stitch
- ch = chain
- st(s) = stitch(es)
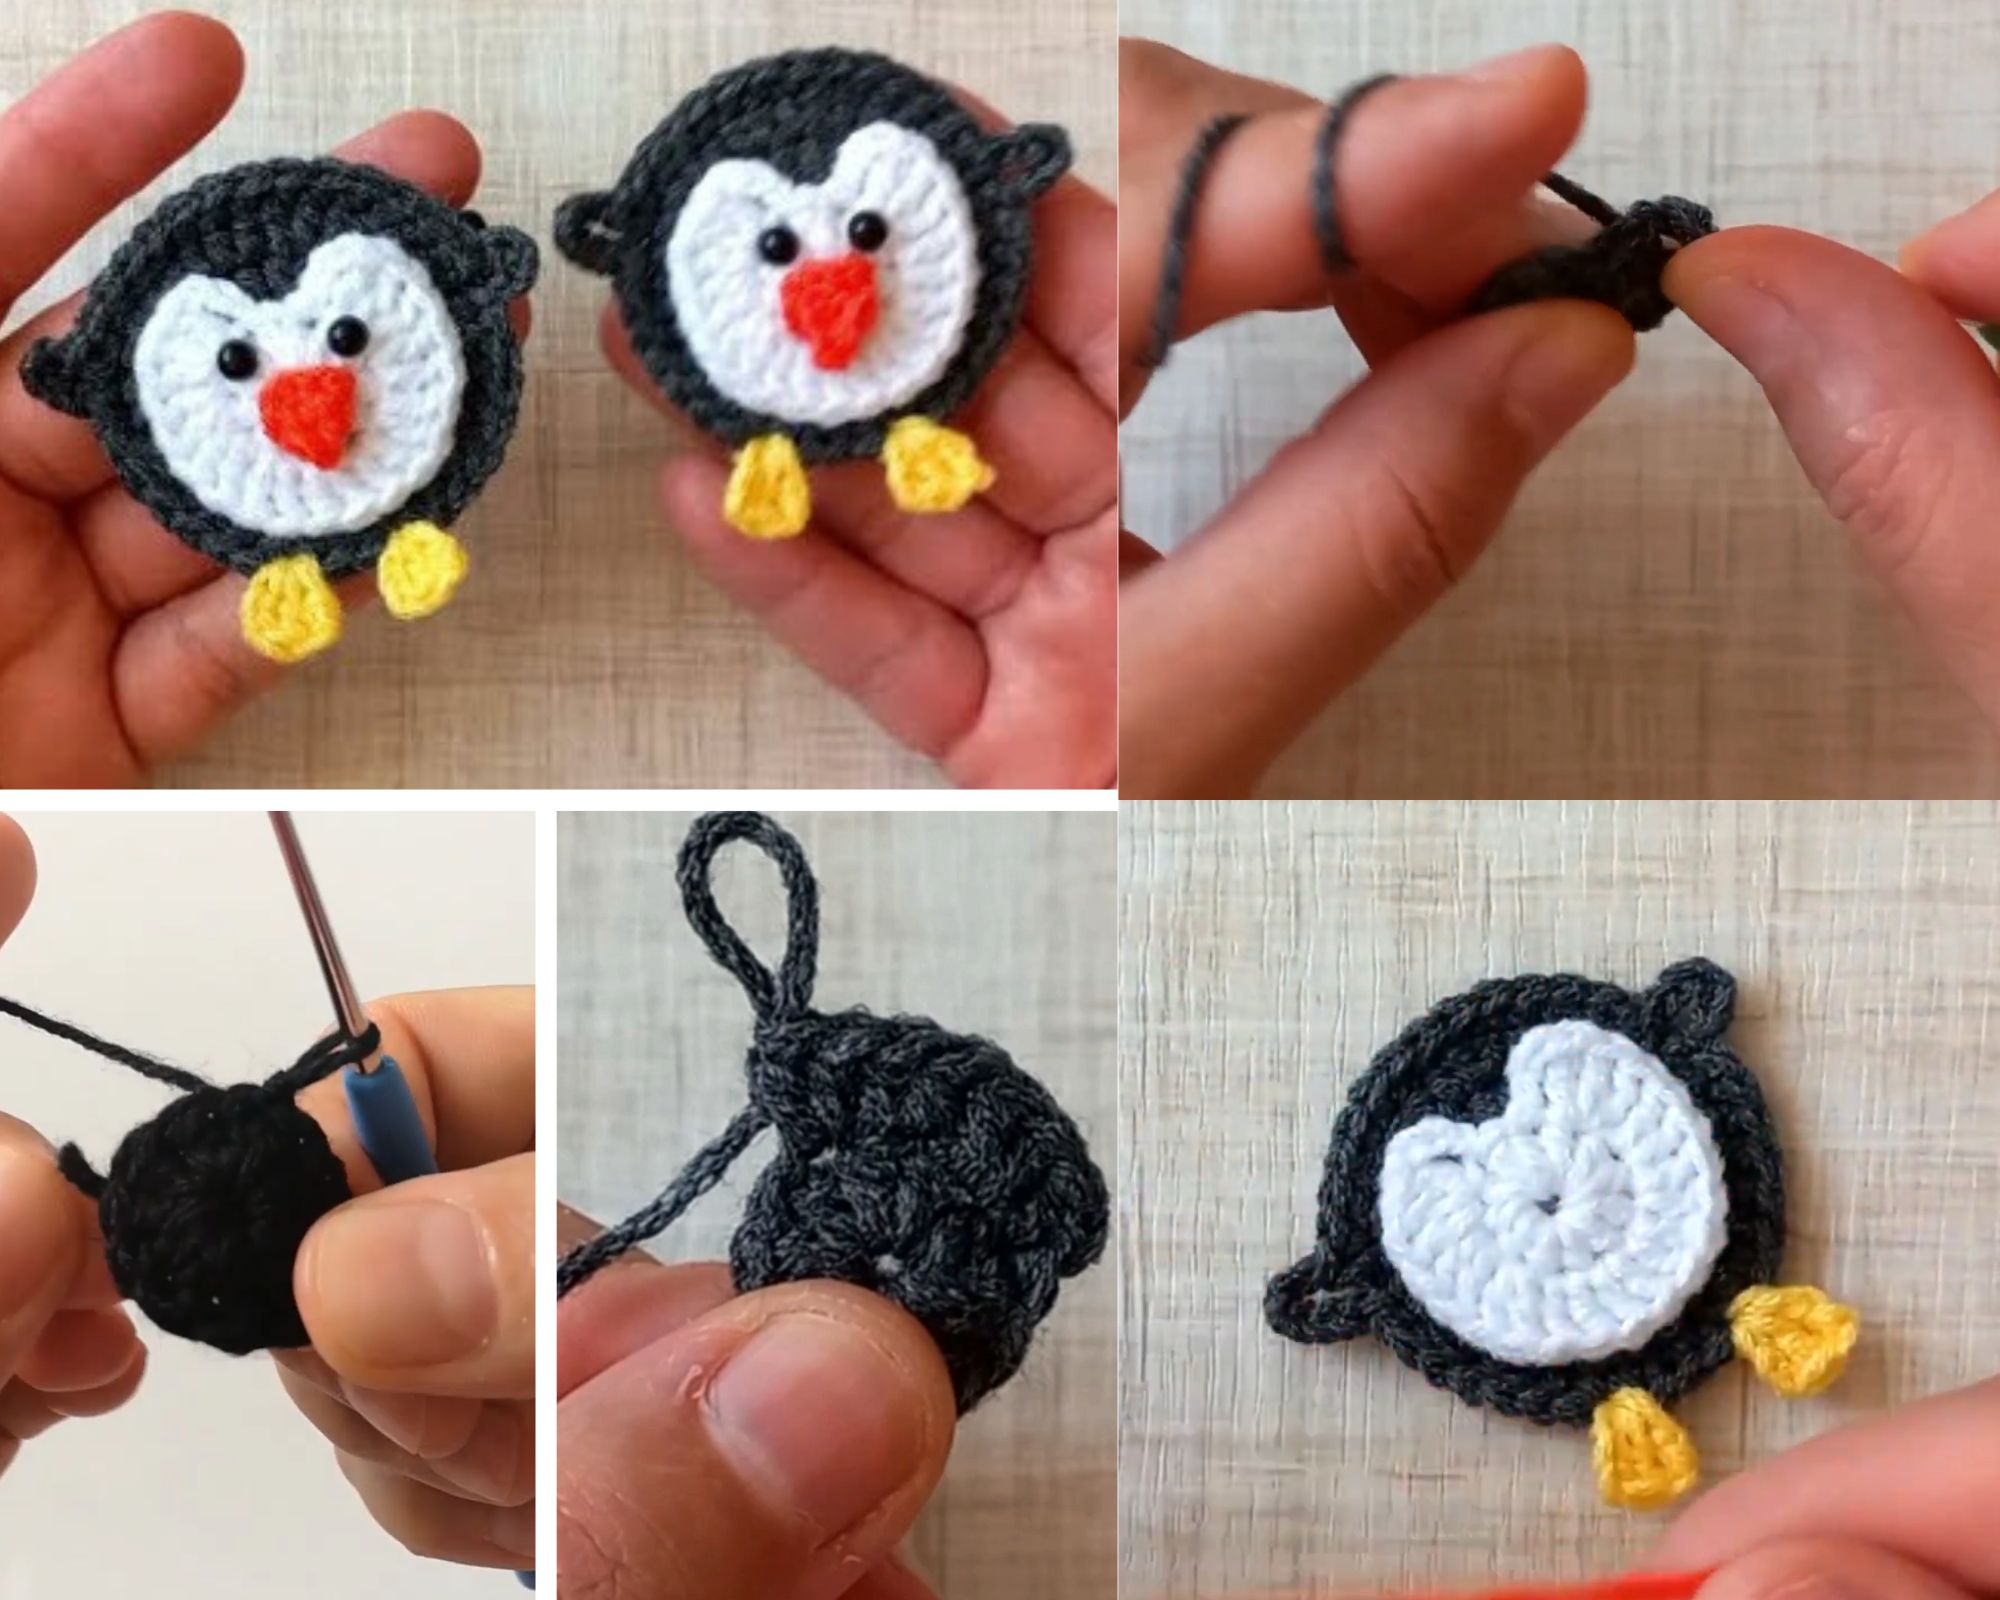
Body (3 Clear Steps) — Making time: 35–55 minutes
This penguin body is made in a simple oval-ball shape. To start, the bottom is formed. After that, the sides grow taller. Finally, the top closes neatly around the hair tie anchor area.
Step 1) Start the base (black yarn)
- Round 1: MR, 6 sc (6)
- Round 2: inc x6 (12)
- Round 3: (sc, inc) x6 (18)
- Round 4: (2 sc, inc) x6 (24)
- Round 5: (3 sc, inc) x6 (30)
At this stage, flatten the circle gently between fingers to check it stays even. If it starts to cup, loosen tension slightly. Otherwise, keep going with the same hook.
Step 2) Build the body height
6) Round 6–9: sc in each st around (30) for 4 rounds
Meanwhile, place the ponytail elastic nearby. That way, the final size stays compact enough for hair. As you go, keep the sides straight by checking the cylinder shape every round.
Step 3) Add the tummy panel and shape the top
Switch to white yarn for a tummy effect (finish the last black stitch with white).
- Round 10: sc around (30)
- Round 11: (3 sc, dec) x6 (24)
- Round 12: sc around (24)
Now, add safety eyes between Round 10 and Round 11, about 5–6 stitches apart, centered on the white side. After placing them, confirm the expression looks even. Then, stuff the body firmly but not rock-hard.
- Round 13: (2 sc, dec) x6 (18)
- Round 14: (sc, dec) x6 (12)
- Round 15: dec x6 (6)
Fasten off, leaving a tail. To finish this section, weave and snug the opening shut.
Hair tie attachment idea (simple and secure):
Before the final stitches are pulled tight, the ponytail elastic can be positioned and stitched down during assembly. Alternatively, a small crochet loop can be added on the back.
Additional Parts
Each part is small, so progress feels fast. First, make the feet. Next, crochet the beak. After that, add the flippers, because they create the classic penguin silhouette.
Foot (make 2) — Making time: 8–12 minutes
Use orange yarn.
- Round 1: MR, 6 sc (6)
- Round 2: inc x6 (12)
- Round 3: sc around (12)
- Round 4: (2 sc, dec) x3 (9)
Then, stuff lightly (or keep flat for a minimal style). Fasten off and leave a sewing tail. Next, pinch the top slightly, so the foot sits flat against the body.
Nose / Beak (make 1) — Making time: 3–6 minutes
Use orange yarn.
- Round 1: MR, 4 sc (4)
- Round 2: (sc, inc) x2 (6)
- Round 3: sc around (6)
Fasten off, leaving a tail. Importantly, do not overstuff. Instead, keep it slightly flat for a neat profile. Later, the beak will sit between the eyes and slightly above the center of the tummy.
Hand / Flipper (make 2) — Making time: 10–15 minutes
Use black yarn.
- Round 1: MR, 6 sc (6)
- Round 2: sc around (6)
- Round 3: (sc, inc) x3 (9)
- Round 4–5: sc around (9) for 2 rounds
Afterwards, flatten the opening. Then, sc across to close (4–5 sc across). Fasten off and leave a tail. For best symmetry, count the closure stitches on the first flipper and match the second.
Accessories / Details (Optional) — Making time: 8–15 minutes
A tiny heart makes the penguin feel gift-ready. Additionally, it adds a pop of color on a ponytail.
Mini Heart (make 1, pink or red yarn):
- MR, then crochet: 3 ch, 2 tr, 3 dc, 1 tr, 3 dc, 2 tr, 3 ch, sl st into MR
- Next, pull MR tight to form the heart. Then, fasten off and leave a tail to sew.
Alternatively, add:
- A tiny scarf (chain 25–30, then sc back)
- A bow (two small loops, sewn near the top)
- A glitter thread accent (one strand held with yarn for special occasions)
Face & Assembly — Making time: 25–40 minutes
Assembly is where the penguin turns “cute.” First, lay out all parts. Next, pin them in place. Then, stitch slowly for a clean finish. Finally, secure the hair tie firmly for everyday use.
1) Place the beak
- First, position the beak centred between the eyes.
- Next, sew around the edge with a neat whip stitch.
- As you stitch, add a tiny pinch of stuffing only if needed.
2) Add the feet
- To begin, sew the feet near the bottom front, spaced evenly.
- Then, angle them slightly outward for a playful stance.
- After that, stitch back and forth through the body to secure.
3) Sew the flippers
- First, place flippers on the sides, slightly below eye level.
- Next, sew the top edge firmly.
- Then, add one tack stitch at the lower edge, so the flipper lies nicely.
4) Attach the ponytail elastic (important)
Choose one of these beginner-friendly methods:
Option A: Elastic tucked behind the penguin (most secure)
- First, place the elastic on the back of the body.
- Next, use black yarn and stitch over and through the elastic in 4–6 places, like tiny anchors.
- Meanwhile, keep stitches snug but not too tight, so the elastic still stretches.
- Finally, knot well inside the body and weave in ends.
Option B: Crochet back strap (neat and replaceable)
- First, stitch yarn onto the back.
- Next, ch 12–18 (depending on elastic thickness).
- Then, sl st back to form a strap loop.
- After that, slide the elastic through the loop.
Because of this, Option B makes the elastic replaceable, which is helpful for kids’ accessories.
5) Add cheeks and expression (optional)
- First, add two cheek dots with blush floss.
- Then, embroider a tiny smile (optional).
- Finally, step back, check symmetry, and tie off neatly.
Special Features
- Compact, hair-friendly size: as a result, it sits comfortably on a ponytail.
- Sweet expression: because wide-set eyes and a tiny beak create a gentle look.
- Clean color blocking: therefore, the design stays classic and simple.
- Secure attachment: most importantly, anchored stitches keep the hair tie reliable.
Sizing Tips
Finished size depends on yarn, hook, and tension:
- Worsted yarn + 3.0 mm hook: about 5–6 cm tall (not including elastic)
- DK yarn + 2.5–2.75 mm hook: about 4–5 cm tall
- Chenille/velvet yarn: bigger and softer, but stitches can hide
In general, a smaller hook creates tighter stitches. As a result, the penguin looks firmer and more polished.
Finishing Tips FOR ( Crochet Penguin Ponytail Amigurumi )
- Neat stitching: first, use invisible decreases for smoother shaping.
- Secure shaping: next, stuff gradually, then press gently to remove lumps.
- Clean final look: after that, weave ends in, change direction once, and trim close.
- Safety check: finally, for very young kids, embroider eyes instead of using safety eyes.
In the last step, give the penguin a gentle fluff and pat for a crisp final shape.
Common Mistakes to Avoid
- Loose tension: as a result, stuffing shows. To fix this, use a smaller hook or tighter stitches.
- Skipping stitch counts: therefore, the body twists. Instead, mark and count calmly.
- Eyes placed too high/close: to avoid this, test placement first, and then lock them.
- Overstuffing the beak: because of that, it looks bulky. So, keep it lightly filled.
- Weak elastic attachment: most importantly, add extra anchor stitches for strength.
Variations & Customization Ideas
- Color changes: for example, pastel, navy-and-silver, or rainbow tummy.
- Size options: alternatively, thinner yarn for mini or plush yarn for big.
- Expression themes: likewise, sleepy, happy, or party versions.
- Gift-ready ideas: in particular, custom gift boxes, handmade decor baskets, and personalized party favors.
Additionally, swapping the elastic for a keychain ring turns it into a backpack charm.
Tutor Suggestions FOR ( Crochet Penguin Ponytail Amigurumi )
- To begin with, practice the magic ring on scrap yarn. After that, everything feels smoother.
- Next, count stitches at the end of each round. As a result, shaping stays correct.
- Meanwhile, pin pieces before sewing. That way, placement looks right early.
- Later, sew slowly and evenly. Consequently, the finish looks boutique-neat.
- Finally, allow small handmade quirks. After all, those details make amigurumi feel special.