
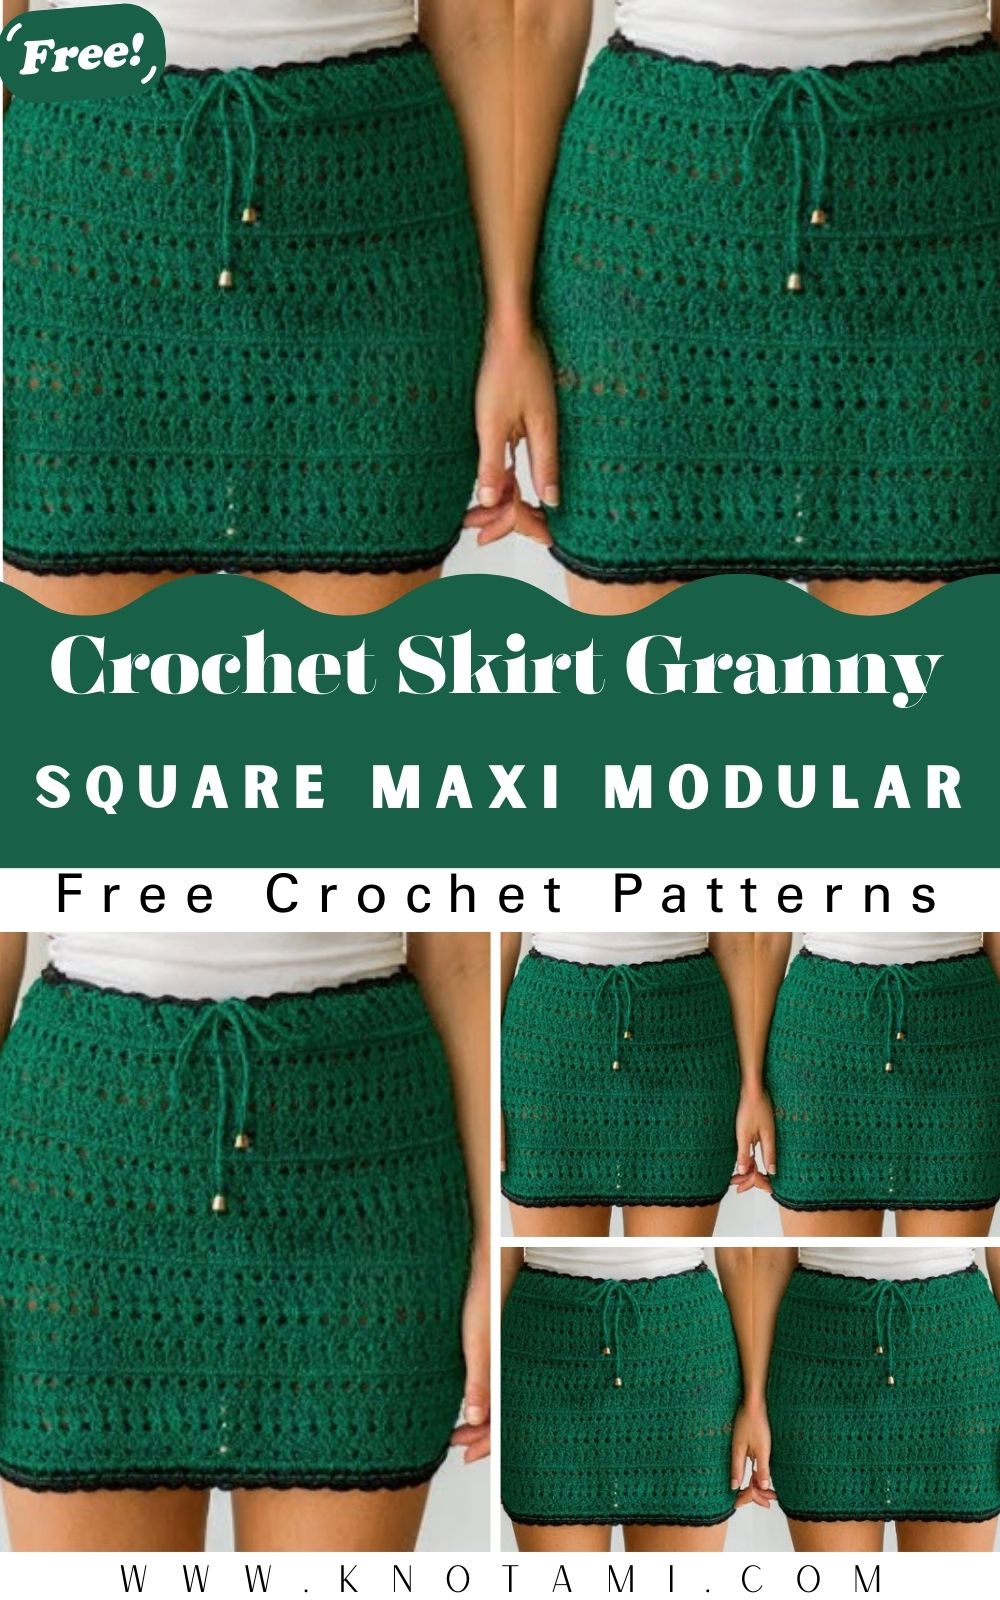
Effortlessly assemble statement style: the Incredible Crochet Skirt Granny Square Maxi Pattern. Join-as-you-go panels, dreamy drape, and festival-ready flair make this project deliciously addictive.
Build drama, not difficulty. The Incredible Crochet Skirt, Granny Square Maxi Modular Pattern delivers runway presence with beginner-friendly methods. Each square is quick, portable, and perfect for color experiments; the join-as-you-go assembly keeps motivation high and finishing low. Mix fibers for seasonal versatility, breathable cotton for summer, soft blends for cooler days, and scale from tea to full-length maxi.
With clear shaping guidance and smart waistband options, you’ll craft a comfortable, custom fit that swishes, flatters, and turns heads anywhere you wander.
- City strolls with a cropped cardigan
- Beach days layered over a swimsuit or slip
- Special events styled with heels and jewelry
Incredible Crochet Skirt Granny Square Maxi Modular Pattern
Welcome! If you’ve been searching for a breezy, beginner-friendly project that still looks runway-ready, you’ll love this Incredible Crochet Skirt, Granny Square Maxi Modular Pattern. It combines classic granny squares with smart, modular construction so you can customize length, fit, and color while keeping each step approachable. Moreover, the join-as-you-go method means less seaming and more satisfaction as you watch your maxi skirt bloom panel by panel.
Summary Paragraph (Natural and Smooth)
This Incredible Crochet Skirt Granny Square Maxi Modular Pattern gives you a modern, made-to-measure fit using timeless motifs. Because it’s modular, you can easily adjust the waist, hips, and hem, while the granny square layout makes color play fun and stress-free. Furthermore, the maxi length creates swishy movement, and the pattern offers simple steps for beginners. With clear measurements, step-by-step instructions, and adaptable styling, this granny square maxi modular pattern delivers comfort, flair, and customization perfect for everyday wear, festivals, and vacations.
Estimated Making Time Overview
- Planning and measurement: 20–30 minutes
- Gauge swatch and test square: 25–40 minutes
- Making all squares: 5–12 hours (size and speed dependent)
- Joining squares (join-as-you-go or seam): 60–120 minutes
- Waistband (elastic casing or rib): 45–75 minutes
- Blocking and shaping: 30–45 minutes active time (plus 6–24 hours drying)
- Finishing (weaving ends, trimming, optional lining): 45–90 minutes
Therefore, the total active time is roughly 9–16 hours for most makers, spread over a few cozy sessions.
Materials and Exact Measurements
- Yarn: DK-weight cotton or cotton blend for breathable drape (Category 3).
- Yardage estimate by size (includes a small buffer):
- XS–S: 1,100–1,300 yards (1,005–1,190 m)
- M–L: 1,300–1,600 yards (1,190–1,460 m)
- XL–2X: 1,600–1,900 yards (1,460–1,737 m)
- 3X–5X: 1,900–2,300 yards (1,737–2,103 m)
- Tip: If using multiple colors, split the total yardage evenly among your palette or use scraps; however, keep at least one consistent color for joins/edging.
- Yardage estimate by size (includes a small buffer):
- Hook: 4.0 mm (US G-6) for squares; 3.5 mm (US E-4) for waistband to reduce stretch.
- Elastic (optional casing waistband): 1 inch (2.5 cm) non-roll elastic, length = snug waist measurement minus 2 inches (5 cm).
- Drawstring (alternative to elastic): 0.25 inch (6 mm) cotton cord, 55–75 inches (140–190 cm), or crochet an I-cord to match your waist plus 20 inches (50 cm) for tying.
- Notions: Scissors, tapestry needle, stitch markers, measuring tape, safety pin (for threading elastic), blocking mats, rust-proof pins, and a steam iron or spray bottle.
- Optional Lining: 4-way stretch knit or lightweight slip:
- Length: desired skirt length plus 1 inch (2.5 cm) for hemming
- Width: hip measurement plus 2–4 inches (5–10 cm) ease
Gauge and Square Size
- Granny square gauge (after light blocking): One 4-round granny square should measure approximately 4.75 inches (12 cm) across.
- If your squares are larger than 4.75 inches, use a smaller hook; conversely, if they’re smaller, use a larger hook.
- Doing a quick test square is crucial; consequently, it ensures your final circumference and length match your plan.
Sizing and Planning (Fit Made Simple)
- Measure your high waist (where you’ll wear the skirt), your fullest hip, and your desired length from waist to hem.
- Ease:
- Waist: 0–2 inches (0–5 cm) of negative ease if you’re using elastic or a drawstring.
- Hips: 2–4 inches (5–10 cm) of positive ease so the skirt glides gracefully.
- Square count formula:
- Columns around = ceiling((hip + ease) ÷ square width).
- Example: If the hip is 40 inches and the ease is 2 inches, the total is 42. With a 4.75-inch square, 42 ÷ 4.75 ≈ 8.84, so use 9 columns.
- Length formula:
- Rows down = round((desired length) ÷ square height).
- Example: For a 36-inch maxi with 4.75-inch squares, 36 ÷ 4.75 ≈ 7.58, so plan 8 rows of squares for full coverage (you can trim with hem options).
- Suggested starting points (examples, not strict rules):
- Petite/Short Maxi (33–35 inches): 7 rows of squares
- Standard Maxi (36–40 inches): 8 rows of squares
- Tall Maxi (41–43 inches): 9 rows of squares
- Because everyone’s measurements differ, always test a 2–3 column mock-up around your hips before you commit to the whole skirt. Additionally, remember that blocking may add a fraction of width and length.
Step-by-Step: Body Construction (Modular Panels)
We’ll build vertical panels (columns) of granny squares, then join columns into a tube. This approach is flexible and beginner-friendly.
Step 1: Plan Your Palette and Panel Count (Time: 20–30 minutes)
- Decide on your number of columns using the formula above; likewise, decide on your number of rows to achieve the desired length.
- Sketch or list your color order for each panel; alternatively, embrace random scrappy squares for a boho look.
- Place stitch markers on a measuring tape at square-width intervals; consequently, you’ll visualize how many columns fit your hip comfortably.
- Pro tip: Start with one complete panel (full column of squares) and test fit before making them all.
Step 2: Make a Test Square and Confirm Gauge (Time: 25–40 minutes)
- Crochet a standard 4-round granny square in your chosen hook and yarn.
- Lightly block it: pin to 4.75 inches (12 cm), steam or spritz, then let it relax fully.
- Re-measure:
- If it’s too large, drop the hook size.
- If it’s too small, increase hook size.
- Because accuracy here prevents later frustration, don’t skip this step.
Crochet All Granny Squares (Time: 12–18 minutes per square; total 5–12 hours)
- Square recipe (classic):
- Round 1: Ch 4, sl st to form a ring. Ch 3 (counts as dc), 2 dc in ring, ch 2, [3 dc, ch 2] x 3, sl st to top of ch-3. Tighten the center tail.
- Round 2: Sl st to next ch-2 corner, ch 3, 2 dc, ch 2, 3 dc in the same corner; then (ch 1, [3 dc, ch 2, 3 dc] in next corner) x 3; ch 1, sl st to join.
- Round 3: Sl st to corner, work [3 dc, ch 2, 3 dc] in each corner; in each side space, work 3 dc separated by ch 1.
- Round 4: Repeat Round 3 logic corners get [3 dc, ch 2, 3 dc], sides get 3 dc groups with ch 1 between.
- Make the number of squares needed:
- Squares per panel = row count (e.g., 8 rows tall = 8 squares per panel).
- Total squares = panels (columns) × rows.
- Example: 9 columns × 8 rows = 72 squares.
- Keep tails 4–5 inches (10–13 cm) for weaving. Additionally, weave tails as you go to save finishing time.
Join Squares into Panels Join-As-You-Go (JAYGO) or Seam (Time: 60–90 minutes for panels)
- Option A: Join-As-You-Go on the final round:
- When working Round 4 of a square, substitute chain spaces at joins with slip stitches into the adjacent finished square’s chain space.
- Corner join: replace one chain of the ch-2 with a slip stitch into the adjoining corner, then ch 1 to finish the corner.
- Side join: replace each ch-1 space with a slip stitch to the side space of the neighbor square.
- This method keeps the fabric flexible and the interior neat.
- Option B: Seam panels after all squares are done:
- Lightly block squares first; then whipstitch or slip stitch them together through back loops only for low-bulk seams.
- Create vertical panels first (e.g., 8 squares tall per panel). Then, align panels side by side and join edges to form a tube. Moreover, keep one seam partially open at the top 3–4 inches (7.5–10 cm) if you plan a side slit.
Try-On and Adjust (Time: 10–20 minutes)
- Slip the tube over your hips. If it’s too snug, add a column. If it’s too loose, remove one column or block more gently.
- Because yarn grows slightly with wear, aim for a hip fit that is easy but not overly loose.
- Additionally, confirm length. If needed, add or remove a row of squares before moving to the waistband.
Waistband and Top Edge
You can finish the top with an elastic casing, a drawstring channel, or a ribbed yoga-style waistband.
Elastic Casing (Clean and Secure) (Time: 45–60 minutes)
- Round A: With a smaller hook (3.5 mm), attach yarn at the top edge. Work 1 round of sc evenly, placing 1 sc per stitch or space; smooth the top edge by spacing stitches consistently. Join with sl st.
- Round B: Ch 1, sc in each stitch around; do not increase. Join.
- Round C (Fold Line): Ch 2, hdc in each stitch around; join.
- Round D: Repeat Round B.
- Round E: Repeat Round B, leaving a 2-inch (5 cm) gap unworked at the back or side seam for inserting elastic.
- Insert elastic:
- Measure your waist snugly; subtract 2 inches (5 cm); cut elastic; overlap ends by 1 inch (2.5 cm) and zigzag or hand-sew securely.
- Thread elastic with a safety pin through the channel.
- Try on, adjust if needed, then close the gap with sc or whipstitch.
- Consequently, this casing provides structure without bulk and looks polished.
Drawstring Channel (Adjustable and Beginner-Friendly) (Time: 35–50 minutes)
- Round A: With sa maller hook, work 1 round of sc around the top edge; join.
- Round B: Ch 3 (counts as dc), [dc in next 3 stitches, ch 1, skip 1] repeat around for eyelets; join.
- Round C: Ch 1, sc in each stitch and space; join.
- Make a drawstring:
- Crochet an I-cord or chain 180–220 chains; then slip stitch back for sturdiness.
- Thread through eyelets. Additionally, add tassels or beads if desired.
- This option is great for adjustable comfort and easy laundering.
Ribbed Waistband (Stretchy, Yoga-Style) (Time: 60–75 minutes)
- Switch to a smaller hook and work 1 round of sc along the top edge; join.
- Then, work 6–10 rounds of [dc in the back loop only] for rib texture. Alternatively, use hdc BLO for a denser rib.
- Optionally, add a round of decreases every 2 rounds (e.g., dec every 20 stitches) to gently shape the waist.
- Finally, finish with a round of sc to stabilize the edge.
Bottom Hem and Finishing the Body
- Simple straight hem: Work 1–2 rounds of sc or hdc along the bottom edge (Time: 15–25 minutes).
- Subtle flare: Work [dc, ch 1] in each stitch for one round, then 1 round of dc to seal the drape (Time: 20–30 minutes).
- Scalloped edge: [Skip 1, 5 dc in next stitch, skip 1, sc in next] repeat around for a romantic finish (Time: 25–35 minutes).
Blocking and Final Shaping (Time: 30–45 minutes active, plus drying)
- Lay the skirt flat on the blocking mats. With rust-proof pins, shape the waist and hem evenly; then gently steam or spritz.
- Avoid pressing down with an iron; instead, hover-steam to relax stitches.
- Because blocking improves drape and stitch definition, don’t skip this step. Allow 6–24 hours to dry fully.
Weaving Ends and Optional Lining (Time: 45–90 minutes)
- Weave ends: Use a tapestry needle to weave in at least 3 directions through the same color to lock tails securely.
- Optional lining: Measure your preferred finished length and cut/stretch the hem accordingly. Either hand-stitch the lining to the inside waistband or wear a separate slip. Furthermore, a lining adds opacity without sacrificing movement.
Basic Tips for Beginners
- Start with smooth, light-colored yarn so you can see your stitches. Additionally, cotton blends give a beautiful swish and are great for warm weather.
- Keep your tension relaxed; consequently, your squares will block consistently and join neatly.
- Mark corners: Place stitch markers in each corner of your first few squares; therefore, you won’t lose count while chatting or watching TV.
- Weave in ends as you go; alternatively, assign one short “finishing session” after every 10 squares to prevent overwhelm.
- Test fit early: After assembling 2–3 panels, try on the tube. Importantly, adjust column count before making the rest.
Common Mistakes and How to Fix Them
- Mistake: Twisting the tube before seaming the last panel.
- Fix: Lay the skirt flat and align the top edges before closing the final seam; additionally, use markers to hold the edges.
- Mistake: Inconsistent square size due to tension changes.
- Fix: Block each square lightly before joining; alternatively, adjust hook size up or down if your tension shifts day to day.
- Mistake: Skirt too tight at the hips.
- Fix: Add one column (panel); then redistribute color balance. Because you’re working modularly, the fix is painless.
- Mistake: Waistband rolling or stretching out.
- Fix: Use a smaller hook for the waistband; furthermore, add elastic for structure or switch to BLO ribbing for consistent recovery.
- Mistake: Corners not lining up during joins.
- Fix: Count groups on each side before joining; consequently, you’ll prevent subtle skew that grows over multiple rows.
Smart Variations (Customize with Confidence)
- Color Stories:
- Monochrome Minimal: One color throughout; then add a contrasting waistband for a subtle pop.
- Gradient Glow: Arrange colors from light to dark across panels; thus, the skirt reads as a soft ombré.
- Scrap-Happy Boho: Mix leftovers; however, choose one unifying join color to keep the look cohesive.
- Square Styles:
- Sunburst Granny, Solid Granny, or Daisy Center: Swap motifs while preserving the same final square size. Consequently, you can mix designs and still maintain the overall fit.
- Shape Tweaks:
- Side Slit: Leave one panel open from mid-thigh to hem; then edge it neatly with sc for a tailored finish.
- High-Low Hem: Add one extra row of squares to the back panels; therefore, you’ll create swing and drama.
- Midi Version: Stop at 6–7 rows for a calf-length look; additionally, lighten the hem with a simple sc edge.
- Waist Options:
- Built-in Drawstring: Add eyelets and a braided tie for adjustable comfort.
- Wide Rib “Yoga” Waist: Work 10–14 rounds BLO to create a fold-over waistband for soft, lounge-worthy hold.
- Texture Edges:
- Picot Trim, Crab Stitch (reverse sc), or a narrow shell border changes the vibe instantly without changing the main construction.
Care, Wear, and Styling
- Care: Hand wash or machine wash cold in a garment bag on gentle; then lay flat to dry. Because cotton can grow when wet, avoid hanging it to dry.
- Wear:
- Beach Day: Slip it over a swimsuit with a breezy tank.
- City Casual: Pair with a fitted tee and sneakers.
- Festival-Ready: Style with a cropped top, stacked bracelets, and sandals.
- Lining Notes: If you prefer more coverage, add a light slip. Alternatively, use nude biker shorts for comfort without extra heat.
Troubleshooting Fit (Quick Reference)
- Waist is perfect, but hips are snug:
- Add a single column to increase around-the-body width; then rebalance colors.
- Hips are fine, but the waist feels loose:
- Add elastic or a drawstring; alternatively, switch to a smaller hook and work 2–3 rounds of sc to tighten the top edge.
- Length grew after blocking:
- Remove the hem round or switch to a firmer stitch (sc); moreover, cotton blends relax, so block gently.
- Length is short:
- Add a decorative hem panel (e.g., a 2–3 inch shell border) or add one more row of squares before you seam the last panel.
Putting It All Together (Concise Build Plan)
- First, calculate columns and rows using your measurements and the square size.
- Next, make a test square and adjust your hook for gauge accuracy.
- Then, crochet all squares in batches, weaving ends periodically for sanity.
- After that, join squares into vertical panels; then seam or JAYGO panels into a tube.
- Subsequently, choose and build your waistband (elastic, drawstring, or rib).
- Finally, block the skirt, weave all ends, and add an optional lining if desired.
Why This Pattern Works for Beginners
- It’s modular. Therefore, you tackle small, repeatable pieces rather than a large, complicated fabric.
- It’s adjustable. Consequently, you can fine-tune hips, waist, and length at multiple checkpoints.
- It’s forgiving. Moreover, blocking smooths small inconsistencies, and color play distracts from tiny imperfections.
- It’s portable. Thus, each square is a quick win you can make anywhere on the couch, at the café, or during travel.
Final Encouragement
With this Incredible Crochet Skirt, Granny Square Maxi Modular Pattern, you’ll create a custom, flowy skirt that feels effortless and looks stunning. Because the steps are clear, the measurements are precise, and the fit is modifiable, the entire process stays enjoyable from first square to final swish. Ultimately, you’ll finish with a skirt that reflects your style, colorful, comfortable, and completely you.