
Glow golden with the Passionate Crochet Sunkissed Fishnet Shrug Pattern, an airy, weekend-friendly make that layers like a dream, flatters every silhouette, and transforms simple outfits into beach-to-brunch looks.
Turn heads with the Passionate Crochet Sunkissed Fishnet Shrug Pattern, a sun-kissed layer that pairs breezy openness with elegant flow. Though it looks couture, the construction is simple, modular, and wonderfully forgiving. Therefore, it’s perfect for confident beginners seeking a statement piece they can finish fast. 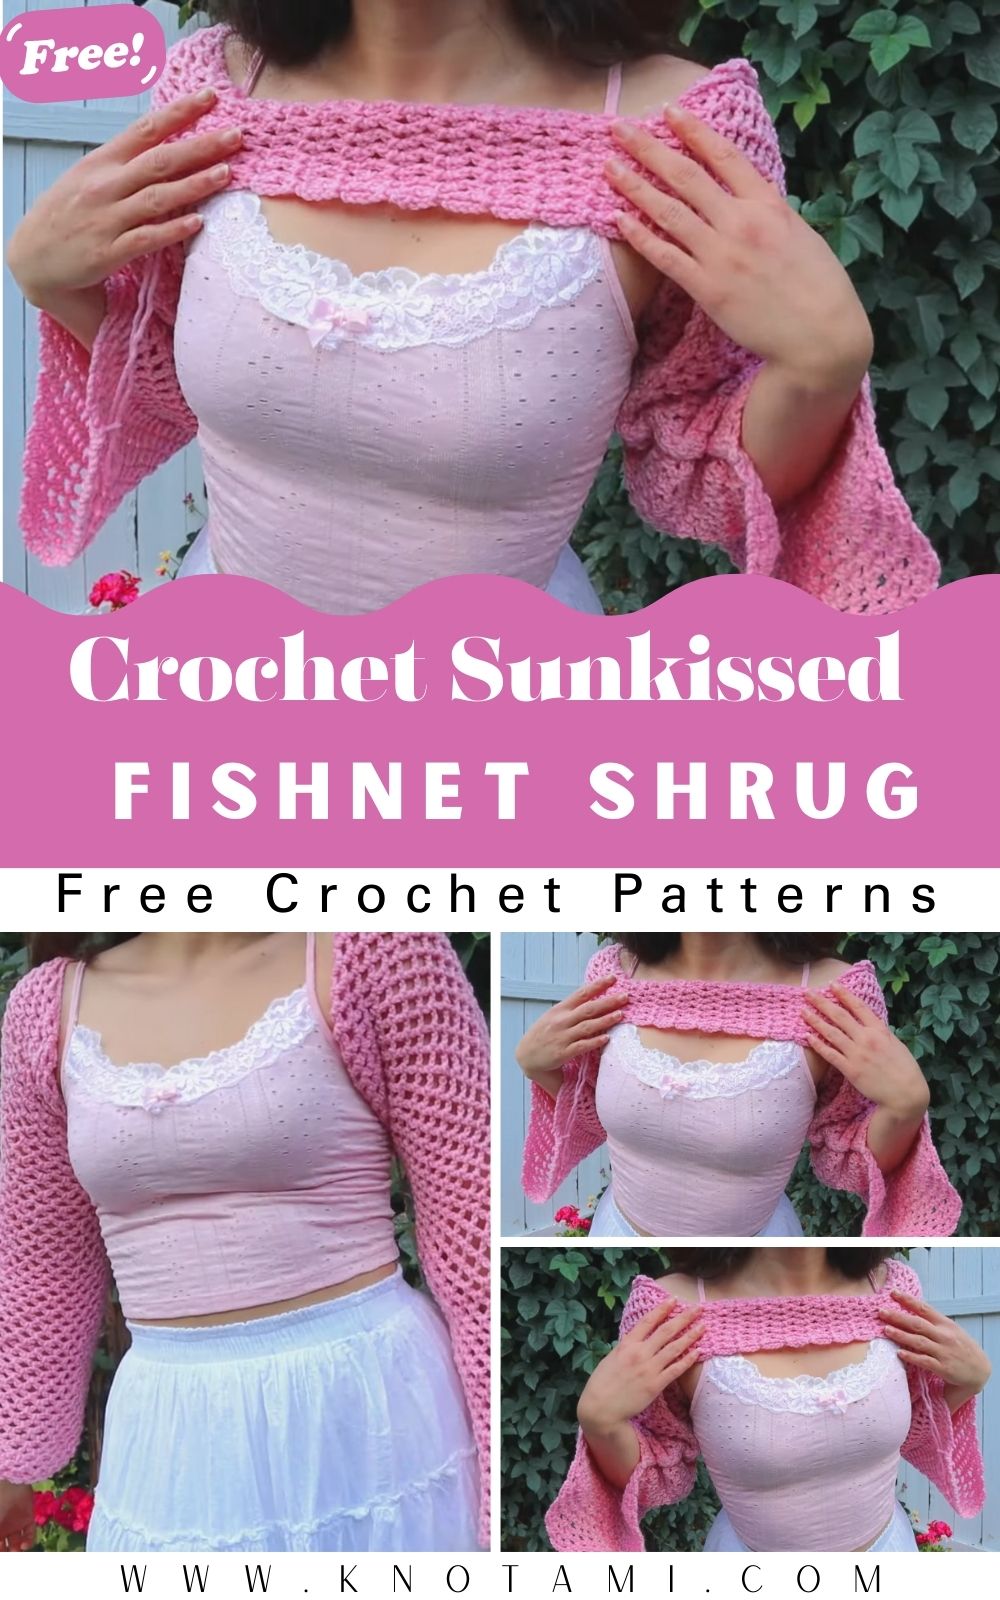
Customize sleeve fullness, add a tie-front, or leave it open for effortless movement. Furthermore, the lightweight mesh packs flat and travels beautifully, making it your go-to styling piece all season.
Uses:
- Festival-ready statement layer over crop tops or bralettes
- Evening shimmer topper with metallic yarns or beaded edges
- Photo-friendly accessory for vacations and events
Passionate Crochet Sunkissed Fishnet Shrug Pattern
If you love lightweight layers with breezy movement, this Passionate Crochet Sunkissed Fishnet Shrug Pattern is your new favorite make. With airy mesh, graceful drape, and a flattering, open shape, it’s perfect for beach days, festivals, coffee runs, or dates. Moreover, it’s truly beginner-friendly: you’ll use simple chains and slip stitches to build delicate fishnet rows, then join two sleeves with a quick body panel.
Because you asked for smooth readability, you’ll notice transitional words guiding you through each step clearly and naturally. Consequently, you can follow along with confidence, even if this is your first wearable.
SEO keywords integrated naturally: Passionate Crochet Sunkissed Fishnet Shrug Pattern, crochet fishnet shrug, beginner crochet shrug, fishnet shawl crochet, easy crochet mesh, bell sleeve shrug, summer crochet pattern, size 4 yarn, 5 mm hook.
Materials and Exact Measurements
- Yarn: Medium/Size 4 yarn (acrylic or cotton). For a breezy, summer-ready crochet fishnet shrug, choose acrylic for bounce or cotton for cool breathability.
- Yardage: approximately
- XS–S: 500–600 yards (457–549 m)
- M–L: 600–750 yards (549–686 m)
- XL–2XL: 750–900 yards (686–823 m)
- Example used in video: “I Love This Yarn,” Size 4, 100% acrylic.
- Yardage: approximately
- Hook: 5.0 mm (H-8)
- Tapestry needle: size large, blunt tip
- Scissors: sharp
- Measuring tape: flexible, body-measurement style
- Stitch markers: optional, to mark sleeve rounds or body edges
- Blocking tools: optional (pins and mat) for smoothing mesh
Measurements to take (write these down before you start):
- Upper arm circumference (bicep, at widest point): typically 10–16 in (25–41 cm)
- Sleeve length (from top of shoulder to wrist or desired length): typically 19–24 in (48–61 cm)
- Shoulder width across back (tip to tip, across the top): typically 14–18 in (36–46 cm)
- Desired back panel drop (how deep you want the body panel across your back): 2–8 in (5–20 cm), depending on coverage
Because this pattern is adjustable, you will use your measurements to guide chain counts and row totals. Additionally, you can test-fit frequently to ensure a perfect, personalized fit.
Before You Start: Gauge and Notes
- Gauge (approximate, since mesh is highly flexible): with a 5.0 mm hook and size 4 yarn, 4–5 “fishnet diamonds” across 4 inches (10 cm) and 4–5 rows per 4 inches (10 cm). Because yarns vary, adjust your hook as needed for drape.
- Fishnet repeat used here: ch-5 loop anchored with a slip stitch (sl st). You will skip two foundation chains and slip stitch into the third to anchor each loop when working the first row.
- Construction overview:
- Make Sleeve 1 as a tube (worked flat for 1–2 rows, then in the round).
- Repeat for Sleeve 2.
- Join sleeves at the inner, shoulder-side openings with a chain bridge, then build a short fishnet body panel across the back.
- Finish and weave in ends.
Because you’ll try on as you go, your shrug will fit your unique measurements beautifully.
Sizing Tips (Read First)
- For snug sleeves: wrap your foundation chain around your bicep so it fits with minimal ease (about 1–1.5 in / 2.5–4 cm of extra room).
- For relaxed sleeves: allow 2–3 in (5–7.5 cm) of ease.
- For dramatic bell sleeves: allow 3–5 in (7.5–13 cm) of ease.
- Example: A size XS/S maker in the video used about 70 chains for a loose, bell-style sleeve. However, you should measure your chain around your bicep, not your wrist, to ensure the sleeve fits the widest part of your arm.
- Body panel width: chain across the back from the inner top edge of one sleeve to the other (shoulder opening to shoulder opening), then add 1–2 in (2.5–5 cm) of ease for comfortable movement. In the video, the chain was around 57 chains for a smaller frame; your number may differ.
Because mesh stretches minimally, always measure at the widest area and add ease.
Step-by-Step Pattern: Sleeve 1
- Foundation chain and fit test (10–20 minutes)
- First, make a slipknot and chain (ch) until the chain comfortably wraps around your bicep at the widest point.
- Next, test the chain by wrapping it around your upper arm. If you prefer a snug sleeve, subtract a few chains; if you want a bell sleeve, add more chains until it feels loose and drapey.
- Typical ranges:
- Snug: 44–60 chains
- Relaxed: 60–72 chains
- Bell: 70–86 chains
- Tip: Because you’ll work a ch-5 mesh, a chain count that isn’t “perfectly divisible” still works; you can anchor the last stitches neatly at the end of the row.
- Row 1: Establish the fishnet (20–35 minutes)
- Then, begin your fishnet mesh:
- Chain 5.
- Slip stitch (sl st) into the last chain you made to create your first small loop at the end of the foundation chain.
- Next, chain 5, skip 2 chains on the foundation, and slip stitch into the 3rd chain. This anchors a ch-5 loop.
- Continue: ch 5, skip 2, sl st in 3rd across the entire foundation.
- Finally, if one chain remains at the end, single crochet (sc) into that last chain to secure the row neatly.
- Result: You’ve created one row of scalloped fishnet loops.
- Row 2: Stack the fishnet (15–25 minutes)
- After that, turn your work (optional ch 1 to turn if you prefer).
- Then, chain 5 and slip stitch into the center of the first fishnet loop from the previous row. Aim for the midpoint for an even stack.
- Continue across the row: ch 5, sl st into the center of the next loop until the end.
- At the edge, anchor the row: slip stitch into the last available edge stitch (this keeps the edge tidy).
- Join to work in the round (5–10 minutes)
- Because working in the round prevents twisting and speeds things up, join now:
- Fold the strip so the two short ends meet.
- Slip stitch the edges together at two neighboring anchor points to secure the tube without gaps.
- Slip stitch or ch 1 to move your hook into position at the top edge.
- From here, you’ll work in continuous rounds rather than rows.
- Work sleeve rounds to the desired length (60–120 minutes)
- Next, continue the mesh pattern in the round:
- Round repeat: ch 5, sl st into the center of the next loop, all the way around.
- At the end of each round, slip stitch into the first loop of the round to join. Then begin the next round with ch 5.
- Try on regularly:
- For wrist-length sleeves, continue until your sleeve reaches from your shoulder to your wrist (often 19–24 in / 48–61 cm).
- For elbow-length, stop earlier (often 12–15 in / 30–38 cm).
- Because the mesh grows quickly, you’ll see length accumulate fast. However, if your sleeve twists, simply flatten and continue; the loops will align when worn.
- Fasten off (3–5 minutes)
- Finally, when Sleeve 1 is long enough, cut the yarn, leaving a 6–8 in (15–20 cm) tail. Then pull through and secure.
- Weave in later to lock the seam and first-round joins.
Step-by-Step Pattern: Sleeve 2 (Repeat)
- Repeat the same steps you followed for Sleeve 1 (90–180 minutes total)
- First, chain and fit-test around your other bicep.
- Next, establish two rows of fishnet.
- Then, join into a tube and work in the round to the same length as Sleeve 1.
- Because symmetry matters, count your rounds or measure sleeve length side-by-side to match.
- Finally, fasten off with a 6–8 in (15–20 cm) tail.
Estimated time for both sleeves combined: 3–5 hours, depending on your pace and desired length.
Build the Body Panel (Correct Attachment at Shoulder Openings)
Important note: In the source video, the maker initially attached the body at the bicep edge by mistake, then corrected it. Therefore, attach the body at the inner, shoulder-side openings of the sleeves only. Consequently, your shrug will drape correctly across your back and sit naturally on your shoulders.
- Plan the body width (5–10 minutes)
- First, lay both sleeves flat with the round “shoulder openings” facing inward toward each other.
- Then, while wearing one sleeve, measure across your upper back from the inner top edge of one sleeve opening to the inner top edge of the other. Add 1–2 in (2.5–5 cm) of ease for movement.
- Alternatively, if you prefer to measure by chain: with your hook in one sleeve’s inner top edge, chain until the strand reaches the other sleeve’s inner top edge comfortably when stretched lightly across your back. Then add a few chains for ease.
- Typical chain span: 40–70 chains for many sizes. In the video example, around 57 chains reached the other shoulder on a smaller frame.
- Create the chain bridge and attach it to the second sleeve (7–12 minutes)
- Next, join yarn to the inner top edge of Sleeve 1 (the round opening that sits at the shoulder).
- Then, chain the number you measured for your back width and ease.
- After that, slip stitch to the inner top edge of Sleeve 2 to secure the chain bridge.
- Because this bridge becomes Row 1 of your back panel foundation, ensure it’s not twisted and lies flat.
- Row 1 across the back (fishnet over the chain; 15–25 minutes)
- Now, begin working fishnet loops back across the chain and the sleeve-edge loops:
- Starting from Sleeve 2’s attach point, ch 5 and sl st into the center of the nearest loop or anchor point along the body edge.
- Then, continue: ch 5, sl st into the next available loop or into the chain bridge (skip 2 chains on the bridge, sl st into the 3rd).
- Work across the chain bridge, then continue over the Sleeve 1 edge.
- At the end, anchor with a slip stitch. Because this is a back-and-forth body panel, you will turn to work on the next row.
- Rows 2–5 (or more) for body depth (30–60 minutes)
- Turn, then repeat: ch 5, sl st into the center of each loop across the back panel area only (from one shoulder opening to the other).
- Work as many rows as you want for coverage:
- Minimal shrug look: 2–3 rows
- Medium coverage: 4–6 rows
- Deeper back panel: 7–10 rows
- Because the fishnet is airy, a few rows add a lot of visual impact without bulk.
- Optional shaping or edging (15–30 minutes)
- If desired, finish the lower edge of the body panel (and/or sleeve cuffs) with a simple decorative pass:
- Picot edge: [sl st in loop, ch 3, sl st in same loop] repeat lightly for a dotted trim.
- Shell-suggested accent: [sl st, ch 2, sl st] for a soft ripple.
- Alternatively, for a minimalist look, skip edging and keep the clean fishnet lines.
- Final fastening and weaving (10–20 minutes)
- Finally, cut yarn tails and weave in all ends with a tapestry needle.
- Because mesh has open spaces, weave in ends in multiple directions to secure them invisibly.
Estimated time for body panel and finishing: 1–2 hours, depending on the number of rows and any optional edging.
Basic Tips for Success
- Measure at your bicep, not your wrist. Because the bicep is the widest part of your arm, you’ll ensure the sleeve fits without strain.
- Aim for the loop center. When slip stitching into each fishnet loop, target the midpoint so your rows stack evenly and your mesh lines stay straight.
- Try it on often. Since this is a wearable, try the sleeve tube on every so often to confirm circumference and length. Consequently, you’ll avoid frogging later.
- Manage twist proactively. If the fabric twists as you work flat, don’t worry. After joining and working in the round, it naturally settles when worn.
- Add ease for movement. When chaining across the back for the body panel, add at least 1–2 inches (2.5–5 cm) of ease so you can stretch, reach, and hug comfortably.
Common Mistakes and Easy Fixes
- Attaching the body at the wrong place:
- Mistake: Joining the body chain at the bicep edge of each sleeve.
- Fix: Always attach the body chain at the inner, shoulder-side round openings.
- Sleeves too tight:
- Mistake: Measuring around the forearm or wrist instead of the bicep.
- Fix: Redo the foundation chain to fit your bicep with added ease. Then continue with the fishnet rows.
- Uneven loops or wavy mesh:
- Mistake: Inconsistent chain tension or slip stitching off-center.
- Fix: Slow down, count your chains, and place slip stitches through the loop’s middle each time.
- Running out of yarn:
- Mistake: Underestimating yardage for larger sizes or deeper body panels.
- Fix: Buy an extra skein or plan color-block sections that allow you to switch shades stylishly if needed.
- Twisted join:
- Mistake: Twisting the sleeve when slip stitching into a tube.
- Fix: Lay the piece flat, align loops, and use markers to hold edges before joining.
Variations to Make It Yours
- Mesh openness:
- Smaller diamonds: ch-4 loops for a tighter fishnet and more coverage.
- Larger diamonds: ch-6 loops for an airier, dramatic net.
- Sleeve silhouette:
- Snug: fewer foundation chains and fewer rows.
- Bell: add extra foundation chains and maintain that width through the length.
- Color play:
- Ombre yarn for sun-washed, sunkissed shifts.
- High-contrast stripes per sleeve for festival flair.
- Metallic thread held with your yarn for evening shimmer.
- Edge details:
- Picots for delicate femininity.
- Shell-like accents for a beachy vibe.
- Minimalist slip-stitch round for clean modern lines.
- Closures:
- Add a tie-front cord at the body panel’s top corners.
- Add a button loop if you prefer a secure front closure.
Estimated Total Making Time
- Measuring and planning: 10–20 minutes
- Sleeve 1: 90–120 minutes
- Sleeve 2: 90–120 minutes
- Body panel (including bridge and rows): 60–90 minutes
- Finishing and weaving: 10–20 minutes
Total: approximately 4–6 hours for most makers. Additionally, if you add deeper back coverage or decorative edging, allow another 30–60 minutes.
Care and Wear
- Hand wash cool and lay flat to dry for best shape retention.
- Because acrylic is resilient, you can also machine wash on gentle inside a mesh bag and lay flat to dry.
- Light steam blocking can relax any curling and refine the drape. However, avoid heavy ironing on acrylic.
Style Ideas and Uses
- Beach-to-brunch cover-up over a tank, sundress, or swimsuit.
- Festival-ready topper with denim shorts and a bralette.
- Evening layer with a satin slip and sandals for effortless glam.
Troubleshooting and FAQs
- How do I size up or down quickly?
- First, adjust the foundation chain around your bicep. Then, increase or decrease sleeve length to taste. Finally, adjust the back-panel chain span across your shoulders and add ease.
- What if my yarn is thicker or thinner?
- If you use bulky yarn, downsize the loop count (try ch-4) and reduce chains for circumference. If you use DK or sport, try ch-6 for a floaty net and add chains for circumference.
- Can I work both sleeves at once?
- Yes. Additionally, you can alternate a few rounds per sleeve to ensure both match exactly in tension and length.
- Do I need edging?
- Not at all. However, a single round of slip stitches or picots can finish edges and add polish.
Clear, Catchy Wrap-Up
Ultimately, the Passionate Crochet Sunkissed Fishnet Shrug Pattern blends breezy style with beginner-friendly steps, resulting in a stunning summer layer you’ll wear on repeat. Because the method relies on simple chain-5 loops and slip stitches, you’ll relax into the rhythm quickly. Moreover, you can customize sleeve width, sleeve length, and body coverage effortlessly by measuring as you go.