
If you love quick, rewarding crafts, this tutorial is designed to help you master the art of making a DIY crochet keychain that looks good enough to eat. We have focused on making the steps simple so that even if you are just starting your journey with yarn, you can complete this adorable crochet watermelon keychain in just one sitting.
As you follow along with this guide, you will see how easy it is to combine basic stitches to create a professional-looking amigurumi watermelon slice. This project is a fantastic way to use up small scraps of yarn while creating something functional and trendy. By the time you finish reading, you will have all the skills needed to make a crochet watermelon keychain for your bags, keys, or as a thoughtful handmade gift for your friends and family.

I have embedded the video tutorial above to give you a clear visual guide for every stitch and color change. Watching the video while reading this guide will help you understand the tension and movement required for the crochet watermelon keychain. The video is above to ensure you don’t miss any tiny details like how to embroider the seeds or secure the keyring. Please refer to the embed video as you work through each section of the pattern below to ensure your finished product looks exactly like the one in the tutorial.
7. Skill Level / Level of Difficulty
The skill level for this crochet watermelon keychain is Beginner. If you know how to make a magic ring, a single crochet, and a basic increase, you are ready to start. It is a very forgiving pattern that helps you practice color changes and shaping without any complex or stressful techniques.
8. Tutor’s Suggestions
I suggest that you use a stitch marker at the beginning of every round to keep track of your progress. Since we are working in a spiral for certain parts of the crochet watermelon keychain, it is easy to lose count of your stitches. Additionally, I recommend using cotton yarn because it provides great stitch definition and makes the keychain more durable for daily use on your bag or keys. Don’t pull your stitches too tight, or it might be difficult to insert your hook in the next round.
Material Needed and Step-by-Step Guide
To create your crochet watermelon keychain, you will need the following materials:
-
Cotton yarn in Red, White, and Green
-
A small amount of Black yarn or embroidery thread for the seeds
-
A 3.0mm or 3.5mm crochet hook
-
Fiberfill stuffing
-
A tapestry needle and scissors
-
A metal keyring or lobster clasp
Step-by-Step Guide
Step 1: The Inner Flesh (Red)
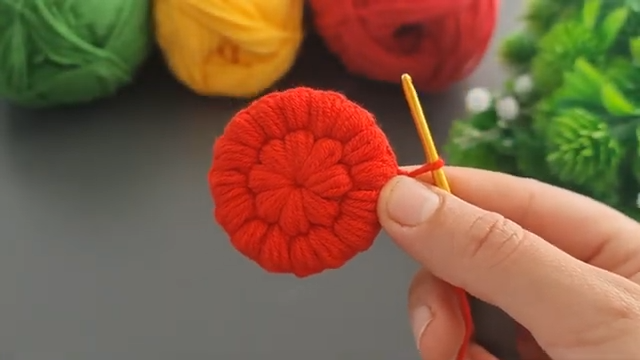
Start by creating a magic ring with your red yarn. Work 6 single crochet stitches into the ring. In the second round, you should increase in every stitch to reach 12 stitches. Continue increasing until your circle is the size you want for your crochet watermelon keychain. Remember that you are making a flat circle that we will later fold in half to create the slice shape.
Step 2: The Rind (White and Green)
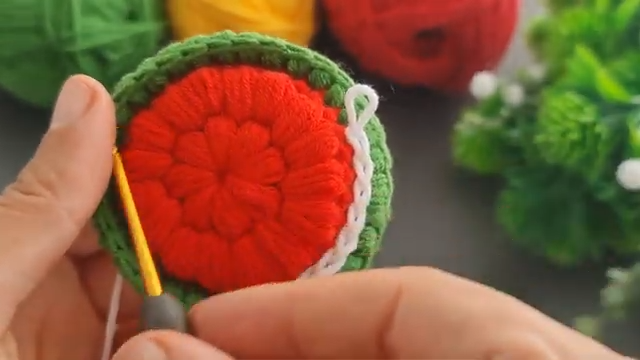
Once your red circle is complete, switch to white yarn for one round. This represents the lighter part of the watermelon rind. After the white round, switch to green yarn and complete one or two more rounds of single crochet. As you work with the green yarn, you will notice the crochet watermelon keychain starting to look like a real fruit slice.
Step 3: Embroidering the Seeds
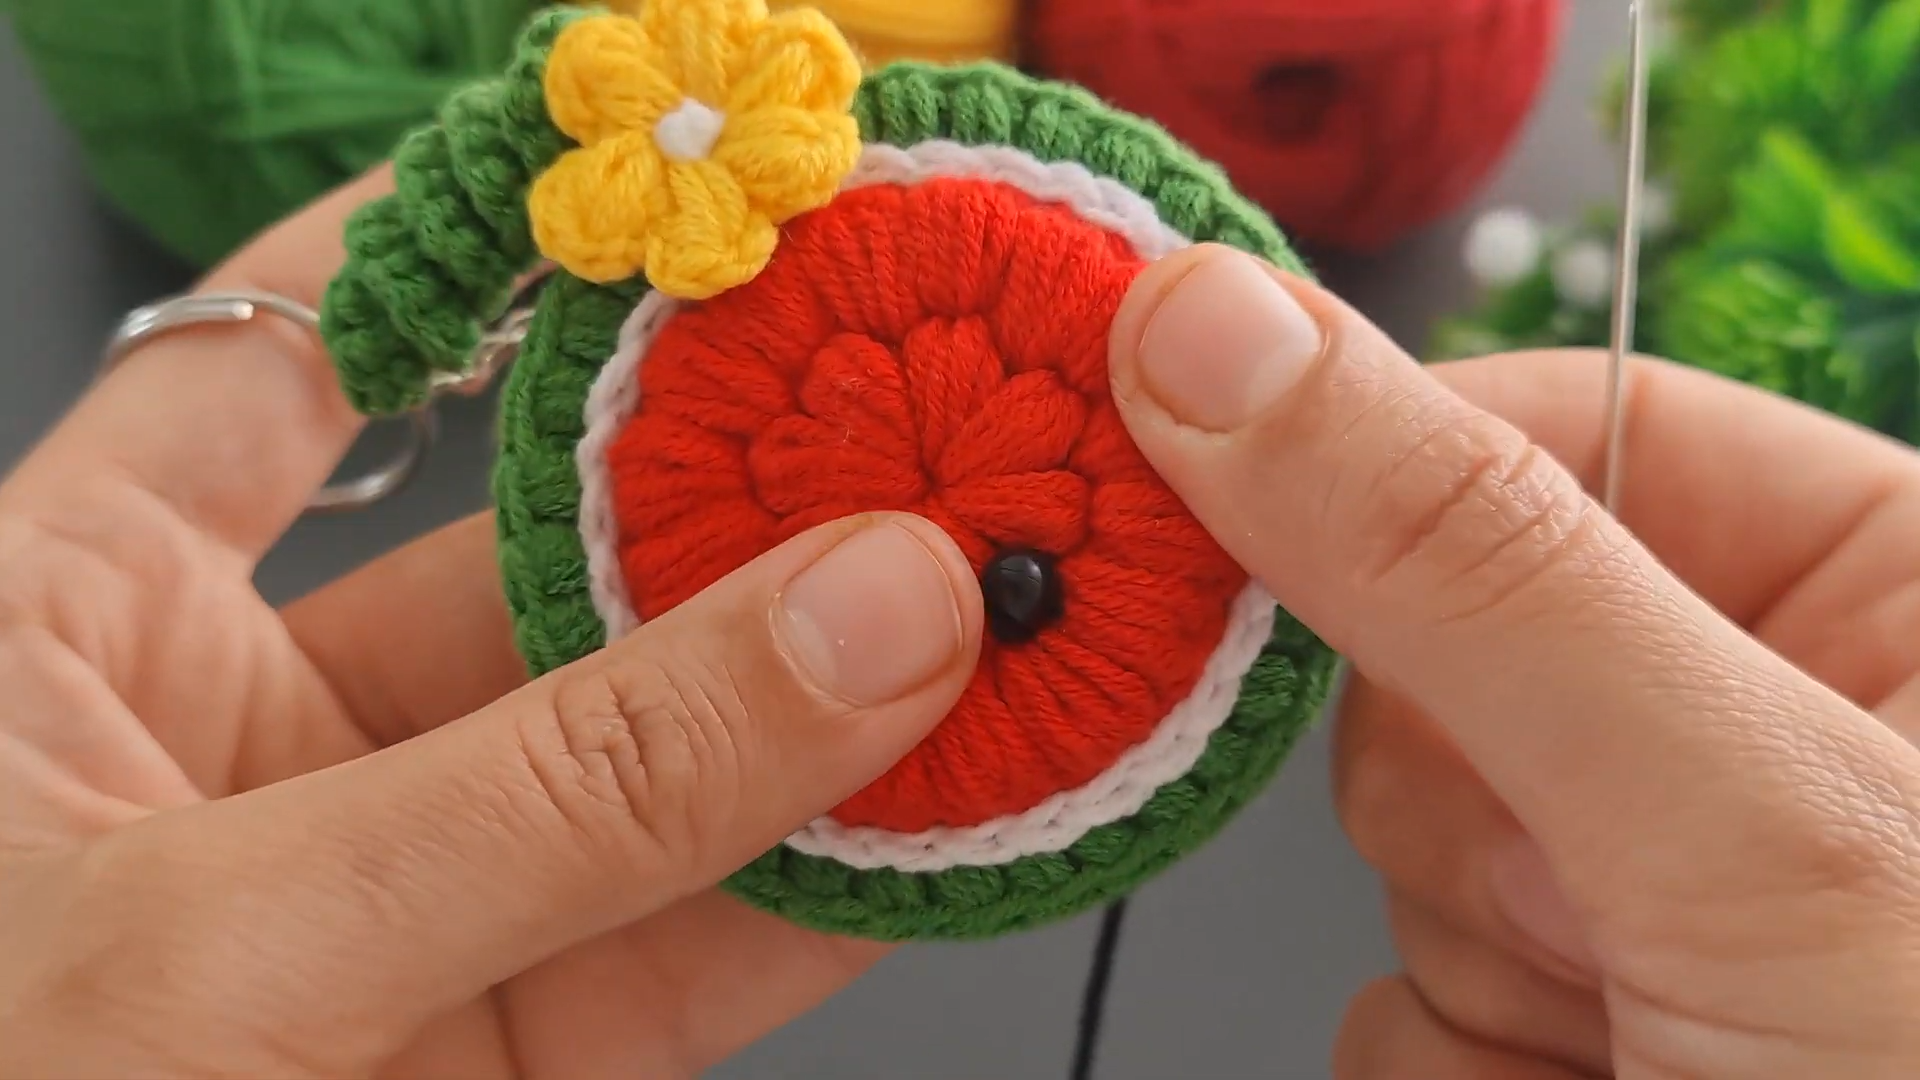
Before folding the circle, use your black yarn and a tapestry needle to stitch small “V” shapes or straight lines onto the red section. These are the seeds. Distribute them evenly to make your crochet watermelon keychain look authentic.
Step 4: Folding and Stuffing
Fold your circle in half so it looks like a semi-circle. Use the green yarn to join the edges together with single crochet stitches. Before you close the gap completely, add a small amount of fiberfill stuffing inside to give your crochet watermelon keychain a 3D look.
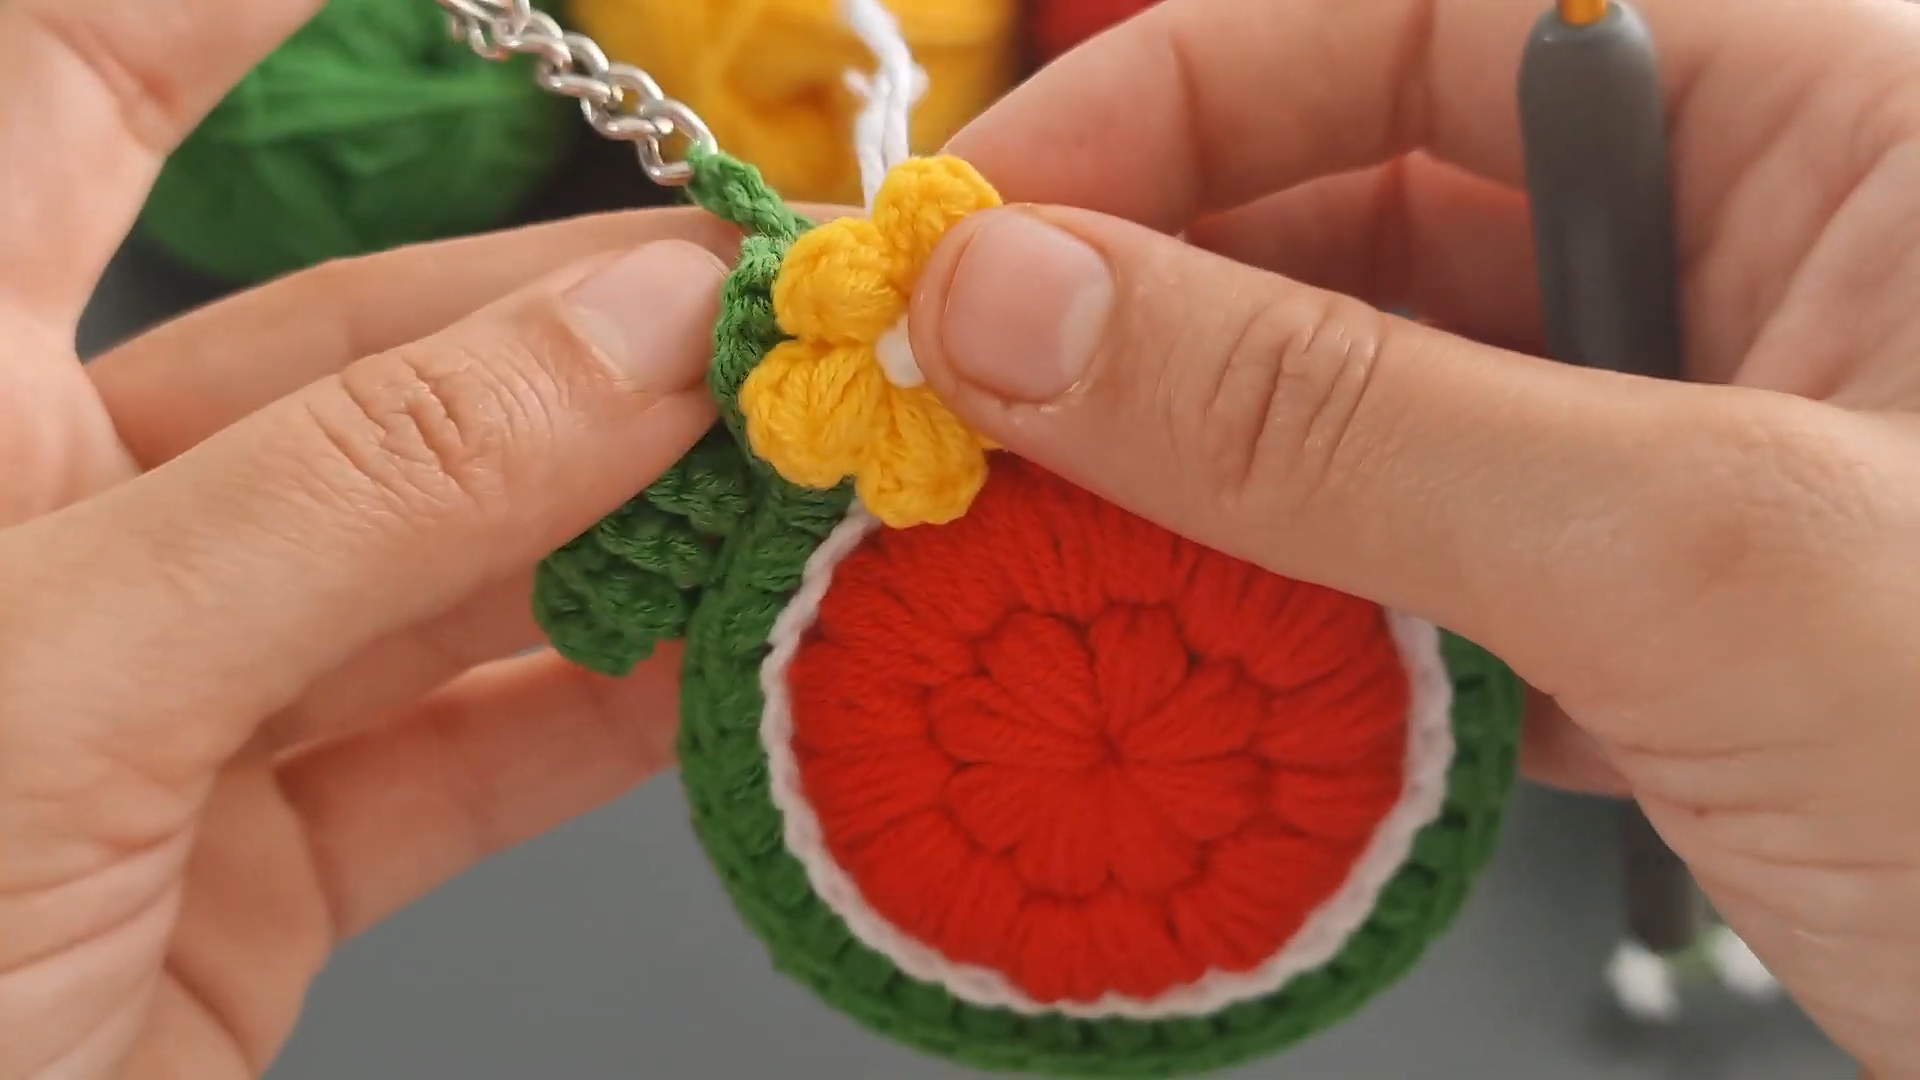
Step 5: Attaching the Keyring

Finally, use your tapestry needle to securely sew the metal keyring to one of the green rind’s corners. Make sure you tie a double knot and weave in the ends so the crochet watermelon keychain stays attached to your keys.
>
Communication with the Reader
You are going to love how fast this project comes together! Once you finish your first crochet watermelon keychain, you will likely want to make a whole batch of them. You can experiment with different shades of pink or red to give each one a unique personality. If you find yourself stuck on a specific stitch, just look at the video provided and you will see exactly how to move your hook. You have all the talent needed to finish this beautiful craft today!
Where We Can Use It
The crochet watermelon keychain is incredibly versatile. You can clip it onto your school backpack to make it stand out in the hallway. It also works perfectly as a zipper pull for your makeup bag or a summer tote. Many people love to use these as charms for their car keys because the soft texture makes them easy to find inside a deep purse. You can even use them as decorative ornaments for a summer-themed party or as cute favors for a birthday celebration.
Tips and Tricks
One great tip for a neat crochet watermelon keychain is to use the “invisible decrease” method when you are shaping the rind. This prevents any large holes from appearing in your work. Another trick is to use a slightly smaller hook than the yarn label suggests to ensure your stitches are tight enough that the stuffing doesn’t show through. If you want a more “kawaii” look, you can add safety eyes and a small pink smile to the red section of your crochet watermelon keychain.
Common Mistakes
A common mistake when making a crochet watermelon keychain is forgetting to carry the yarn during color changes, which can lead to loose loops on the inside. Another error is overstuffing the slice, which might cause the stitches to stretch and look messy. Make sure you don’t skip the white yarn round, as that small detail is what truly makes the crochet watermelon keychain look like a real piece of fruit. Lastly, ensure you secure the seeds tightly so they don’t pull out over time.
FAQs
1. What is the best yarn for a crochet watermelon keychain?
I highly recommend 100% cotton yarn because it is sturdy and doesn’t get fuzzy with frequent handling.
2. How long does it take to make one?
An average beginner can finish a crochet watermelon keychain in about 30 to 45 minutes.
3. Can I wash my keychain if it gets dirty?
Yes, if you use cotton yarn, you can gently hand wash it and let it air dry to keep it looking fresh.
4. Do I need to use stuffing?
While you can leave it flat, adding a bit of stuffing makes the crochet watermelon keychain much cuter and more durable.
5. Is this project suitable for children?
Absolutely! This is a great project for kids who are learning to crochet as it teaches basic shapes and color changes.
Conclusion
In conclusion, making your own crochet watermelon keychain is a fun and easy way to express your creativity while making something useful. You have learned the materials needed, the step by step process, and even some secret tips to make your work look professional. This project is the perfect way to spend a quiet afternoon and you will end up with a beautiful accessory that you can show off to everyone. I hope you enjoyed this tutorial and feel inspired to keep crafting more wonderful items. Happy crocheting!