
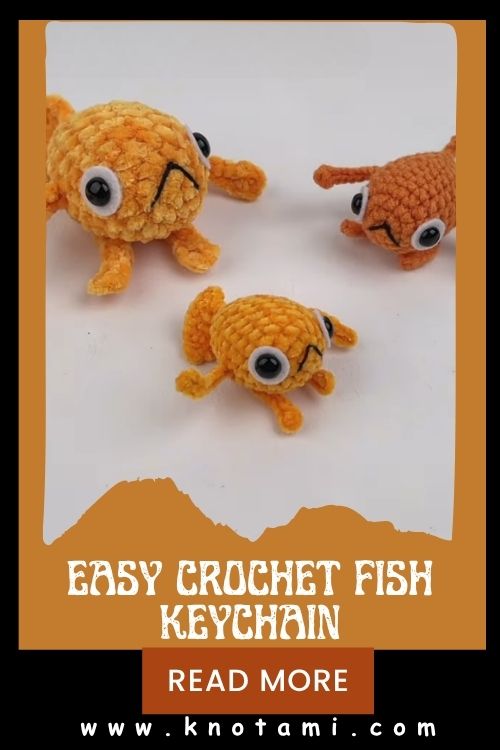
Make a beautiful crochet fish keychain that looks shiny and stylish but is easy enough for beginners to make. This crochet keychain pattern can be used as a charming accessory as well as a small decoration. What’s more, this amigurumi keychain is quick to make, uses less yarn, and is also a great choice for giving as a gift.
If you like quick and easy projects, this crochet fish keychain amigurumi is a great choice. It combines the beauty of a mini amigurumi, the utility of a handmade keychain, and the joy of a beginner project that you can complete in one sitting. Its small size also makes it ideal for using up scrap yarn, so you can easily experiment with different colors. You can attach it to keys, backpacks, or zippers, making it a useful accessory as well as a beautiful handmade addition. It’s also perfect as a small gift or cute desk decor.

Necessary Materials
Gather everything first so you can crochet smoothly from start to finish.
- Yarn: Worsted (medium/#4) or DK (#3) yarn in 1–2 fish colors
- Additionally, use a small amount of contrasting yarn for fins or stripes.
- Crochet hook: 2.5–3.5 mm (choose based on yarn and tightness)
- Moreover, tighter stitches help stuffing stay hidden.
- Fiberfill stuffing
- Safety eyes (6–8 mm) or small black yarn for embroidered eyes
- However, use embroidered eyes for babies and toddlers.
- Tapestry needle (for sewing and weaving ends)
- Stitch marker (or a scrap of yarn)
- Scissors
- Keychain hardware: keyring, lobster clasp, or swivel clip
- In addition, you can add a jump ring for easier attachment.
- Optional: blush, fabric paint dots, or embroidery floss for extra details
Procedure (Beginner Friendly)
This method uses simple amigurumi techniques: crochet in the round, increase, decrease, and basic sewing. Therefore, you can focus on shaping without getting overwhelmed.
Step 1: Start the fish body (rounds in a spiral)
- Make a magic ring (or chain 2 and work into the first chain).
- Work 6 single crochets (sc) into the ring.
- Next, increase around to grow the circle evenly (2 sc in each stitch).
- Continue adding increase rounds until the body reaches a small oval/round base.
Additionally, keep your stitches tight and consistent, because gaps show more on small projects.
Step 2: Build height for a plump amigurumi shape
- Crochet several rounds without increases to create the fish’s “belly.”
- Meanwhile, place a stitch marker in the first stitch of each round so you never lose your place.
- If you want a slightly longer fish, add one extra plain round before shaping the tail.
Moreover, this section lets you customize the final look quickly.
Step 3: Add eyes and begin stuffing
- Place safety eyes between the upper-middle rounds, spaced evenly.
- However, if you embroider eyes, wait until the fish closes so you can adjust expression.
- Start stuffing lightly, then add more as you shape.
As a result, you avoid the lumpy “overstuffed” look that beginners often dislike.
Step 4: Shape the tail end (decreases)
- Begin decrease rounds to taper the body toward the tail.
- Continue decreasing until the opening becomes small.
Additionally, keep stuffing as you go, because the opening gets tight fast.
Step 5: Create the fish tail (flat fin shape)
You can make a simple tail in two beginner-proof ways. Choose the one you like.
Option A: Tail made directly from the body (fastest)
- When the body narrows, crochet a few stitches, then chain a small number (for example, 4–6).
- Slip stitch back toward the body to make a fin point.
- Repeat once more on the opposite side to form a “V” tail.
Therefore, you get a recognizable fish silhouette without extra sewing.
Option B: Separate tail piece (cleaner shape)
- Crochet a small triangle or leaf-like piece using single crochet increases.
- Sew it onto the narrowed end of the body.
Moreover, this option looks extra neat if you plan to sell or gift your keychain.
Step 6: Add top and side fins (optional but classy)
- Crochet a small fin by chaining 3–5 and working back with slip stitches or single crochet.
- Sew one fin on top and one on each side if you want a more realistic fish.
In addition, tiny fins add texture and make the design look “finished” even in one color.
Step 7: Close and secure the body
- Finish any final decreases until the opening closes.
- Stitch the last hole shut with a tapestry needle.
- Weave in all ends securely.
Meanwhile, squeeze the fish gently to check for gaps, then adjust stuffing if needed.
Step 8: Attach the keychain hardware
- Decide where you want the clip or ring—usually on the top fin area or slightly behind the head.
- Sew a small yarn loop on top, or insert a jump ring through stitches.
- Attach the keyring or lobster clasp.
Therefore, the fish sits upright and looks cute while hanging.
Step 9: Add finishing details (simple but high impact)
- Add a small embroidered smile.
- Moreover, stitch a few “gill” lines on the side.
- For example, use a contrasting yarn to add stripes or a tiny dot pattern.
As a result, your crochet fish keychain amigurumi looks custom rather than basic.
Design, Style & Features
This crochet fish keychain feels classy because the shape stays compact, smooth, and intentional. Additionally, the rounded body gives it that classic amigurumi “chubby cute” look, while the tail adds instant character. You can keep it minimalist in one solid color; however, a two-tone palette (light belly + darker back) makes it look more detailed without extra work.
Moreover, this design adapts easily: make it a goldfish in orange, a koi-inspired version in white and red, or a pastel fish for a softer vibe. In addition, small fins and embroidered details create a boutique-style finish even if you only know basic stitches.
Uses & Benefits
A crochet fish keychain amigurumi does more than look adorable—it adds everyday value.
Keychain use
Clip it onto your keys, and you instantly spot them in your bag. Additionally, the soft shape protects phones and sunglasses from scratches when everything bumps together.
Gift ideas
This makes a thoughtful handmade gift for:
- friends who love ocean themes
- teachers (small, affordable, heartfelt)
- party favors or stocking stuffers
Moreover, you can pair it with a short note and turn it into a meaningful “good luck charm.”
Decor purpose
Hang it from a backpack zipper, tote bag, or car mirror. Therefore, it works like mini decor that travels with you. In addition, it looks adorable on a nursery mobile when you use embroidered eyes and safe attachments.
Practical value
Because it uses little yarn, this project helps you:
- use up scraps
- practice shaping and counting
- build confidence with amigurumi basics
As a result, beginners improve fast without committing to a big toy.
Tips for Beginners
If you want your amigurumi toy keychain to look neat on the first try, focus on these simple habits.
- Use a smaller hook than usual. Additionally, tight stitches prevent stuffing from peeking out.
- Count every round. Moreover, counting keeps the fish symmetrical, especially near the tail.
- Mark the first stitch. Otherwise, you may accidentally add extra stitches and lose the shape.
- Stuff gradually. Therefore, you avoid lumps and keep the fish smooth.
- Learn the invisible decrease. In addition, it makes the body look cleaner than a regular decrease.
- Weave ends like you mean it. Moreover, keychains get handled a lot, so secure ends well.
- Test hardware placement early. For example, pin the ring location before sewing, so the fish hangs straight.
FAQs (3–5 Questions)
1) Is this pattern good for beginners?
Yes, it works great as a beginner crochet project because it uses single crochet, increases, and decreases. Additionally, the small size lets you practice amigurumi shaping without spending hours.
2) What yarn works best for an amigurumi keychain tutorial like this?
Worsted or DK yarn works best because it holds shape and shows stitches clearly. However, cotton yarn gives an extra “crisp” finish, which looks especially classy on a crochet keychain.
3) How do I make the amigurumi toy keychain more durable?
Use tight tension, secure knots, and weave ends deeply through the body. Moreover, attach the keyring through multiple stitches or a reinforced loop, so the hardware does not pull out over time.
4) Can I wash a fish amigurumi?
Yes, you can hand-wash it gently with mild soap, then air-dry. Therefore, it stays clean even if it lives on a backpack. However, avoid soaking metal hardware for long periods to prevent rust.
5) How can I personalize this gift?
Change colors, add stripes, or embroider initials on one side. Additionally, you can add a tiny charm bead to the keyring. As a result, the same fish pattern becomes a custom gift for different people.
Summary
This classy crochet fish keychain amigurumi gives you a fast, satisfying make that looks boutique-level without complicated techniques. Additionally, it works as a keychain, gift, or tiny decor piece, so you get plenty of value from a small amount of yarn. Moreover, beginners can practice essential amigurumi skills while creating something genuinely useful. Therefore, grab your scrap yarn, pick a fun color combo, and crochet your own fish charm today.