
This crochet giraffe curtain tie amigurumi pattern gives you a tall spotted friend for your window. Every round comes with its stitch count. Finish it with a tufted tail. It also makes a sweet idea for Valentine’s Day crochet gifts.
Make a tall yellow giraffe with this crochet giraffe curtain tie amigurumi pattern. The head and neck and body are worked in one piece. Then you add a white muzzle and small ears and black tipped horns and spots and a tufted tail. Every round is written out with its stitch count so you can check your work as you go. Use it as window decor or a shelf display. It also suits Valentine’s Day crochet gifts and Lunar New Year crochet decor. Keep it out of a child’s reach.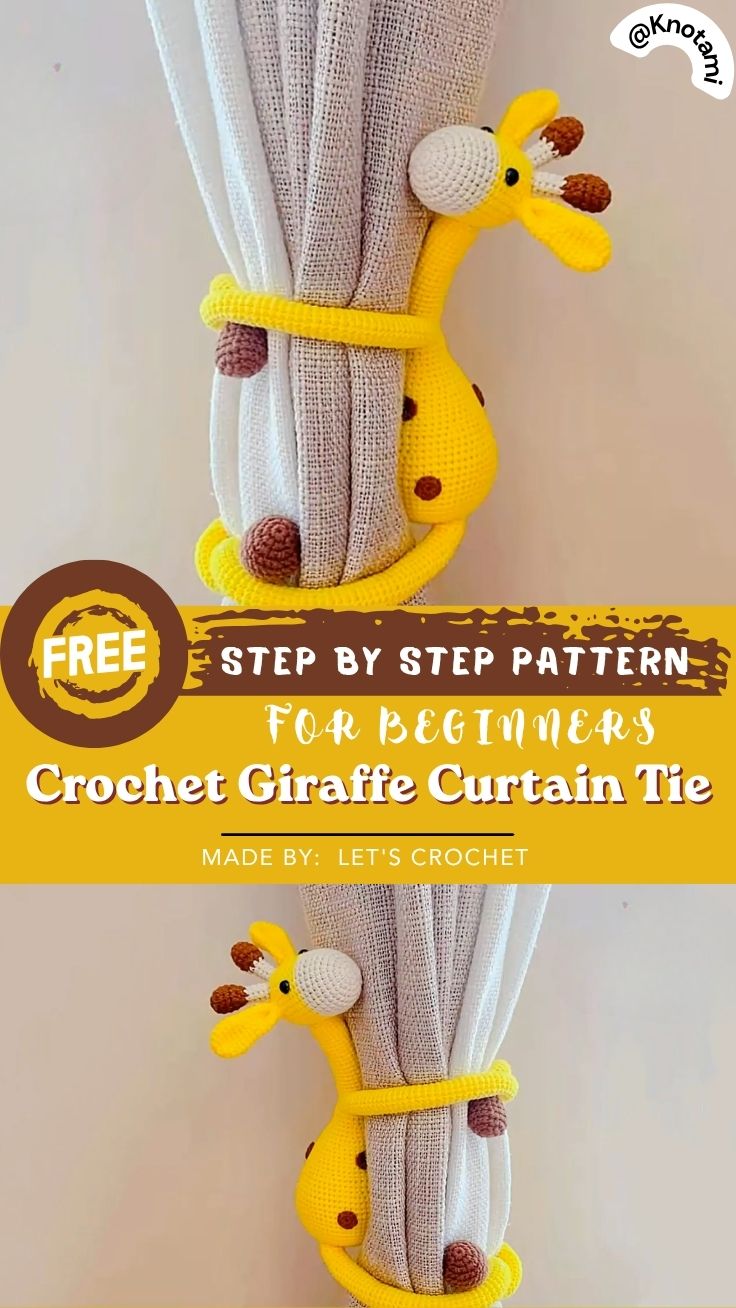
Safety note: Curtain tiebacks and loops can be a strangulation hazard for young children. Use this giraffe as decoration only, and mount it high, well out of a child’s reach.
Pattern Overview
- Style: A tall giraffe with a slim neck, a white muzzle, small horns, ears, legs, arms, black spots and a tufted tail.
- Colors: Yellow for the head, body, ears, legs and arms. White for the muzzle. Black for the horn tips, hooves, spots and tail tuft.
- Parts: One piece for the head, neck and body, plus a muzzle, 2 ears, 2 horns, 2 legs, 2 arms, 9 spots and a tail.
- Finished size: About 8 inches (20 cm) tall when made with worsted yarn and a small hook. Thicker yarn or a larger hook will make the giraffe bigger.
Materials
- Yarn: Yellow, white and black.
- Crochet hook: One that suits your yarn.
- Stuffing: Fiberfill.
- Eyes: One pair of safety eyes.
- Tools: A stitch marker, pins, a tapestry needle and scissors.
Abbreviations (US Terms)
- MR – magic ring
- ch – chain
- sl st – slip stitch
- sc – single crochet
- inc – increase (2 sc in the same stitch)
- dec – invisible decrease
- Rnd – round
Before You Start
Invisible Decrease
Put your hook into the front loop of the next stitch, then into the front loop of the stitch after it. Yarn over and pull through both loops, then yarn over and pull through the two loops left on the hook. This decrease hides well, so the finish looks smooth.
Spiral Rounds and Joined Rounds
Most rounds are worked in a spiral with no joining. Mark the first stitch of every round and move the marker up as you go. The few rounds that are joined are mentioned in the steps. A join leaves a visible seam, so only join where the pattern says to.
Changing Colors
Stretch the last loop a little, put your hook into the stitch, and pull the new color through. Join with a sl st and ch 1.
How to Crochet the Giraffe Curtain Tie
Step 1: Make the Head (Yellow)
- Rnd 1: Make an MR and work 6 sc inside it. Pull the tail tight, join with a sl st and ch 1. (6)
- Rnd 2: Inc in every stitch around. (12)
- Rnd 3: *Sc, inc*, repeat around. (18)
- Rnd 4: *Sc 2, inc*, repeat around. (24)
- Rnd 5: *Sc 3, inc*, repeat around. (30)
- Rnd 6: *Sc 4, inc*, repeat around. (36)
- Rnd 7: *Sc 5, inc*, repeat around. (42)
- Rnd 8–15: Sc in each stitch around for 8 rounds. (42)
Step 2: Shape the Neck
- Rnd 16: *Sc 5, dec*, repeat around. (36)
- Rnd 17: *Sc 4, dec*, repeat around. (30)
- Rnd 18: *Sc 3, dec*, repeat around. (24)
Stuff the head firmly now. The opening gets smaller with every round, so stuffing later is much harder.
- Rnd 19: *Sc 2, dec*, repeat around. Join with a sl st and ch 1. (18)
- Rnd 20: Sc in each stitch around. Join and ch 1. (18)
- Rnd 21–22: Sc in each stitch around. (18)
Step 3: Build the Body
- Rnd 23: *Sc 2, inc*, repeat around. (24)
- Rnd 24–26: Sc in each stitch around. (24)
- Rnd 27: *Sc 3, inc*, repeat around. (30)
- Rnd 28–30: Sc in each stitch around. (30)
- Rnd 31: *Sc 4, inc*, repeat around. (36)
- Rnd 32: *Sc 5, inc*, repeat around. (42)
- Rnd 33–44: Sc in each stitch around. (42)
[REVIEW – not yet confirmed: the narrator said eleven rounds here, but rounds 33 to 44 are twelve. The audio was unclear. Check the video and fix the round range.]
Step 4: Close the Body
- Rnd 45: *Sc 5, dec*, repeat around. (36)
- Rnd 46: *Sc 4, dec*, repeat around. (30)
- Rnd 47: *Sc 3, dec*, repeat around. (24)
Stuff the whole body firmly before you go further.
- Rnd 48: *Sc 2, dec*, repeat around. (18)
- Rnd 49: *Sc, dec*, repeat around. (12)
- Rnd 50: Dec around. (6)
Cut the yarn and leave a long tail. Thread it through the front loops of all 6 stitches, pull tight to close, and hide the tail inside the body.
Checkpoint: Count your stitches at the end of every round. The totals go 6, 12, 18, 24, 30, 36 and 42 for the head, then 36, 30, 24 and 18 for the neck, then 24, 30, 36 and 42 for the body, and 36, 30, 24, 18, 12 and 6 to close it.
Bonus Section: Stuffing Tips for a Firm Shape
Pull your fiberfill into small, fluffy pieces before you push it in, and fill the neck last with a little extra. Small pieces reach every corner and avoid lumps. A well-stuffed giraffe stands up straight, while a soft one tends to flop.
Step 5: Make the Muzzle (White)
- Rnd 1: Make an MR and work 6 sc. Close the ring, join and ch 1. (6)
- Rnd 2: Inc in every stitch. Join and ch 1. (12)
- Rnd 3: *Sc, inc*, repeat around. Join and ch 1. (18)
- Rnd 4: *Sc 2, inc*, repeat around. Join and ch 1. (24)
- Rnd 5–6: Sc in each stitch around. (24)
Ch 1, then cut the yarn and leave a long tail for sewing.
Step 6: Make the Ears (Yellow, Make 2)
- Rnd 1: Make an MR and work 6 sc. Close the ring, join and ch 1. (6)
- Rnd 2: *Sc, inc*, repeat around. Join and ch 1. (9)
- Rnd 3: *Sc 2, inc*, repeat around. Join and ch 1. (12)
- Rnd 4: *Sc 3, inc*, repeat around. Join and ch 1. (15)
- Rnd 5–7: Sc in each stitch around. (15)
- Rnd 8: *Sc 3, dec*, repeat around. (12)
Join, ch 1, and cut the yarn with a long tail for sewing.
Step 7: Make the Horns (Black, Then Yellow, Make 2)
- With black, Rnd 1: Make an MR and work 6 sc. Pull the ring closed, join and ch 1. (6)
- Rnd 2: Inc in every stitch. Join. (12)
- Rnd 3: Sc in each stitch around. Join. (12)
- Rnd 4: *Sc 2, dec*, repeat around. Join. (9)
- Change to yellow, join with a sl st and ch 1.
- Rnd 5–8: Sc in each stitch around in yellow. (9)
Cut the yarn with a long tail. Stuff lightly so the horn keeps its shape, then make a second horn the same way.
Step 8: Make the Legs (Feet, Make 2)
The legs start in black, then change to white, then to yellow.
- With black, Rnd 1: Make an MR and work 6 sc. Close the ring, join and ch 1. (6)
- Rnd 2: Inc in every stitch. Join and ch 1. (12)
- Rnd 3: *Sc, inc*, repeat around. Join and ch 1. (18)
- Rnd 4: Sc in each stitch around. (18)
- Change to white by pulling it through the loops on the top edge of the last round. Join with a sl st, tighten and ch 1.
- Rnd 5–6: Sc in each stitch around in white. Cut the black yarn. (18)
- Change to yellow in the same way. Join and ch 1.
- Rnd 7: *Sc 4, dec*, repeat around. (15)
- Rnd 8–9: Sc in each stitch around. (15)
- Rnd 10: *Sc 3, dec*, repeat around. (12)
- Rnd 11–12: Sc in each stitch around. (12)
Cut the yarn with a long tail, stuff firmly, and make a second leg.
Step 9: Make the Arms (Hands, Make 2)
Work the first 12 rounds exactly like the legs in Step 8. The arms are a little longer, so add extra rounds of 12 sc in yellow before you cut the yarn. Leave a long tail and stuff well.
Step 10: Make the Spots (Black, Make 9)
Make an MR and work 12 sc inside it. Pull the tail tight to close the ring. Join to the first sc with a sl st, ch 1 and cut the yarn. The video uses 9 spots, but you can make as many as you like, or skip them.
Step 11: Make the Tail
- Tail: Fold your yellow yarn into three strands and make a slip knot. Ch 6, then cut the yarn. Make it longer for a longer tail. For a simpler option, braid the strands instead.
- Tuft: Take black yarn, fold it four times, and cut it to the length you want. Attach the folded loops to the end of the tail.
- Cut the bottom ends in small steps so the tuft looks natural. Pull all the strands through the end of the chain with your hook, then pull tight from the other side.
- Hide the loose thread, trim any uneven ends, and tidy the tuft. If you like, tie a tight knot at the end to lock the strands in.
Step 12: Put It Together
- Add a little stuffing to the muzzle so it keeps its shape.
- Pin the muzzle, ears, horns, arms, legs and tail to the body.
- Attach the safety eyes above the muzzle before you sew on the head parts.
- Thread your needle with yarn that matches the part you are sewing, so white does not show on yellow.
- Sew each piece on with small, neat stitches, and pull out the pins as you go.
- Tie off with a knot and hide the thread inside the giraffe.
- Sew on your spots wherever you like.
Video Tutorial
Planning the Spot Placement
These are general ideas, not part of the video.
- Pin before you sew: Pin all 9 spots on the body and step back to check the layout.
- Mix it up: Spots that sit at different angles look more natural than neat rows.
- Take a photo: Snap a picture of your final layout so you can repeat it on a second giraffe.
Safety and Mounting
Hang or place the giraffe high, out of a child’s reach, and check the stitching regularly. Do not give it to a child as a toy.
Common Mistakes to Avoid
- Stuffing too late: Stuff the head after round 18 and the body after round 47. The opening gets smaller every round.
- Skipping stitch counts: Always count at the end of each round.
- Joining every round: It leaves a visible seam. Only join where the pattern says to.
- Sewing with the wrong color: Use yarn that matches each part, so white does not show on yellow.
Troubleshooting
- Floppy neck: Take out the stuffing and refill in small pieces so the neck is firm. Loose stitches also let it bend, so try a hook one size smaller.
- Lopsided head: A missed increase or decrease is the usual cause. Recount and redo from the mistake.
- Stuffing shows: Your hook is too large or your tension is too loose. Go down a hook size.
Personalization Ideas
- Match the room: Choose body and spot colors that go with the room’s existing tones.
- A pair: Make two giraffes for the two sides of a window. Use the same dye lot, hook, and amount of stuffing so they match.
- Fewer or more spots: Make as many spots as you like, or skip them for a plain giraffe.
Love giraffes? Try this crochet giraffe amigurumi pattern for a matching plush, or add a crochet bunny box for cute nursery storage.
Washing and Care
Follow your yarn label. Spot clean gently and dry flat. Because the giraffe uses light and dark yarns together, test a scrap for color bleeding first.
Frequently Asked Questions
Is the giraffe safe for a baby’s room?
Only as decoration. Curtain tiebacks count as a loop hazard, so mount it high and out of reach, and never give it to a child as a toy.
What colors does the giraffe use?
Yellow for the head, body, ears, legs and arms, white for the muzzle, and black for the horn tips, hooves, spots and tail tuft.
How many rounds is the body?
The head and body together take 50 rounds, with the head and neck first and the body closing at the bottom.
Can I use any yarn?
Yes, but the size and how much stuffing shows will change. Make a swatch first.
Stand Your Giraffe Tall
Count your stitches at the end of each round, stuff in small pieces, and your giraffe will stand tall. Each one comes out a little different, and that is part of the charm. Happy crocheting!