
The Joy of Yarn and Creation
There’s a kind of magic in crochet that simple rhythm of looping yarn into something tangible and full of personality. It’s a quiet art form that turns soft strands into adorable characters, each carrying a bit of your creativity and care. The satisfaction of finishing a handmade project feeling its weight in your hand is something only crafters truly understand.
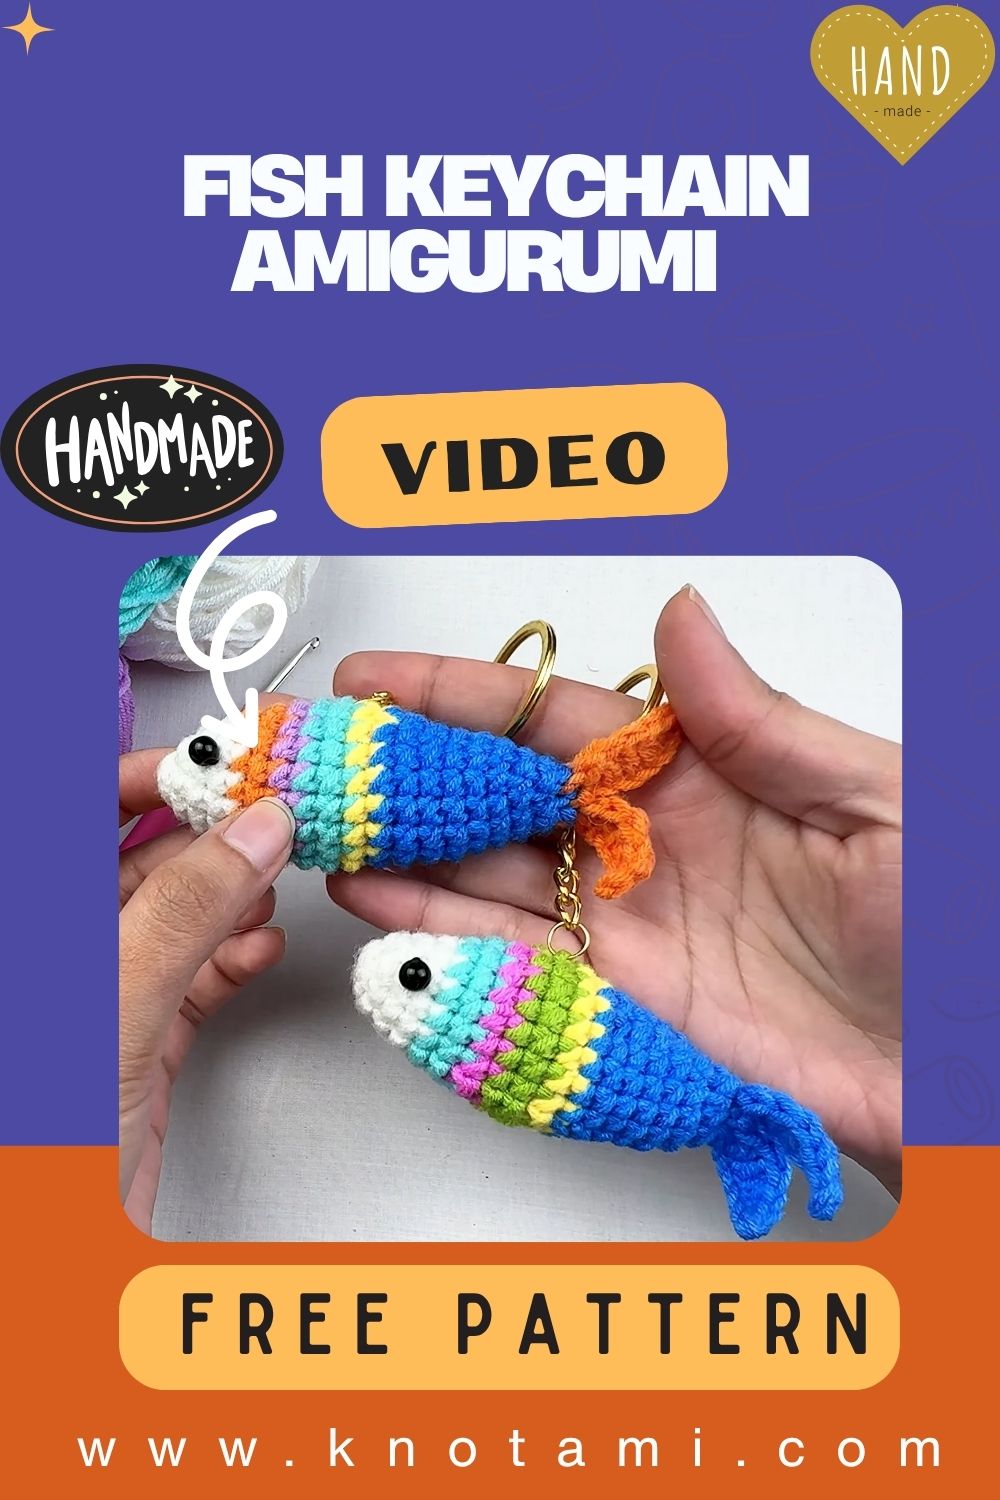
Meet the Crochet Cute Fish Keychain
In this project, we’ll be making a Mini Crochet Cute Fish Keychain, a small, vibrant amigurumi that captures the charm of the sea. Its plump body, fluttering fins, and cheerful expression make it an instant favorite among keychain lovers. Whether you’re adding it to your bag, keys, or gifting it to someone special, this little fish is guaranteed to make waves of smiles wherever it goes.
A Fun Make for Any Skill Level
This pattern is wonderfully versatile easy enough for beginners to enjoy while offering enough creative freedom for advanced crocheters to play with. You’ll learn how to shape curves, create symmetrical fins, add facial details, and assemble small parts with precision. Plus, it’s the perfect stash-busting project you can make a whole school of fish in different colors using leftover yarn!
The Art of Slow Crafting
There’s something deeply calming about crocheting mini amigurumi pieces. The repetition soothes the mind, and each finished fish becomes a token of patience and creativity. Whether you craft during quiet evenings or weekend mornings, this fish keychain invites you to slow down and enjoy the flow stitch by stitch until your little ocean friend comes to life.

Materials & Tools
Here’s everything you’ll need to crochet your mini fish keychain:
-
Yarn Type & Weight:
Use cotton or acrylic yarn in DK (Light #3) or Worsted (#4) weight. Cotton provides crisp stitch definition, while acrylic gives a soft, bouncy feel. -
Hook Size:
-
2.5 mm to 3.0 mm for DK yarn
-
3.0 mm to 3.5 mm for Worsted yarn
Use a smaller hook than recommended on the yarn label to keep stitches tight.
-
-
Stuffing:
Polyester fiberfill just enough to give the fish a firm, rounded shape. -
Safety Eyes:
6 mm to 8 mm (depending on fish size). You can also embroider eyes for a baby-safe option. -
Scissors & Tapestry Needle:
For cutting and weaving ends neatly. -
Stitch Marker:
Essential for keeping track of rounds, especially in spiral crochet. -
Keychain Hardware:
Small split ring and short chain (with jump ring).
Yarn & Color Tips
-
Choose contrasting colors for the body, fins, and tail to make your fish pop.
-
Pastel combinations (like mint and coral) are soft and cute, while bright tropical tones (like turquoise and yellow) add energy.
-
Using variegated yarn creates beautiful natural gradients that mimic real tropical fish patterns.
Step-by-Step Crochet Instructions
Abbreviations:
MR (Magic Ring), sc (single crochet), inc (increase = 2 sc in same stitch), dec (invisible decrease), sl st (slip stitch), ch (chain).
Work in continuous spiral rounds unless stated. Move your stitch marker up each round.
1. Making the Head
With main color (e.g., coral or turquoise):
-
MR, 6 sc (6)
-
inc around (12)
-
(sc, inc) ×6 (18)
-
(2 sc, inc) ×6 (24)
-
(3 sc, inc) ×6 (30)
6–8. sc around (30 each)
Insert safety eyes between Rounds 5–6, leaving about 5–6 stitches apart.
Start light stuffing behind the eyes to shape the head nicely.
2. Forming the Neck & Upper Body
-
(3 sc, dec) ×6 (24)
-
(2 sc, dec) ×6 (18)
-
(sc, dec) ×6 (12)
-
sc around (12)
Stuff gently as you go firm, but not too tight. This section should taper slightly for a natural fish head shape.
3. Building the Main Body
-
(sc, inc) ×6 (18)
-
(2 sc, inc) ×6 (24)
15–18. sc around (24 each) -
(2 sc, dec) ×6 (18)
-
(sc, dec) ×6 (12)
-
dec ×6 (6), sl st to close.
Stuff firmly but leave space at the end for attaching the tail. Shape the body into an oval, gently pinching the front and back ends to emphasize the fish silhouette.
4. Shaping the Tail
With contrasting color (e.g., white or yellow):
-
Ch 6, sl st in 2nd ch from hook, sc in next 2, hdc in next, dc in last, ch 1, sl st back into first stitch.
-
Repeat the same again to form the second fin on the same base.
-
Fasten off with a long tail and sew onto the back of the fish’s body.
Alternative round tail (plumper style):
-
MR, 6 sc (6)
-
(sc, inc) ×3 (9)
-
sc around (9), flatten, sew at an angle for a playful wag.
5. Creating the Fins
Side Fins (make 2)
With contrasting or matching color:
-
MR, 5 sc (5)
-
(sc, inc) ×2 + sc (7)
-
sc around (7)
Flatten, fasten off with a long tail.
Sew to each side of the body (around Rounds 10–12).
Top Fin (Dorsal)
With main color or bright accent:
-
Ch 7, sc across (6)
-
Turn, (sc, inc) ×3 (9)
-
sl st along base to create a wavy edge.
Sew on top center of the fish body, curving slightly backward.
Bottom Fin (Optional)
Ch 5, sc across (4), sew to underside near the belly line for added realism.
6. Assembly & Positioning
-
Attach the tail securely to the end of the body.
-
Sew the side fins symmetrically. Use pins to check placement before stitching.
-
Add the top fin slightly forward of center.
-
If using safety eyes, secure washers tightly inside; if embroidering, add eyes now with black thread.
-
Embroider a tiny smile under one eye or a small dot for a bubble-blowing look.
Pro tip:
Keep your thread ends inside the stuffing cavity. Tug gently to hide knots and create a smooth surface.
7. Adding Final Touches
-
Cheeks: Sew or glue small felt circles or embroider soft pink blush.
-
Stripes: Surface crochet a few lines along the body using white or darker yarn.
-
Tiny bubbles: Embroider small dots near the eyes for a cute “underwater” vibe.
-
Keychain attachment: Thread strong nylon thread or yarn through the top of the head, attach to a jump ring, and secure the keychain chain.
Customization Ideas
-
Color Variations:
-
Tropical Fish: Bright orange + yellow fins + blue stripes.
-
Ocean Blues: Teal + white + silver accent.
-
Pastel Dream: Lavender + baby pink fins.
-
Goldfish Style: Golden orange + white tail.
-
Rainbow Fish: Use gradient yarn for multicolor scales.
-
-
Different Yarn Types:
-
Cotton: Crisp and defined shape.
-
Acrylic: Soft and plush, perfect for keychains.
-
Velvet or Chenille: Ultra-soft, stuffed toy texture.
-
Metallic Thread: For shimmer, use as a secondary strand.
-
-
Themed Versions:
-
Holiday: Red and green stripes with a Santa hat.
-
Birthday: Tiny balloon prop or party hat.
-
Underwater Set: Make multiple fish in various sizes for a “mini aquarium keychain” effect.
-
-
Add-Ons:
-
Tiny bowtie or flower accessory.
-
Glitter eyes or embroidered hearts.
-
A micro “bubble trail” using clear beads attached to thin wire.
-
Advanced Tips & Troubleshooting
-
Invisible Decrease:
Insert hook through the front loops of the next two stitches, yarn over, pull through both loops, yarn over again, pull through both. Keeps the surface smooth. -
Even Stitch Tension:
Keep your yarn hand relaxed. If your fish looks stiff, loosen up slightly; if it’s floppy, tighten your grip. -
Prevent Twisted Rounds:
Always check the first two rounds lie flat. If it curls too early, your tension is too tight. -
Stuffing Balance:
Add fiberfill in small tufts; too much at once creates lumps. The head should be slightly firmer than the tail for realistic shape. -
Joining Parts:
Use ladder stitches for invisible seams. Match yarn color to each part for a clean finish. -
Reading Abbreviations:
Keep a note nearby:-
MR = Magic Ring
-
sc = single crochet
-
inc = increase
-
dec = decrease
-
sl st = slip stitch
-
ch = chain
-
-
Fixing Uneven Shapes:
Roll the fish gently between your palms to even out the stuffing. -
Tail Alignment:
If the fish leans sideways, move the tail slightly higher or lower until it balances upright. -
Color Change Technique:
Switch colors on the last yarn-over of the stitch before the new color to avoid a visible jog. -
Baby-Safe Modifications:
Replace safety eyes with embroidered stitches and skip metal parts (no keyring).
Care Instructions
-
Washing: Hand wash gently in lukewarm water with mild detergent.
-
Rinsing: Press (don’t wring) excess water out using a towel.
-
Drying: Air dry flat; shape fins while damp.
-
Avoid: Direct sunlight or heat dryers (fades colors, melts acrylic).
-
Storage: Keep in breathable pouches; avoid moisture.
-
Maintenance: Check keychain hardware occasionally for loose parts.
Display & Gift Ideas
-
Home Décor: Hang from a shelf, display jar, or mobile for an oceanic vibe.
-
Kid’s Room: Cute accessory for bags, pencil cases, or curtain ties.
-
Desk Buddy: Brighten your workspace with a smiling fish beside your computer.
-
Holiday Ornament: Add a hanging loop and make it a Christmas or summer-themed ornament.
-
Gifts: Perfect for friends who love the sea, scuba diving, or just adorable handmade crafts.
-
Event Favors: Make a batch for parties, baby showers, or ocean-themed weddings!
Benefits of Making a Crochet Cute Fish Keychain
-
Mindfulness & Relaxation: The rhythm of crochet helps ease anxiety and centers your mind.
-
Creative Expression: Customize colors, shapes, and details freely no two fish will ever be identical.
-
Sense of Accomplishment: Finishing a small project gives instant joy and motivation.
-
Eco-Friendly Gifting: Handmade items reduce waste and carry meaning.
-
Emotional Connection: Each fish carries time, care, and creativity a small treasure of affection.
Photography & Social Media Tips
-
Natural Lighting: Take photos near a window for soft, diffused light.
-
Backgrounds: Use neutral or blue-toned backgrounds to enhance color contrast.
-
Props: Add shells, sea glass, or yarn balls to create an underwater story.
-
Angles: Shoot from 45°, top-down, and close-up for texture detail.
-
Composition: Leave negative space for text if posting to social media.
-
Editing: Slightly increase brightness and sharpness keep colors true.
-
Video Ideas: Record the finishing touches, adding eyes, or attaching the keyring people love short progress clips!
Conclusion
The Mini Crochet Cute Fish Keychain Amigurumi is a perfect example of how a handful of stitches can create something delightful and meaningful. It’s small enough to finish in an evening, yet charming enough to gift, sell, or collect in sets. With every loop and color change, you’ll bring this tiny sea creature to life one that’s filled with joy, personality, and handmade magic.
So pick your favorite yarn shades, grab your hook, and dive into this fun ocean-inspired project. Before long, you’ll have a cheerful little fish swimming along your keyring a reminder that even the smallest creations can make the biggest smiles.