
There’s a quiet magic in watching yarn transform beneath your fingertips. Loop by loop, the soft glide of the strand and the gentle tap of the hook turn simple stitches into something real something you can hold. Crochet invites us into a mindful rhythm where imagination becomes tactile, where a cozy evening yields a tiny treasure. It’s art you can carry in your pocket, hang from your bag, or gift to someone who needs a little joy.
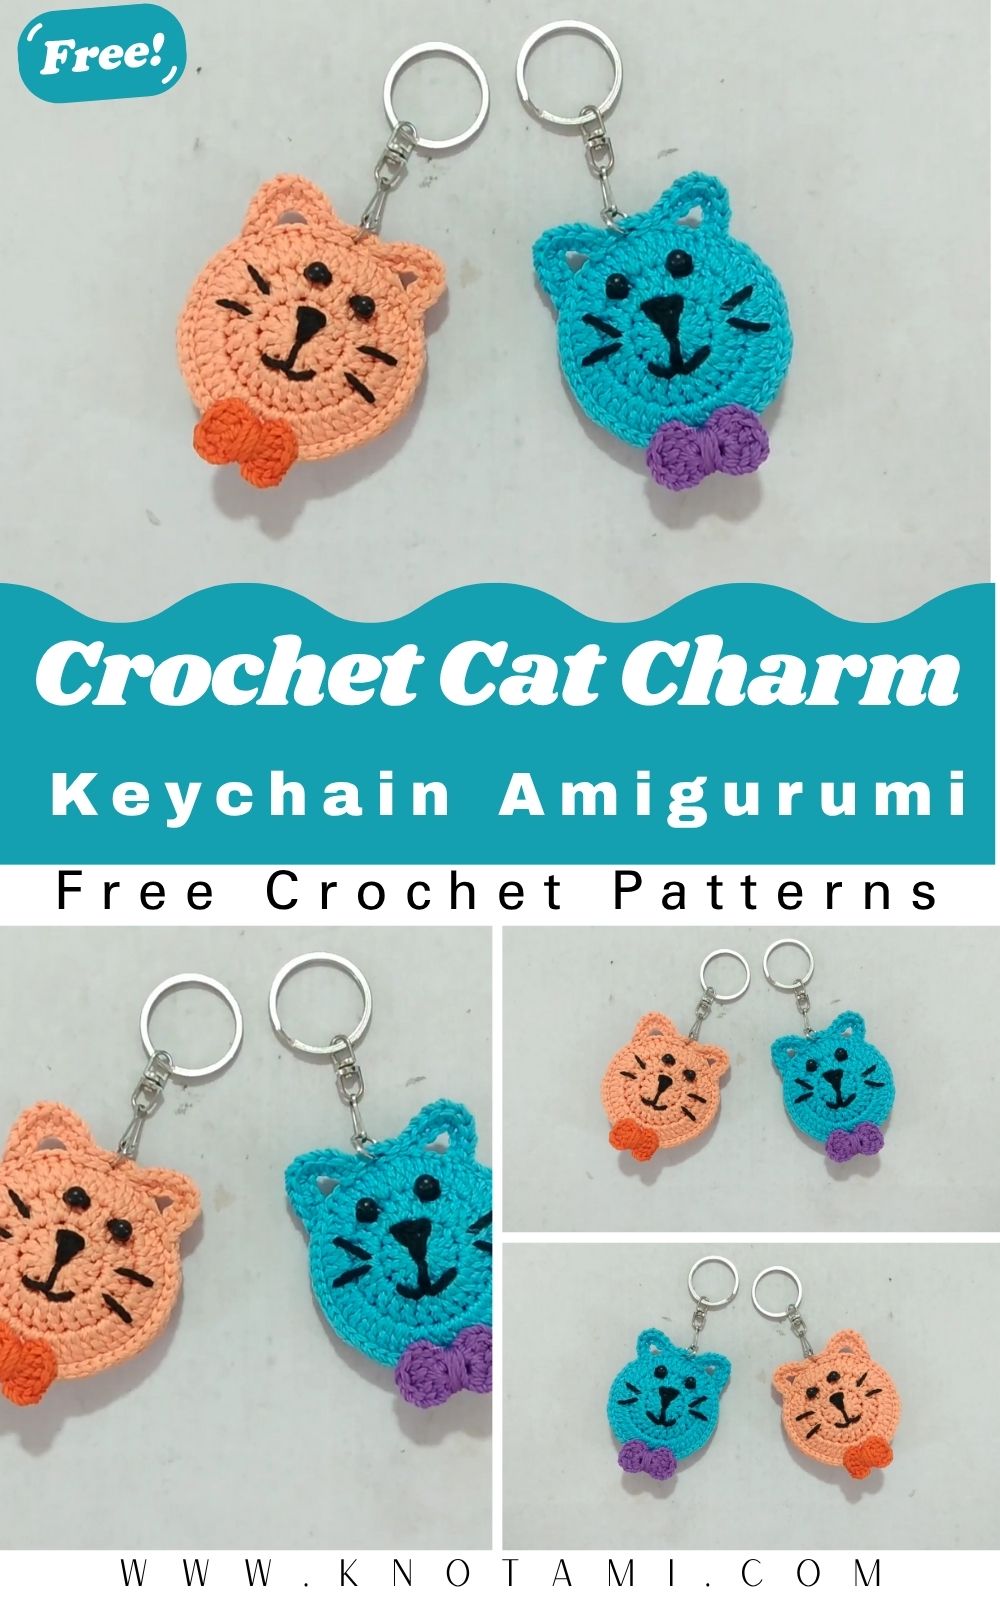
Today’s project the Crochet Cat Charm Keychain captures that magic in miniature. With a round little head, pointy ears, plump body, and a cheerful swish of a tail, this tiny kitty packs a surprising amount of personality into a palm-sized companion. Add a dainty collar, embroider whiskers, or give it sleepy eyes each choice makes your cat unmistakably yours. As a keychain, it’s durable, lightweight, and irresistibly cute.
This pattern welcomes all skill levels. If you’re new to amigurumi, you’ll practice the essentials magic ring, working in spirals, increases, invisible decreases, and neat assembly without being overwhelmed. If you’re an experienced crocheter, you’ll enjoy the clean shaping, optional colorwork, and styling possibilities (think tuxedo patches, calico spots, or a tabby muzzle). It’s also a fantastic stash-buster: tiny scraps become ears, paws, and charming add-ons.
Beyond the finished charm, there’s the craft itself: a soothing cadence of stitches, the soft scrunch of fiberfill, and that satisfying moment when a small face emerges from yarn. The Crochet Cat Charm Keychain is perfect for slow crafting and thoughtful gifting—a handmade bit of warmth that brightens daily routines and invites smiles everywhere it goes.
Materials & Tools
Gathering the right supplies ensures crisp stitches and a durable charm that stands up to everyday keychain life.
Essentials
-
Yarn (DK / Light worsted, Category #3):
-
Main color (MC) for body/head: e.g., cream, gray, black, ginger, or pastel
-
Contrast color (CC) for muzzle/ears/tail tip (optional): white, beige, or pink
-
Accent: a few inches of pink (nose/inner ear) and black or dark brown (whiskers/mouth)
-
-
Hook: 2.25–3.0 mm (choose the smallest size that gives tight, gap-free fabric with your yarn)
-
Stuffing: Polyester fiberfill (a small handful)
-
Safety eyes: 6 mm (embroider eyes if gifting to children under 3)
-
Tapestry needle: Blunt tip for sewing parts and weaving in ends
-
Scissors: Small and sharp
-
Stitch marker: To mark the first stitch of each round
-
Keychain hardware: Split ring or lobster clasp with short chain
-
Optional: Tiny bell/charm, fabric glue (micro-dots to secure knots), powdered blush/fabric-safe paint for cheeks
Choosing Yarn, Texture & Color Combinations
-
Cotton gives neat stitch definition and a firm, polished finish great for small parts like ears and muzzle.
-
Acrylic adds softness and squish nice for a rounder, plush look.
-
Keep all yarns the same weight for consistent gauge and proportional shaping.
-
Classic palettes: tuxedo (black + white), tabby (stone gray + cream), ginger (warm orange + beige), pastel kawaii (mint/pink/lilac with cream).
-
For high visibility on bags, choose a bright body and light muzzle for contrast.
Pro tip: If stuffing peeks through, switch to a smaller hook. Tight, even stitches are the secret to professional mini amigurumi.
Step-by-Step Crochet Instructions
Notes
• Work in continuous rounds (spirals) unless stated. Use a stitch marker for the first stitch of each round.
• Abbreviations: MR (magic ring), ch (chain), sl st (slip stitch), sc (single crochet), inc (increase: 2 sc in 1 stitch), dec (decrease use invisible decrease), FLO/BLO (front/back loop only), FO (fasten off).
• With DK yarn and a 2.75-3.0 mm hook, finished size is 6-8 cm tall (without hardware).
We’ll build the cat in compact pieces for clean shaping: head, ears (2), muzzle, body, legs (4), tail, then add facial details, accessories, and hardware.
1) Making the Head
-
Round 1: With MC, MR, 6 sc (6).
-
Round 2: inc around (12).
-
Round 3: (sc, inc) × 6 (18).
-
Round 4: (2 sc, inc) × 6 (24).
-
Rounds 5–7: sc around (24 each) for height.
-
Place safety eyes between Rounds 5–6, ~5–6 stitches apart (adjust for expression).
-
Round 8: (2 sc, dec) × 6 (18). Begin light stuffing.
-
Round 9: (sc, dec) × 6 (12).
-
Round 10: dec around (6). FO, close neatly and weave in.
Head Shaping Tip: Roll the head between your palms to smooth lumps and keep it round. Adjust stuffing gently around the eye posts for symmetry.
2) Ears (make 2)
Pointy Triangles for classic cat ears
-
Round 1: With MC, MR, 4 sc (4).
-
Round 2: (sc, inc) × 2 (6).
-
Round 3: sc around (6).
-
Round 4: (2 sc, inc) × 2 (8). FO, leave a tail for sewing. Do not stuff.
Optional inner ear: With pink, embroider a tiny V or sew a small felt triangle before attaching.
Placement: Sew ears on top of the head, slightly angled outward for a friendly look (or upright for “alert kitty”).
3) Muzzle
-
With CC (or white), MR, 6 sc (6).
-
Round 2: (sc, inc) × 3 (9).
-
Round 3: sc around (9). FO, leave a long tail.
-
Lightly stuff (just a whisper) and sew centered under the eyes.
Face embroidery: With pink, stitch a tiny triangle nose at the muzzle’s top. With dark thread, add a short vertical line from nose down, then curve smile lines left/right. Add 2–3 whisker stitches per side (optional).
4) Forming the Neck & Upper Body
Separate body (sewn to head):
-
Round 1: With MC, MR, 6 sc (6).
-
Round 2: inc around (12).
-
Round 3: (sc, inc) × 6 (18).
-
Round 4: (2 sc, inc) × 6 (24).
-
Rounds 5–7: sc around (24).
-
Round 8: (2 sc, dec) × 6 (18). Start stuffing evenly.
-
Round 9: (sc, dec) × 6 (12).
-
Round 10: dec around (6). FO, close and weave.
One-piece option (head + body):
Instead of fastening off the head at Round 8, expand again for the neck/body:
-
Next: (sc, inc) × 6 (18) → (2 sc, inc) × 6 (24) → 2–3 rounds even → decrease back down (18 → 12 → 6).
This reduces sewing but be sure to support the neck with stuffing pushed slightly into the head cavity.
Balance Tip: For a tidy silhouette, keep the body slightly shorter than the head’s height; this reads “kawaii” and hangs straighter as a charm.
5) Building the Main Body Base & Legs
Optional base ridge: After your last full body round at 24 stitches, work 1 round in BLO. This creates a subtle edge that helps the cat sit. Then begin decreases.
Legs (make 4):
-
Method A (simple nubs): MR, 5 sc, sl st, FO with tail. Flatten lightly, do not stuff.
-
Method B (paw dip): MR, 6 sc in CC for a toe-tip, then switch to MC and sc 1 round. FO.
Placement: Pin two legs near the front underside and two near the back so the kitty sits or hangs straight. Always pin before sewing to preview balance.
6) Tail
-
Curve Tail: ch 9–11, starting in 2nd ch from hook, sc across; FO with tail. Sew to the lower back, curving gently to one side.
-
Plush Tail (round): MR, 5 sc; next round sc around; FO. Lightly stuff and sew in place.
Durability Tip: Add one anchoring stitch into the body core so the tail resists tugging from daily keychain use.
7) Assembly & Positioning
-
Head ↔ Body: If separate, pin the head slightly overlapping the body’s top curve. Before final stitches, tuck a little extra stuffing at the neck junction. Sew with ladder stitches for an invisible seam.
-
Ears: Pin, check symmetry from multiple angles, sew with tiny whip stitches.
-
Muzzle: Center under eyes; sew using the long tail, easing edges flat.
-
Legs & Tail: Position, test balance on a flat surface, then sew.
-
Details: Embroider whiskers, brows, or eyelids for personality.
Professional Finish Tip: Weave yarn tails in several directions (3–4 passes) before trimming. This locks them so they don’t work loose with handling.
8) Adding Final Touches & Accessories
-
Collar: ch 28–34 (to fit), sc back, FO. Wrap around neck and tack at the back.
-
Bell/Charm: Sew a tiny bell or bead at the front center of the collar.
-
Bow: ch 12, Row 1: sc across; FO; fold center and wrap thread to cinch; sew near an ear or collar.
-
Back Patch/Tuxedo: Surface stitch or applique an oval on the chest or add a white belly patch (small oval worked flat).
Kawaii Tip: Blush the cheeks with a cotton swab and fabric-safe pigment, or embroider two tiny pink dots.
9) Attaching the Keychain Hardware
-
Choose a sturdy stitch at the top center of the head (between/behind ears).
-
Using doubled yarn or strong embroidery floss, pass through that stitch twice to form a loop.
-
Slide on the split ring or lobster clasp chain and knot securely.
-
Add a micro-dot of fabric glue to the knot; let it cure fully.
Hanging Balance Tip: If the charm tilts forward, move the loop slightly behind the head’s centerline, or anchor deeper into the stuffing core.
Customization Ideas
Alternative Color Schemes
-
Tuxedo: Black body, white muzzle/belly, pink nose.
-
Tabby: Gray body with embroidered darker stripes; cream muzzle.
-
Calico: White base with ginger and charcoal patches.
-
Pastel Kawaii: Mint or lilac body, cream muzzle, baby-pink nose.
-
Chocolate & Cream: Mocha body with beige accents and gold collar.
Different Yarn Types
-
Cotton: Crisp, structured, and durable for keychains.
-
Acrylic: Softer and squishier; great for chubby silhouettes.
-
Cotton + Metallic Thread (held together): Subtle sparkle for collars or bows.
-
Sport (#2) weight: Use a smaller hook for a micro-kitty charm.
Themed Versions
-
Holiday Kitty: Red scarf, green bow, jingle bell.
-
Valentine Kitty: Heart belly patch in rose pink.
-
Graduation Kitty: Tiny flat cap and tassel in school colors.
-
Sleepy Cat: Embroidered closed eyes and a nightcap.
Add-Ons & Tiny Props
-
Mini fish, yarn-ball applique, flower crown, or a tiny backpack (two straps sewn to the body).
Advanced Tips & Troubleshooting
-
Invisible Decreases: Insert hook through front loops only of the next two stitches, yarn over, pull through both loops, yarn over, pull through two. Results in smooth shaping with no holes.
-
Even Tension: Keep your hands relaxed. If fabric is stiff and warpy, go up 0.25–0.5 mm; if gaps appear, go down a size.
-
Prevent Twists: Always mark the first stitch and count each round; spiral drift can skew symmetry.
-
Stuffing Balance: Add small tufts gradually. Think firm marshmallow structured but squeezable. Overstuffing distorts spheres.
-
Shape Rescue: Gently massage pieces between palms to redistribute stuffing. A light steam through a damp cloth can reset fibers (no direct iron).
-
Seamless Joins: Use the ladder (mattress) stitch; color-match yarn to the piece you’re sewing.
-
Clean Color Changes: If adding patches in-round, change colors on the final pull-through of the stitch before the new color starts.
-
Reading Abbreviations: Keep a small reference card nearby MR, sc, inc, dec, sl st, FLO/BLO.
-
Eye Safety: For baby gifts, embroider eyes (satin stitch) instead of safety eyes.
-
Hardware Strength: Anchor the loop through multiple stitches at the head crown and into the stuffing core for load distribution.
Care Instructions
-
Hand wash gently in cool water with mild detergent.
-
Avoid soaking the metal hardware; wipe it dry promptly.
-
Do not wring. Press between towels to remove moisture.
-
Air dry flat in the shade; reshape ears and muzzle while damp.
-
Sunlight caution: Prolonged UV fades pastels store out of direct sun.
-
Long-term storage: Keep in a dust-free pouch/box; avoid crushing the tail/ears.
-
Refresh: If fuzz forms, carefully trim flyaways with small embroidery scissors.
Display & Gift Ideas
-
Bag & Key Charm: Clip to backpacks, totes, or zipper pulls for instant personality.
-
Desk Buddy: Sit the kitty near your monitor for a daily smile.
-
Home Décor: Arrange a trio (tuxedo, ginger, pastel) in a small dish or shadow box.
-
Kid’s Room Accent: Hang from a peg or mobile (embroidered eyes for safety).
-
Holiday Ornament: Add a longer loop; perch among twinkle lights.
-
Personalized Gift: Match a friend’s pet’s markings; add an initial on the collar.
-
Craft Fairs & Party Favors: Batch-make in assorted colors; include mini care cards.
Benefits of Making a Crochet Cat Charm Keychain
-
Relaxation & Mindfulness: Repetitive stitches quiet the mind and anchor you in the present.
-
Stress Relief: Small, fast finishes deliver a mood-boosting sense of progress.
-
Accomplishment & Joy: Watching a face emerge from yarn is pure maker happiness.
-
Eco-Friendly Gifting: Handmade, low-waste presents beat mass-produced trinkets.
-
Emotional Connection: A hand-stitched kitty carries your time, care, and intention.
-
Skill Building: Practice shaping, invisible decreases, neat seaming, and hardware attachment on a low-risk canvas.
-
Community & Sharing: Great for swaps, charities, or teaching someone their first amigurumi.
Photography & Social Media Tips
-
Natural Daylight: Shoot near a window; cloudy light is soft and flattering.
-
Clean Backgrounds: Neutral linen, light wood, or pastel poster board keeps focus on stitches.
-
Story Props: Add a tiny ball of yarn, your hook, scissors, or a miniature fish toy.
-
Angles:
-
Front close-up for face and muzzle
-
Side profile to show tail curve
-
Top-down to highlight ear placement and symmetry
-
-
Editing: Lightly brighten and increase contrast; avoid heavy filters that skew yarn colors.
-
Short Videos: Post a 360° spin, time-lapse assembly, or a before stuffing vs after reveal.
Conclusion
From the first magic ring to the last woven tail, the Easy Crochet Cat Charm Keychain is a pocket-sized celebration of creativity. It’s quick to make, endlessly customizable, and perfect for gifting a tiny companion stitched with love. As you attach the ears, embroider whiskers, and tie a sweet collar, you’ll watch your cat’s personality appear one detail at a time.
So choose your favorite colors, settle into your coziest corner, and let your hook purr along. In just a handful of peaceful rounds, you’ll turn yarn into a cheerful little friend that brightens every day dangling from your keys, peeking from a bag, or waiting on a shelf to make someone smile.