
This hot crochet halter crop top summer pattern offers instant style, a flattering fit, and playful elegance. Create a big fashion impact with less yarn, which is a great choice for vacations, street style, beach days, and rooftop cocktail nights.
Sun-chasing and confidence-boosting, the Warm Crochet Halter Crop Top Summer Pattern delivers easy stitches, breathable texture, and a flattering tie-back you can adjust in seconds. Because it’s worked in simple sections, beginners progress quickly while experienced makers customize cups, band width, and length with zero stress. 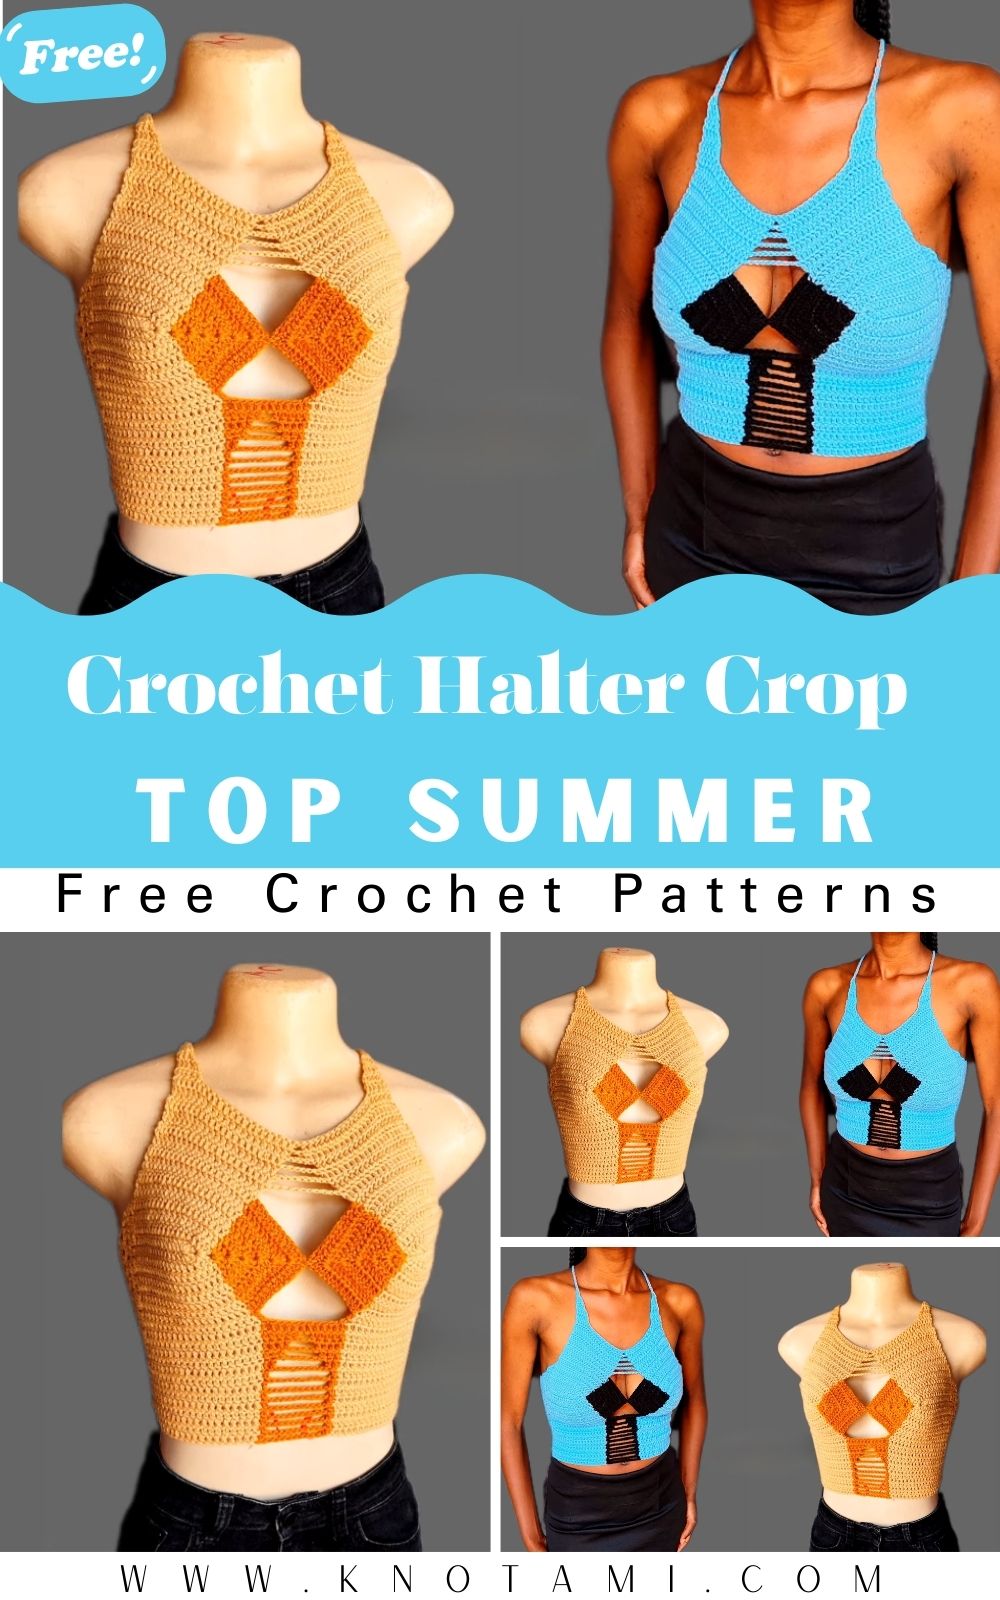
Moreover, the pattern shines in cotton or bamboo, so it feels cool on hot days and layers smoothly at night. Choose color-blocking, add a playful edging, and, consequently, create a chic staple that moves from beach to street without missing a beat.
- Festival-ready outfit
- Beach-day bikini topper
- Layer under a denim jacket
Warm Crochet Halter Crop Top Summer Pattern
Warm Crochet Halter Crop Top Summer Pattern: an easy, breezy make for sunshine days. This beginner-friendly halter works up quickly, looks polished, and feels soft and breathable. Because it’s adjustable, it flatters many body types. Moreover, you can customize color blocking, band width, and strap length without stress. For clear guidance, follow the step-by-step timeline below, which includes making times, sizing tips, and smart troubleshooting.
Bold style note and SEO cue: If you’ve been searching for a Warm Crochet Halter Crop Top Summer Pattern that’s truly wearable, this is it. It’s light, cute, and festival-ready, yet supportive enough for everyday outfits.
Materials and Measurements
- Yarn: Lightweight cotton or bamboo blend (sport/DK recommended for summer comfort). Choose two shades (main color and middle/contrast color). Additionally, use two balls of the contrast color so you never have to carry them under the main color.
- Hook: 3.5 mm crochet hook.
- Tools: Scissors, darning needle (for weaving and joining), tape measure, and optional stitch markers.
- Cup foundation chains by size:
- Small: chain 14 (plus 2 turning chains)
- Medium: chain 16 (plus 2 turning chains)
- Large: chain 18 (plus 2 turning chains)
- XL: chain 20 (plus 2 turning chains)
- Medium cup reference size from the video: approximately 15.5 length by 15 width (as stated). Because makers often read these as centimeters rather than inches, verify against your own tape and bust coverage before proceeding.
- Strap chains by size:
- Small: 200 chains
- Medium: 220 chains
- Large: 250 chains
- XL: 250+ as preferred
Sizing and Planning (Read Before You Start)
- Because cup depth determines your coverage, add or subtract rows on each cup to match your measurement. For medium, the video works about 8 rows; for small, stop when the cup reaches your desired height; for large/XL, add rows until the cup covers comfortably.
- Since the band and side panels provide underbust fit, measure your ribcage and add side rows until the total width fits with light negative ease (snug but not tight).
- If your yarn differs from the tutorial, swatch a quick 10 cm/4 in double crochet square. Then adjust the hook size to achieve a soft, not-too-stiff fabric and the cup size you want.
- Finally, always check fit after each major section; that way, you can tweak rows or chain lengths early.
Step-by-Step Instructions for Making Time
A. Make the Two Bra Cups (about 45–75 minutes each, depending on size and experience)
- Foundation and Row 1: Chain your size count, then add 2 turning chains. Starting in the third chain from the hook, work 1 double crochet (dc) in each chain across. Into the very last chain, place 3 dc to round the cup tip. Chain 1. Then continue along the opposite side of the foundation, placing 1 dc in each stitch to mirror the first side. Because symmetry matters, ensure the stitch count on this return side matches the first side.
- Row 2: Chain 2, turn. Work 1 dc in each stitch until the center chain-1 space. In that space, place 2 dc, chain 1, and 2 dc (this is the cup’s center increase). Then, dc in each stitch to the end.
- Row 3 and color change: Work across in the main color up to the last stitch before the chain-1 space, but do not complete the final pull-through. Instead, finish that DC with your contrast (middle) color. In the center chain-1 space, place 2 dc, chain 1, 2 dc in the contrast. On the last dc of the contrast section, finish the pull-through with your main color to continue neatly. Because you changed color on the last pull-through (not afterward), the transition stays clean.
- Row 4: Continue as established, keeping the contrast color only where needed near the center. Crucially, do not carry the contrast under the main color across the body of the cup; rather, use separate balls of the contrast for each side so the darker shade never shadows through the lighter shade.
- Repeat: For a medium cup, continue to Row 8 total, keeping the center increase at every row (2 dc, ch 1, 2 dc in the center). For small, stop earlier when the cup height equals your desired coverage. For large/XL, add rows for more depth. Then fasten off each working contrast strand cleanly (leave the outer main-color yarn attached if you prefer to move straight into the joining stage).
Tip: Pause to measure. Because the video’s medium cup measures about 15.5 by 15, check your cup over your bust and confirm the edges sit comfortably near the side seam without digging.
B. Join the Cups and Build the Decorative Center Panel (about 60–90 minutes)
- Join cups, Row 1: With the color that matches the outer edge of the first cup, dc across to the very last stitch of that color block. Now switch to the contrast, chain 10 to bridge the gap, then dc into the outermost stitch of the second cup. Continue DC across that second cup. This neat chain-10 span anchors your front center.
- Row 2: Chain 2, turn. Dc across the first cup. When you reach the chain span, place 1 dc in each chain (10 dc), then dc into the first stitch of the second cup and continue across. By the end, you should see a tidy strip of contrast dc centered between the cups (the video notes a total of 12 dc in the contrast segment, including adjacent stitches).
- Row 3 (begin opening pattern): Work inthe main color until the contrast block. In contrast, place 5 dc, chain 2, skip 2 stitches, then place 5 dc. Finish that last contrast dc by pulling through with your main color and continue across. This begins a stylish window in the center.
- Row 4: In the contrast block, place 4 dc, chain 4, skip 4, then 4 dc.
- Row 5: Place 3 dc, chain 6, then 3 dc.
- Row 6: Place 2 dc, chain 8, then 2 dc.
- Row 7: Place 1 dc, chain 10, then 1 dc.
- Rows 8–13: Repeat Row 7’s idea across the remaining rows as needed to reach 13 total rows for the center section (as per the tutorial). Consequently, you’ll get a graduated, airy lattice that looks chic and keeps the top breathable.
Color management note: Because you’re not carrying contrast under light stitches, the center panel remains crisp. Additionally, always switch colors on the final pull-through of the previous stitch for a clean edge.
C. Shape the First Side Panel and Lower Edge (about 60–90 minutes per side)
- Prep: After completing the center panel, cut only the middle color tails you no longer need. Keep the outer light color attached. Then rotate your work to begin along one side edge. From here onward, you’ll work the side in the light color only.
- Row 1 along the sides: Chain 2. Working into the ends of the cup rows, follow a tidy rhythm to maintain shape: place 2 dc in the first row end, 2 dc in the second row end, and 1 dc in the third row end, repeat (2, 2, 1) across. Because the tutorial leaves four rows unworked near the cup’s center point, stop when you’re four rows shy of the very center. This keeps the underbust angle flattering.
- Row 2 (mesh setup): Chain 2, turn. Skip the first stitch, dc in the next stitch, dc in the next; chain 1, skip 1, then dc in each of the next two stitches. Continue this two-dc, chain-1 rhythm across. This creates a breathable mesh that keeps the fabric cool.
- Row 3 (mesh growth): Chain 2, turn. Into each chain-1 space, place 2 dc; chain 1, then 2 dc in the next chain-1 space, and so on. Stop at the second-to-last chain-1 space. In the final space, place only 1 dc. This taper keeps the edge neat.
- Row 4: Chain 2, turn. Place 1 dc in the first small space you just created, chain 1, then resume “2 dc in space, chain 1” across. Place 2 dc into the very last edge space. This alternating start/finish keeps the edge straight and professional.
- Rows 5–10: Repeat the Row 3/Row 4 logic, alternating where you start with 1 dc versus 2 dc, and always remembering the chain-1 between groups. Because consistency matters, count your groups to keep both sides matching.
- Row 11 (decorative loops): Chain 3 to begin. Then, in the next chain-1 space, place 2 dc. Do not chain 1 between every pair now; instead, work pairs of 2 dc back-to-back for a few spaces, then chain 2 before the next pair to create six evenly spaced loops along the edge. Finally, place 1 dc in the last small space. This row creates strong lower loops you can thicken or leave as-is.
- Optional reinforcement: Chain 1, turn, and slip stitch across every stitch and across each chain-2 gap. This quick pass adds structure and durability to the loops at the lower edge.
Repeat the entire side-panel sequence on the other side (about 60–90 minutes). Consequently, both sides will mirror cleanly, supporting the bust and framing the center feature.
D. Build the Upper Band (about 35–55 minutes)
- Row 1: With the right side facing, attach the light color at the upper outer corner of the first cup. Chain 2, then dc across the top edge to the inner corner. Chain 10 to bridge the neckline gap, then dc into the first stitch across the top of the second cup and continue to the outer edge.
- Row 2: Chain 2, turn. Dc across the first cup’s top. When you reach the neckline gap, chain 8 (instead of 10), then continue dc across the second cup.
- Row 3: Work the same idea, but reduce the center chain to 6.
- Row 4: Reduce the center chain to 4.
- Row 5: Reduce the center chain to 2.
- Row 6: Finally, do not chain between the cups; instead, dc straight across for a solid, supportive halter neckline. Because this gradual chain reduction shapes the neckline, it sits smoothly while still feeling flexible.
E. Straps and Ties (about 20–35 minutes per strap plus chain time)
- First strap base: Without cutting yarn, chain 2 and turn. Work 5 dc across from the outer edge inward to form the strap base.
- Row 2: Chain 2, turn. Work a dc decrease (dc2tog) over the first two stitches. Then work 1 dc in each of the remaining stitches to make a total of 4 stitches.
- Row 3: Chain 2, turn. Dc in the first two stitches. Then dc2tog over the last two stitches to reduce to 3.
- Row 4: Chain 2, turn. Dc2tog over the first two stitches, then dc once in the last stitch (now you’re at 2 stitches).
- Row 5: Chain 2, turn. Dc2tog over those last two stitches to form a single, sturdy anchor stitch.
- Chain tie: For strength, add one more strand (so you’re working with three strands). Then chain your size count (200 small, 220 medium, 250 large/XL). Because thicker ties feel better on the neck, three strands make a comfortable, durable cord. Fasten off and weave the extra strand tails neatly into the strap base.
- Second strap: Attach yarnton the opposite top corner and mirror the exact steps.
F. Finishing and Joining (about 20–35 minutes)
- Clean up: Weave in all ends through matching colors only. Consequently, nothing peeks through.
- Back/center join: With a short length of the contrast/dark yarn and a darning needle, join the matching chain-1 spaces where indicated by your fit preference (the tutorial stitches a few discreet joins through the small chain-1 spaces to stabilize the center or back as desired). Because everybody is different, adjust the tightness of these joins so the top hugs without gaping.
- Final check: Slip on the top, tie the neck cords, and cross the lower ties through the reinforced loops if you added them. Then adjust tension until the bra cups sit smoothly and the underbust band feels secure.
Basic Tips for Success
- Switch colors on the last pull-through: Always finish the previous stitch with the new color. Therefore, your color transitions stay crisp with no jogs.
- Use two balls of the contrast color: Instead of dragging a single contrast strand under light stitches, park a small contrast ball on each side. Consequently, the darker shade never shadows through the lighter cup.
- Mark your center chain-1 spaces: A small stitch marker helps you never miss the cup increase point.
- Check fit often: After cups, after the center panel, and after each side panel, hold the piece to your body. Because crochet has minimal stretch lengthwise, it’s smart to fit as you go.
- Keep edges flat: Slip-stitch reinforcements along the bottom loops add structure. Additionally, a light steam block (hover only) helps relax cotton stitches and even out the mesh.
Common Mistakes and Quick Fixes
- Carrying contrast yarn under the main color: This causes color “ghosting.” Instead, use separate contrast balls and never run them under light areas.
- Switching colors too late: If you swap after completing a dc, the join blurs. Therefore, redo the stitch and switch on the final pull-through.
- Miscounting chain gaps in the center panel: If the lattice looks uneven, rip back only the contrast section for that row and redo the chain/skip count (2, then 4, then 6, then 8, then 10).
- Over-tight chains between cups: If the neckline pulls, add a chain or two on that row. Conversely, if it gaps, remove one or two chains.
- Uneven side edges: If the (2, 2, 1) rhythm along the row ends wanders, your edge will ripple. Pause, count, and adjust on the next row by placing one fewer dc at the end of the row to flatten.
- Strap cords too thin: If two strands feel diggy on your neck, add a third strand before chaining. Consequently, the tie becomes softer and stronger.
Easy Variations
- Single-color minimalism: Work the entire piece in one shade for a sleek, modern look.
- Bold color blocking: Keep the cups light, the center panel dark, and the side panels striped.
- Sparkle edge: Add beads to the final slip-stitch pass along the lower loops for a subtle shimmer.
- Picot trim: Instead of slip stitches on the last side row, work a picot every two spaces for a playful finish.
- Longer band: Add more side rows for a mini-cami length. Consequently, you can pair it with high-waisted jeans or a flowy skirt.
- Back lacing: Thread a thin cord through the lower loops for corset-style adjustability.
Sizing Tips at a Glance
- Bust coverage begins at the cup: Increase or decrease the number of cup rows until the height reaches your comfort level. Because everyone’s curve is different, ignore strict row counts and trust the tape measure.
- Bridge distance matters: If your cups sit too close together, reduce the initial chain to 10 to 8. If they feel too far apart, add chains. Therefore, the center looks intentional, not stretched.
- Underbust fit lives in the side panels: Add or remove side rows until the total width equals your underbust circumference with 2–5 cm (about 1–2 in) of negative ease.
- Strap length is personal: Start with 200–250 chains depending on size, then try on. If you prefer a bow with longer tails, add 20–40 chains. Conversely, if you want a tight knot, subtract 10–20.
- Yarn choice changes everything: Lighter cotton (sport) yields a softer drape; DK gives slightly more coverage. Adjust the hook size up or down 0.5 mm to keep the fabric supple, not stiff.
Care and Wear
- Wash gently in cool water and lay flat to dry. Because cotton can relax slightly and reshape while damp.
- For travel or festivals, roll it, don’t fold it. Additionally, keep ties bundled with a small hair elastic to prevent tangles.
Estimated Total Making Time
- Cups: 1.5–2.5 hours total (two cups, depending on size)
- Join and center panel: 1–1.5 hours
- Side panels and loop reinforcement: 2–3 hours total (both sides)
- Upper band: 35–55 minutes
- Straps and chain ties: 1–1.5 hours (both sides)
- Finishing: 20–35 minutes
Overall: About 6–9 hours for beginners, faster if you’re already comfortable with double crochet and color changes.
Final Friendly Note
You’ve now got a complete, beginner-friendly Warm Crochet Halter Crop Top Summer Pattern with intuitive shaping, clean colorwork, and adjustable comfort. Because the steps flow logically and because each section includes a time estimate, you can pace your project across a weekend or spread it out over a few evenings.