Crochet Small Dog Scarf Coaster Amigurumi Pattern
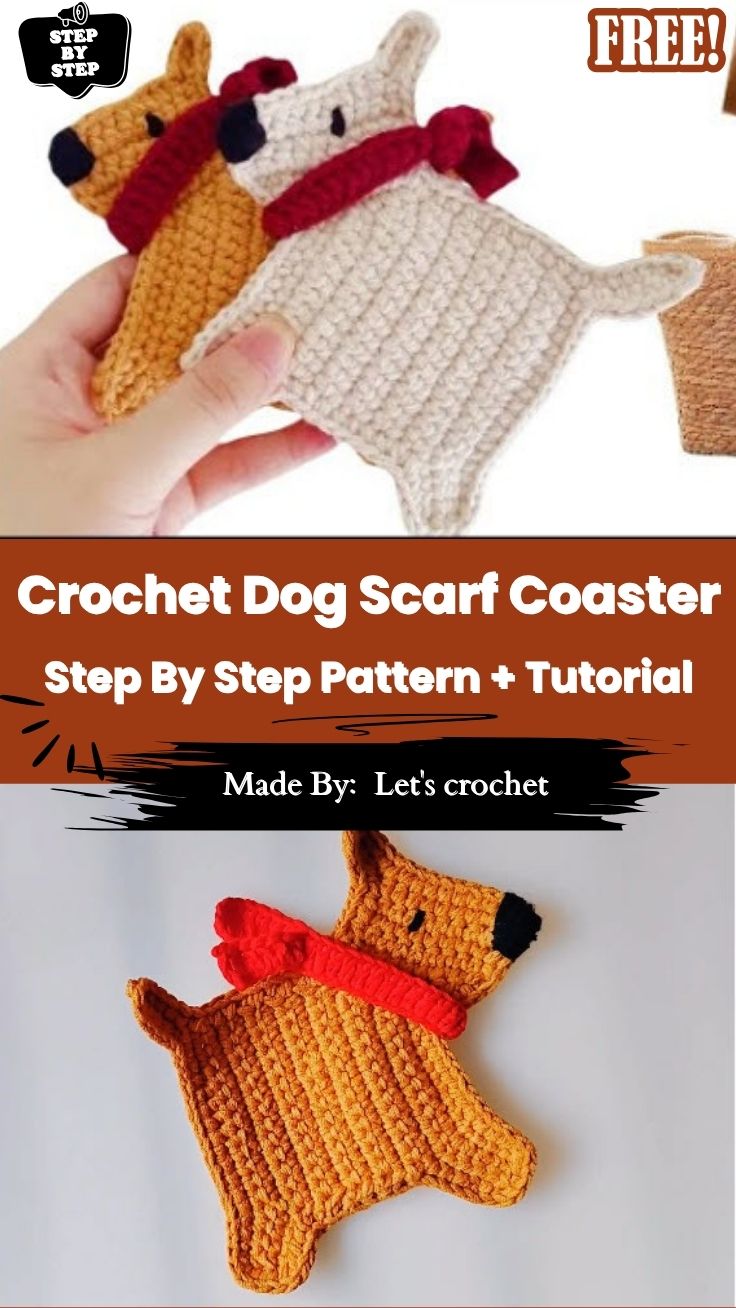
A floppy-eared pup in a little red scarf sitting flat under your morning coffee. This Crochet Small Dog Scarf Coaster Amigurumi Pattern turns golden and cream yarn into a coaster that’s half kitchen helper half tiny dog portrait. Make one for your own table or a pair for the dog lover who has everything.
The coaster is built from two flat panels so it stays low under a mug. Most tutorials rush past the two things that make or break it: getting both panels to match exactly and adding the scarf without a bulky ridge. Both get proper attention below.
How Long It Takes
- Face panels: 20 to 30 minutes each
- Ears and muzzle: 15 to 20 minutes
- Scarf: about 10 minutes
- Assembly and finishing: 15 to 20 minutes
Materials
- Yarn: worsted weight cotton in golden tan (face and ears), cream (muzzle) and red (scarf). One coaster uses roughly 15 to 25 grams of the main color, which is about 25 to 40 yards of most worsted cotton, plus small amounts of the other two colors.
- Hook: 3.5 mm to 4 mm, a little smaller than the yarn label suggests.
- Face details: black yarn or embroidery floss for the eyes and nose.
- Tools: yarn needle, stitch markers, pins and scissors.
Cotton is the better choice for anything that sits under drinks. It holds its shape under repeated pressure, soaks up drips and washes clean. Acrylic works for a display piece and comes in brighter colors, but it flattens and stretches more over time. Not sure your yarn is really worsted? The Craft Yarn Council yarn weight chart will help you check.
Abbreviations (US Terms)
- ch = chain
- sc = single crochet
- inc = increase (2 sc in one stitch)
- sl st = slip stitch
- st(s) = stitch(es)
Before You Start
This coaster isn’t stuffed. Two matching face panels are joined around the edge with nothing in between. Even a little filling makes the center dome, and then your mug wobbles.
Everything here is single crochet, so the real skill is steady, firm tension. Work a small test circle first. If it cups or ruffles at the edge, change your hook size before starting the real panels.
Crochet the Coaster Pieces
Face Panels (golden tan, make 2)
Both panels are worked as a flat circle, adding 6 stitches every round. Spread out the increases, so the edge stays round instead of turning into a hexagon.
- Rnd 1: 6 sc in a magic ring (6 sts).
- Rnd 2: inc in each st around (12 sts).
- Rnd 3: (sc, inc) 6 times (18 sts).
- Rnd 4: (sc, inc, sc) 6 times (24 sts).
- Rnd 5: (3 sc, inc) 6 times (30 sts).
- Rnd 6: (2 sc, inc, 2 sc) 6 times (36 sts).
- Keep adding 6 stitches a round, with one more sc between increases each time, until the panel is the size you want. A standard coaster is about 10 cm (4 inches) across, which is usually around Rnd 8 or 9 in worsted cotton. Follow the video for the exact finish.
- Fasten off. Make the second panel with exactly the same number of rounds.
Pro Tip: Stack the two panels before going further. If one is bigger, pull it back to where they differ. Don’t try to ease a mismatch together at the seam, because that’s the number one reason coasters end up lopsided.
Ears (golden tan, make 2)
Work each ear as a small, flat teardrop shape that hangs down beside the face, as shown in the video. Leave a long tail for sewing. Keep them the same length, because on a flat face even a small difference is easy to see.
Muzzle (cream, make 1)
Work a small flat oval, as shown in the video. It should cover roughly the lower third of the face. Leave a tail for sewing.
Scarf (red, make 1)
- Chain enough to stretch across the bottom of the face, plus a few extra chains for a short hanging tail.
- Work 1 or 2 rows of sc to make a narrow strip.
- Keep it a single layer. A folded or doubled scarf raises a ridge at the neck and tips your cup.
Watch the Video Tutorial
The video shows the ear and muzzle shapes and where each piece goes on the face. Keep it open beside you while you work.
Put the Pup Together
- Sew the muzzle onto the lower half of one face panel, centered left to right. This becomes the front.
- Add the eyes. Embroider them just above the muzzle, leaving a small gap so the face doesn’t look crowded. Count stitches or rounds to line them up. Measuring by eye drifts easily at this size.
- Add the nose at the top of the muzzle once both eyes look level. Then step back and check the whole face.
- Join the panels. Hold the front and back together, wrong sides facing, and sl st or whip stitch around the edge through both loops. All the yarn ends from the face now sit hidden between the layers.
- Attach the ears at the upper sides of the head. Tack each one with a single loose stitch first, look at it from arm’s length, then sew it down for good.
- Add the scarf last. Lay it across the bottom of the face, below the muzzle, and let the tail hang to one side. Tack it with just a few small stitches at the ends and middle instead of sewing it down all the way.
If the scarf is a different color from the face, weave the color-change ends flat along the back of the work instead of knotting them, so no bumps show through on the front.
Keep It Flat With Blocking
If the finished coaster domes a little in the middle, dampen it lightly, lay it face up on a towel and pin the outer edge at 6 to 8 points. Let it dry completely before you unpin it. Blocking fixes small doming from seam tension. It can’t fix panels that were different sizes to begin with.
Common Mistakes
- Working the front and back panels to different round counts.
- Adding stuffing out of habit from other amigurumi.
- Stacking the increases in the same spot every round, which turns the circle into a hexagon.
- Doubling the scarf or sewing it on too tightly.
- Sewing the ears down before checking them against each other.
Troubleshooting
- Edge curls after finishing: try blocking before you give up on the panel. A light steam or a damp pin-and-dry flattens most small curls.
- Coaster sits crooked after joining: undo just the seam, not the panels, and rejoin with the smaller edge stretched slightly to match.
- Scarf bunches up: snip the tacking stitches and reattach with fewer, looser ones.
- Still wobbles after blocking: the cause is usually a thickness difference between the panels, or a doubled scarf. Blocking alone won’t fix that.
Size and Breed Variations
To make the coaster bigger or smaller, add or remove a full round on both panels, never just one. The ears and muzzle can grow or shrink by roughly the same amount.
Change the ears and colors to make different breeds. Try cream and brown for a classic puppy, black with white patches for a spotted dog, or solid grey with pointed ears for a schnauzer-style face. Leave the scarf off completely, and the face works as a plain dog coaster or as an appliqué for a pillow or tote bag.
Seasonal Scarf Swaps
The scarf is the only part that’s tacked on lightly, so you can change it without redoing the whole dog. Make a few extras and switch them through the year:
- Winter: red and white stripes. Change color every row for a candy-cane look that matches a crochet Christmas snowman on the same shelf.
- Spring: soft mint or lavender with a tiny crocheted flower tacked on one end.
- Autumn: mustard, rust or olive, all warm colors that suit a golden pup.
- Game day: your team’s two colors in wide stripes.
Keep the spare scarves in a small pouch with the coaster, and you’ve got a gift that changes with the seasons.
Care Instructions
Hand wash in cool water, press out the water in a towel without wringing, and lay flat to dry. Cotton handles warm mugs well. If you used acrylic, test it under a hot drink before relying on it, because some acrylics soften with heat.
Safety Note
For homes with small children or dogs that chew, stick to embroidered eyes and skip buttons or beads. Sew the ears and scarf on securely, so there’s nothing loose to pull off.
Gift and Pairing Ideas
- Matching set: crochet four pups in different breed colors for a full coaster set.
- Coffee lover bundle: pair the coaster with a crochet coffee cup keychain in the same yarn colors.
- Dog lover gift: add a playful crochet balloon dog amigurumi to the bundle.
- Pet pals set: for someone with a cat and a dog, include a crochet cat face keychain.
FAQs
Is this coaster stuffed?
No. It’s two flat panels joined with nothing in between, so it sits flat under a cup.
Can I use acrylic yarn instead of cotton?
Yes, but cotton holds its shape better and handles drips and warm mugs more reliably.
Why does my coaster dome in the middle?
Usually the tension is too tight for the number of increases, or the increases are stacked in the same spot every round. Try a slightly bigger hook, or stagger your increases more.
Why is my coaster ruffling at the edge?
That’s the opposite problem: too many stitches for your tension. Go down a hook size, or check that you’re adding exactly 6 stitches per round.
How much yarn do I need for one coaster?
Roughly 15 to 25 grams of the main color, plus small amounts of cream, red and black for the muzzle, scarf and face.
Can I skip the scarf?
Of course. The dog face works perfectly well on its own.
Paws Down the Coziest Spot for Your Mug
Two matching circles, a cream muzzle, a pair of floppy ears and one little red scarf: that’s all it takes to give your coffee a furry friend to sit on. Once you’ve made the first pup, try a whole litter in different breeds. Nobody can resist a table full of tiny dog faces.