Crochet Cat Face Keychain Amigurumi For Beginners
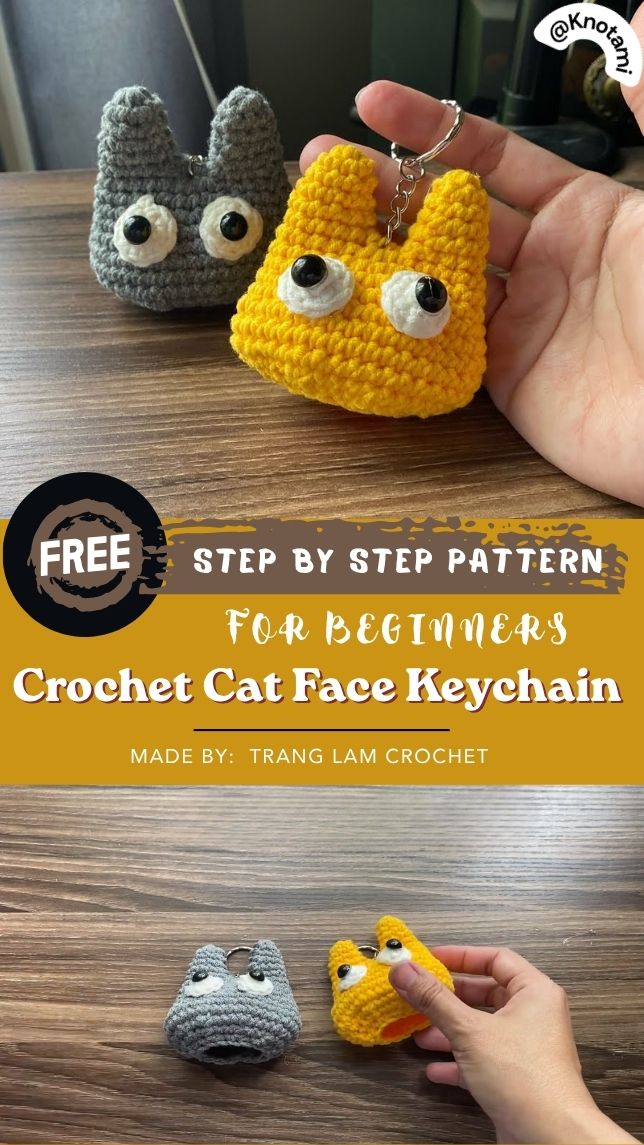
Two pointed ears sit on top of a round golden face, with a soft orange muzzle patch just below the eyes. This crochet cat face keychain amigurumi for beginners is a tiny, quick project for your keys or bag.
You only need a small amount of yarn and about one evening to finish it. The head and ears work up in a handful of rounds, and the finished piece stays soft, round, and pocket-sized. It makes a fast handmade gift, backpack charm, or bag accessory.
Keychain Overview
- Parts: A round stuffed head with two pointed ears, a small oval muzzle patch, and keychain hardware.
- Look: Round and friendly rather than realistic. One color for the head and ears and a second color for the muzzle make it read clearly as a cat, even at this small size.
- Skill level: Beginner. It’s a manageable first amigurumi.
- Time: About 1 to 1.5 hours from start to finish.
Materials
- Yarn: A small amount of DK or light worsted cotton or cotton blend in a main color (yellow or gold in the photos), plus a contrast color for the muzzle (orange in the photos). Acrylic works too.
- Crochet hook: 2.5 mm, as shown in the tutorial. The small size keeps the stitches tight so stuffing doesn’t show through.
- Eyes: A small pair of black safety eyes, or embroidery floss for stitched eyes.
- Stuffing: A little polyester fiberfill.
- Hardware: A split ring or jump ring, plus a swivel clip or lobster clasp.
- Tools: A stitch marker, a tapestry needle, and small scissors.
- Optional: Floss for whiskers or a mouth.
Abbreviations (US Terms)
- MC – magic circle
- sc – single crochet
- inc – increase (2 sc in the same stitch)
- dec – invisible decrease
- sl st – slip stitch
- st(s) – stitch(es)
Before You Start
Read through the steps once, and keep your safety eyes close by so you can check their placement as you go. On a head this small, even a tiny placement error shows, so slow down at the eye and ear stages.
Work your single crochet snug and even. For a keychain, tension matters more than exact gauge, since the fabric needs to be dense enough to hold the stuffing.
How to Crochet the Cat Face Keychain
Step 1: Start the Head With a Magic Circle

With your main color, make a magic circle and work your first round of sc into it. Pull the ring closed tightly so there’s no gap in the center, and place your stitch marker.
Keep working in rounds, increasing evenly so the head stays round, then shape the two pointed ears at the top as shown in the video.
Step 2: Add and Secure the Safety Eyes

Insert the safety eyes before stuffing, while you can still reach inside to attach the backings. Count the same number of stitches out from the center front for each eye so they sit evenly.
For extra hold, thread a tapestry needle with your main color and stitch a few times around each eye post from the inside. On a piece this small, the backing has less fabric to grip, so the extra stitches help.
Step 3: Attach the Muzzle and Close the Head

- Crochet a small oval muzzle patch in your contrast color, as shown in the video.
- Lay it against the lower face and check that it’s centered below the eyes.
- Sew it on while the head is still open, so you can reach inside to keep your stitches neat.
- Stuff the head firmly, adding a little fiberfill at a time.
- Close the opening with small, even stitches.
Step 4: Attach the Keychain Hardware
Thread the jump ring through several stitches at the top of the head rather than just one, so the pull is spread across more fabric. Hold the keychain up by the ring to check that it hangs face forward, then add the swivel clip or lobster clasp.
Video Tutorial
Tips for a Neat, Even Face
- Count every round: Check your stitch count at the end of each increase round. An early miscount throws off everything after it.
- Match the ears: Make sure both ears have the same height and stitch count.
- Stuff gradually: Adding fiberfill a little at a time keeps the head round and helps you catch thin spots.
- Check the size: Hold the head next to a house key or coin. If it looks more like a small toy, go down a hook size or use a thinner yarn.
- Floppy ears: If your yarn is very soft, a little fabric stiffener or a small drop of clear glue at the base of each ear helps them stand up.
Common Mistakes to Avoid
- Loose stitches: Stuffing peeks through and the shape turns soft.
- Rushing the eyes: Safety eyes are hard to move once the backings lock on, so check the placement first.
- Skipping stitch counts: Small errors add up to a lopsided head.
Troubleshooting
- Gappy stitches: Go down a hook size, or pull each stitch a little snugger.
- Lopsided head: A missed or extra stitch is the usual cause. Count back to the error and redo it.
- Mismatched ears: Redo the smaller ear instead of stretching it to match.
- Curling muzzle: Smooth it flat with a damp finger and let it dry before sewing it on.
- Eyes or hardware coming loose: Reinforce the eye backings with a few stitches, and use a jump ring that fits snugly.
Batch-Making Tips for Multiples
If you’re making several keychains for gifts or to sell, work them in batches. Crochet all the heads first, then all the muzzles, then add all the eyes, and finish with the closing and hardware. Repeating the same step many times in a row keeps your tension and stitch counts consistent across the whole group.
Love cat projects? Try this crochet tropical kitty keychain or a cute crochet cat coaster next.
Ways to Use It
Clip it to a backpack zipper, hang it from a purse strap, add it to your house keys, or tuck it into a gift bag as a small handmade present.
Finishing and Care
Weave each yarn tail through several stitches inside the head instead of trimming it short, so it can’t work loose. Spot clean the keychain with a damp cloth. For a deeper clean, hand wash it briefly in cool water, reshape it, and let it air dry completely.
Frequently Asked Questions
How long does this keychain take to make?
A confident beginner can usually finish one in about 1 to 1.5 hours, including the hardware.
Can I use embroidered eyes instead of safety eyes?
Yes. Stitched eyes work well and are the safer choice if the keychain might end up with a young child.
What yarn works best for a first keychain?
A smooth DK or light worsted cotton blend shows the stitches clearly and gives a clean finish.
Why does my cat face look lopsided?
It usually comes from a missed or extra stitch in one of the increase rounds. Count your stitches at the end of every round.
Final Notes
This crochet cat face keychain amigurumi is a quick, beginner-friendly project with lots of charm. Shape the round head and ears, add the eyes and muzzle, and attach the hardware, and your little kitty is ready to ride along on your keys. Happy crocheting!