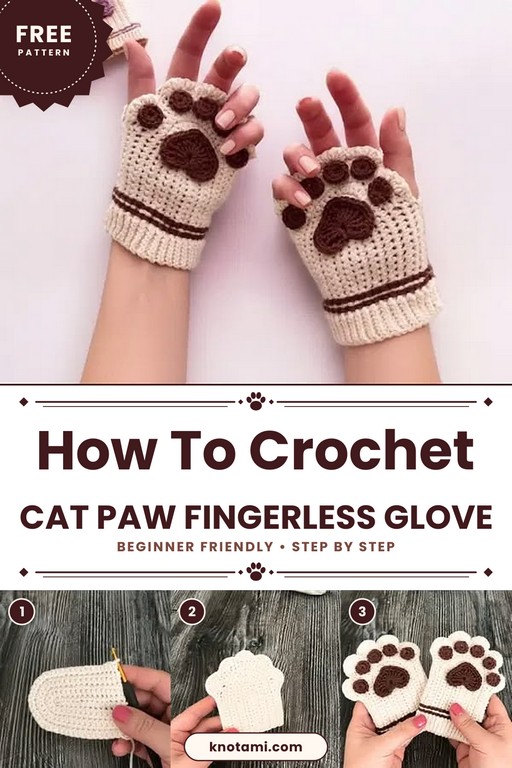
Cozy Crochet Cat Paw Fingerless Gloves Pattern
Soft yarn curls around the palm, and tiny paw pads peek up from the back of the hand on these Crochet Cat Paw Fingerless Gloves. Fingertips stay free for typing and sketching while the wrists stay wrapped in warm cotton.
Cold mornings call for something better than stuffing hands into pockets. Because the gloves cover the palms and wrists but leave every fingertip open, phones, pens, and chopping boards stay within easy reach. What makes the paw pad appliqués special is that each one starts from a simple magic ring. Also, the fingerless shaping stays approachable for anyone comfortable with single and double crochet.
Crochet Cat Paw Fingerless Gloves Pattern Overview
Each glove is worked in joined rounds from a chain ring. After a few increases, a snug ribbed cuff finishes the piece. Five little paw pads are stitched on afterward. Because cotton yarn and a 2.50 mm hook give a firm fabric, the gloves hold their shape well. Likewise, the stitch counts are easy to adjust, so the same pattern fits larger or smaller hands. As a result, many crocheters finish two pairs in a single day.
Finished Size and Gauge
- Palm circumference: about 7 in (18 cm), with plenty of stretch
- Length: about 4.5 in (11.5 cm) before the cuff is stretched
- Gauge: about 5 sc and 5 rounds per inch (2.5 cm) with a 2.50 mm hook
Materials You Need
- Cotton yarn, or any yarn you prefer
- Crochet hook size 4 (2.50 mm)
- Yarn needle for weaving and sewing
- Stitch markers
- Craft glue (optional, for the paw pads)
Special Techniques
- Magic ring: forms the round paw pads without a hole in the middle.
- Increasing: two single crochet stitches worked in one stitch to widen the palm.
- Back loop only: creates the ribbed look on the cuff.
Abbreviations: ch = chain, sc = single crochet, dc = double crochet, sl st = slip stitch, st = stitch.
Time Box
- Prep: about 10 minutes to gather yarn and hook
- Stitching: about 2 to 3 hours per pair
- Finishing: about 30 minutes for the paw pads and loose ends
Step-by-Step Pattern
Stitch names are in bold, and numbers in parentheses show the stitch count at the end of each round. Also, work every round without turning, and mark the first stitch of each round.
1. Start the Foundation Ring
First, make ch 30 and leave a long tail for weaving in later. Next, join with a sl st to the first chain, taking care not to twist the chain.
2. Round 1: Base Round
Start with ch 1, then work 1 sc in each chain around (30). Finally, join with a sl st to the first sc.
3. Round 2: Increase Round
Begin with ch 1, then work sc around, placing 2 sc in every fifth stitch (6 increases in total). After that, join the round (36).
Pro-Tip: Drop a stitch marker into the first stitch of every round, because counting errors are much easier to catch early than three rounds later.
4. Rounds 3 to 8: Palm Rounds
Work 1 sc in each stitch around for 6 rounds (36). Meanwhile, keep tension even so the fabric stays flat.
5. Rounds 9 to 12: Stretch Rounds
Begin with dc in each stitch for Round 9 (36). Next, work sc in each stitch for Round 10 (36). Then repeat both rounds once more for Rounds 11 and 12 (36 each). Because the two stitches alternate, the fabric gains stretch without losing shape.
6. Rounds 13 to 16: Thumb Opening
For Round 13, work sc in the next 16 stitches, ch 6, skip 6 stitches, and then sc in the remaining 14 stitches (36 including the chains). Next, work sc in each stitch and each chain for Round 14 (36). After that, work dc in each stitch for Round 15 (36). Finally, work sc in each stitch for Round 16 (36).
Why it matters: because the six skipped stitches leave just enough room, the thumb moves freely without the glove pulling.
7. Rounds 17 to 19: Ribbed Cuff
Work sc in the back loop only of each stitch for 3 rounds (36). Then fasten off, leaving a tail for weaving in.
8. Neaten the Thumb Edge
First, rejoin yarn at the thumb opening and work 12 sc evenly around the edge. Then join with a sl st and fasten off. Finally, check that both gloves have matching thumb openings.
9. Make the Paw Pads
For each large pad, make a magic ring, ch 1, and work 10 sc into the ring. Instead, for each toe, work 6 sc into a magic ring. Once the tail is pulled tight, fasten off. In total, make 10 pieces: 2 large pads and 8 toes, so each glove gets 1 large pad and 4 toes.
10. Attach and Finish
First, place the large pad in the center of the back of the hand, then arrange the four toes in an arc above it. After that, sew them on or attach them with a dab of glue. Finally, weave in every loose end, and block gently if you want crisper shape.
Quick Summary
- Chain 30 and join into a ring
- One increase round brings the count to 36
- Single crochet and double crochet rounds shape the glove
- Thumb gap made with 6 chains and 6 skipped stitches
- Cuff worked in back loops for a ribbed edge
- Paw pads made from magic rings and sewn on last
Common Mistakes
- Twisting the foundation chain before joining the ring
- Skipping the stitch markers, so counts drift by a stitch or two
- Placing the thumb gap in a different spot on each glove
- Gluing the paw pads before checking placement
Uses and Benefits
Crochet cat paw fingerless gloves suit autumn walks, chilly offices, and long study evenings when bare fingertips matter. Since cotton stays breathable, hands feel warm without getting sweaty. Also, the paw pads add personality, so a pair makes an easy birthday or holiday gift for animal lovers. Besides that, short wrist cuffs slide neatly under jacket sleeves and keep drafts out.
Beginner Tips
- Choose cotton for softness and durability, though other yarns work too.
- A 2.50 mm hook balances tight stitches with flexibility.
- Keep tension even for a tidy finish.
- Use stitch markers to track the round start and the thumb placement.
- Pick a stretchy yarn if you want gloves that are easy to pull on.
Washing and Cleaning Instructions
Hand wash in cool water with a mild soap, then press out the water without wringing. Next, lay the gloves flat to dry, and reshape the thumb opening with your fingers while damp. Skip the dryer, because heat can shrink cotton and loosen the paw pad glue.
Personalization Ideas
Color Choices
For a tuxedo-cat look, try black gloves with white pads, or choose gray gloves with pink pads.
Size Changes
To fit a wider or narrower palm, add or remove 6 chains in the foundation. Likewise, add rounds before the thumb for longer hands.
Decoration Options
For extra detail, sew small buttons or embroider tiny claws above the pads.
Frequently Asked Questions
Can beginners crochet cat paw gloves?
Anyone comfortable with single and double crochet can manage them. Although the thumb opening is the only tricky part, the written counts above make it simple.
Which yarn works best?
Cotton gives clear stitch definition, while soft acrylic blends add stretch and extra warmth.
How can I change the size?
To change the size, add or remove 6 chains in the foundation ring, and then adjust the increase round to match. Also, work extra palm rounds for longer hands.
How many paw pads does each glove need?
Five per glove: one large pad and four small toes.
Paws Up for Cozy Hands
A pair of crochet cat paw fingerless gloves turns a cold commute into something a little more cheerful. Because the shaping is simple, matching both thumb openings takes little effort. Finally, soft little pads add the playful finish, so the pair works just as well for a friend as for yourself.