How to Crochet a Magic Ring for Amigurumi
Round toys, flower centers, hats, and keychains all begin with a tiny circle that pulls shut without a hole. The magic ring is the trick behind it, and learning how to crochet a magic ring is the single biggest step toward amigurumi.
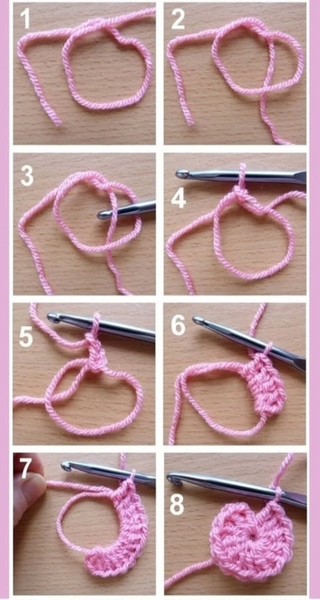
It feels fiddly for the first few tries. Stay with it, because one tug on the tail closes the center completely. Eight short steps take you from loose yarn to a finished circle, and every one of them is shown in the photo collage below.
What You Need
- Smooth yarn in a light color, so the loops are easy to see
- A hook one or two sizes smaller than the yarn label suggests
- Basic single crochet, covered in the earlier lesson
- A stitch marker
How to Make a Magic Ring
Step 1: Make a Loop
Leave a tail about six inches long. Lay the yarn down so it curves into a loose loop, with the tail on one side and the working yarn (the strand running back to the ball) on the other.
Step 2: Cross the Yarn Into a Circle
Bring the tail over the working yarn so the two strands cross. A circle about one inch wide forms, and the crossing point sits at its base. Pinch that spot between your thumb and finger so nothing shifts.
Step 3: Insert the Hook Into the Circle
Slide the hook through the middle of the circle, passing under the strands that form it. Keep the pinch steady while you work.
Step 4: Pull Up a Loop
Catch the working yarn with the hook and draw a loop back through the circle. The ring stays open, and a loop now sits on the hook.
Step 5: Chain One
Yarn over and pull through the loop on the hook. The chain locks the ring in place. It does not count as a stitch.
Step 6: Work the First Single Crochet Into the Ring
Insert the hook into the circle, under both strands of the ring. Yarn over and pull up a loop, then yarn over and pull through both loops on the hook. The first stitch sits snug around the ring.
Step 7: Keep Stitching Around the Ring
Repeat the single crochet into the circle until six stitches cover it. Keep pinching the base as you go, and let the stitches slide together so they hug the ring.
Step 8: Pull the Tail to Close the Ring
Hold the work and pull the tail. One of the two strands in the ring slides. Tug the one that moves until the center shuts, then check that the other strand is snug too. Finish with a firm pull on the tail, and the circle sits flat with no hole.
Keep Going in a Spiral
Most amigurumi is worked in a continuous spiral. Place a stitch marker in the first stitch of the new round, and move it up each time you reach it. Round two usually doubles the stitches, and the shaping rules are explained in crochet increases and decreases. See the ring in action in the first rounds of the crochet little ant amigurumi, or explore the Amigurumi category.
If the Ring Keeps Slipping
Try an alternate start. Chain two, then work six single crochets into the second chain from the hook. A tiny hole remains, but nothing can come undone. Slippery yarn like bamboo or silky acrylic often behaves better this way.
Common Mistakes
- Stitching around only one strand. The ring won’t close fully. Insert the hook under both strands.
- Pulling the wrong strand. If nothing moves, try the other strand, then the tail.
- Starting with a huge ring. A circle wider than a quarter leaves gaps. Keep it small.
- Loose first round. Pinch the base between finger and thumb so stitches don’t slide.
- Leaving the tail unsecured. Tie it off or weave it in, or the ring may open during stuffing.
Bonus: Rescue Plan for a Slipping Ring
If the center loosens after you’ve stitched several rounds, thread the tail on a yarn needle and weave it through the front loops of the first round. Pull snug, tie a small knot, and tuck the end inside the work.
FAQs About the Magic Ring
Is the magic ring the same as an adjustable ring?
Yes. Both names describe the same technique.
How many stitches go into the ring?
Six is the most common start, though patterns sometimes call for more or fewer.
Do I need to join the first round?
Not for spiral amigurumi. Just keep working and mark your first stitch.
Why does my ring leave a hole?
Usually only one strand was pulled. Tug each strand in turn until both feel snug.
Round and Round You Go
Four or five tries and your fingers will find the loop without looking. Soon you’ll catch yourself starting rings for fun, which is exactly how amigurumi habits form. Keep a marker clipped to your project bag, because spirals love to lose their starting spot.